
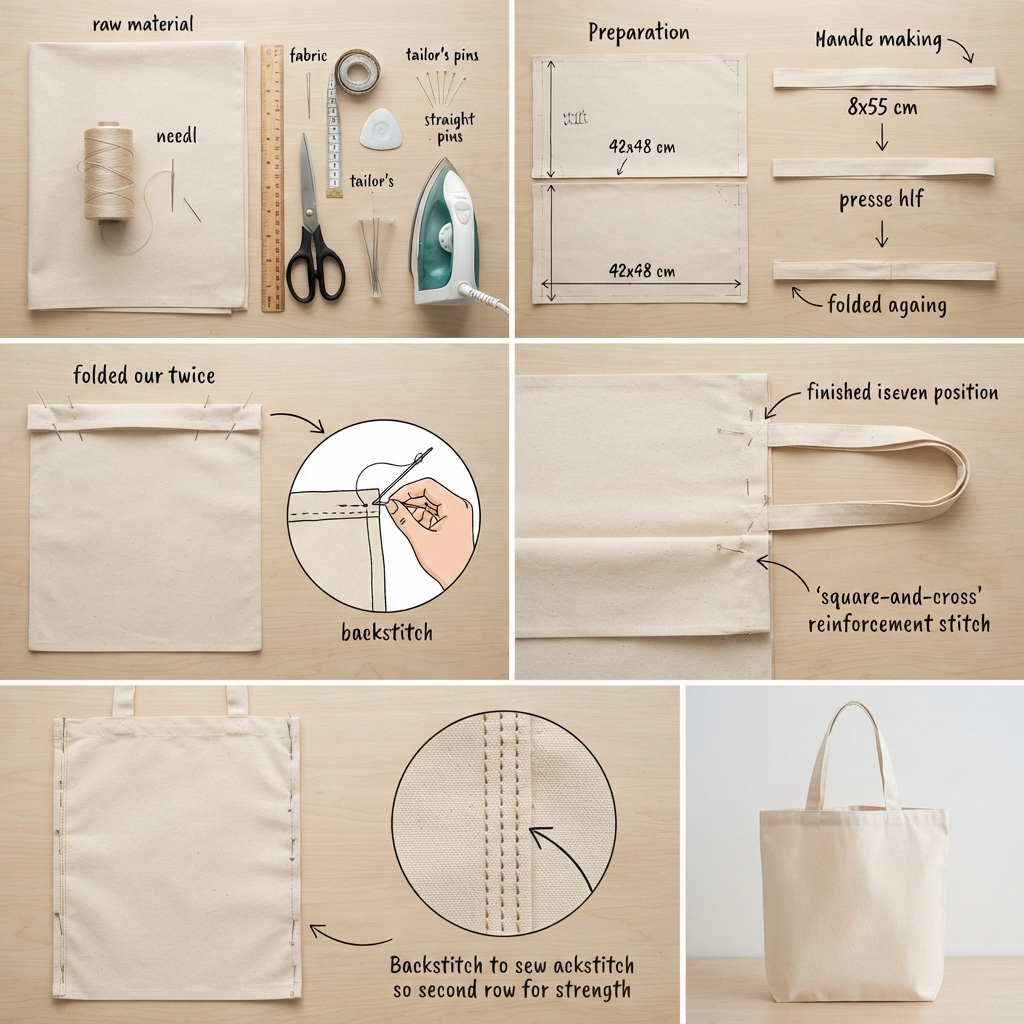
Making a simple canvas bag is a wonderful sewing project for beginners. It is easy to customize, practical for everyday use, and a great way to practice basic sewing skills.
You do not need an advanced pattern or complicated techniques to make a simple tote-style canvas bag. With a few pieces of fabric, strong thread, a needle, and some patience, you can create a useful handmade bag at home.
This step-by-step guide will show you how to measure, cut, sew, and finish a simple canvas bag.
Why Make Your Own Canvas Bag?
A handmade canvas bag is useful for carrying books, groceries, school supplies, craft materials, or personal items.
Making your own bag also allows you to choose the:
- Fabric color
- Bag size
- Handle length
- Pocket design
- Decorative details
- Stitching style
It is also an excellent project for practicing hand sewing.
Materials You Will Need
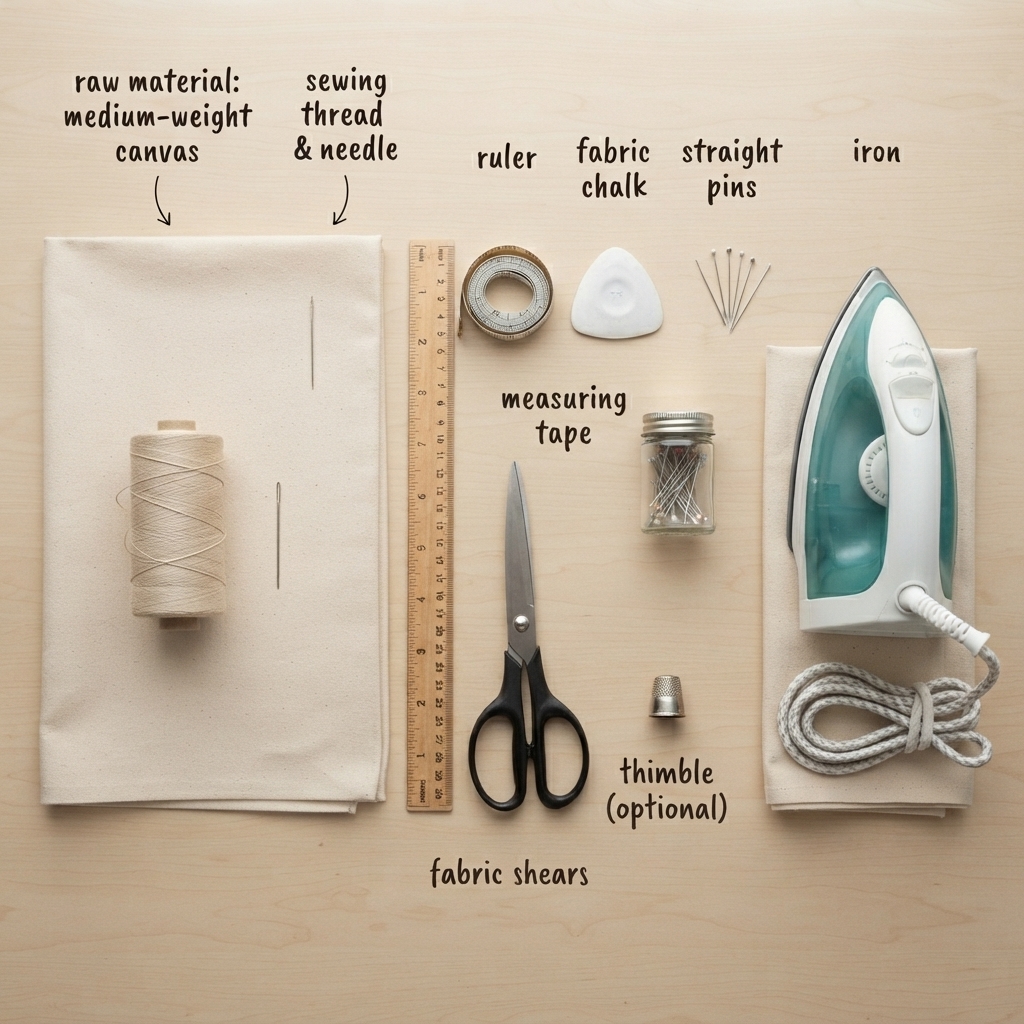
Gather the following supplies:
- Medium-weight canvas fabric
- Strong sewing thread
- Sharp hand-sewing needle
- Fabric scissors
- Measuring tape
- Ruler
- Fabric chalk or washable marker
- Straight pins or sewing clips
- Iron and ironing board
- Optional: thimble
If you are sewing the entire bag by hand, choose a needle strong enough to pass through the canvas comfortably.
Choosing the Right Canvas
Canvas is available in different weights and textures.
For your first bag, choose a medium-weight canvas. It should be strong enough to hold everyday items but not so thick that it becomes difficult to sew.
A very heavy canvas can be challenging for beginners, especially when several layers meet at the seams and handles.
If the fabric requires prewashing, follow its care instructions before cutting.
Step 1: Decide the Bag Size
First, decide how large you want your finished bag to be.
A simple beginner tote could have a finished size of approximately:
- 35–40 cm wide
- 40–45 cm tall
You can make the bag smaller for children or larger for shopping and storage.
Remember that you need additional fabric for seam allowances and the top hem.
Step 2: Cut the Main Bag Pieces
Cut two identical rectangles from the canvas.
For example, you could cut two pieces approximately 42 cm wide and 48 cm tall, allowing extra fabric for the seams and top edge.
Use a ruler to mark straight lines before cutting.
Check that both pieces are exactly the same size.
Accurate cutting will make the rest of the project much easier.
Step 3: Make the Handles
Cut two long strips of canvas for the handles.
A simple starting size is approximately:
- 8 cm wide
- 55 cm long
Adjust the length depending on whether you want short handles or longer shoulder straps.
Prepare the Handles
Fold each strip lengthwise in half and press it.
Open it and fold both long edges toward the center.
Press the folds again.
Finally, fold the strip in half and sew along both long edges.
This creates a strong, neatly finished handle.
Repeat with the second strip.
Step 4: Finish the Top Edges
Place one main bag piece on your work surface.
Fold the top edge toward the wrong side by approximately 2 cm.
Press the fold with an iron.
For a cleaner finish, fold the raw edge inward once more.
Pin or clip the folded edge.
Repeat with the second bag piece.
Step 5: Sew the Top Hems
Thread your needle with strong thread.
Use a backstitch or another secure hand stitch to sew along the folded top edge.
Keep the stitches small and reasonably even.
Repeat the process on the second bag piece.
You now have two main pieces with finished top edges.
Step 6: Position the Handles
Place the handles on the right side of the fabric.
Position the two ends of each handle several centimeters away from the side edges.
Make sure the handles are not twisted.
Measure the distance from each side so that the handles are positioned evenly.
Pin or clip them in place.
Before sewing, hold the bag up and check that the handles look balanced.
Step 7: Attach the Handles
The handles need strong stitching because they will carry the weight of the bag.
Sew each handle end securely to the canvas.
A square-and-cross pattern is a useful way to reinforce the connection.
First sew around the edges of the handle end to form a small square. Then sew diagonally across the square to create an X.
If sewing by hand, use a strong backstitch and go over the attachment area more than once if necessary.
Repeat for all four handle ends.
Step 8: Join the Bag Pieces
Place the two main pieces together with their right sides facing each other.
Align the side and bottom edges carefully.
Pin or clip around the sides and bottom.
Keep the top open.
This is the basic shape of your bag.
Step 9: Sew the Side Seams
Start at one upper side edge.
Sew down the side using a strong backstitch.
Continue across the bottom edge and then sew up the other side.
Keep your seam allowance as consistent as possible.
Because a bag can carry heavy objects, use firm stitches and reinforce the beginning and end of each seam.
Step 10: Strengthen the Seams
For an everyday canvas bag, stronger seams are useful.
After making the first row of stitches, you can add a second row close to the first.
Pay particular attention to the bottom corners and side seams.
This extra reinforcement can help the bag withstand regular use.
Step 11: Finish the Raw Edges
Canvas can fray after being cut.
You can finish the inside edges using a simple hand-sewing technique such as a whip stitch.
Another option is to fold the raw edges inward and secure them with additional stitching.
The goal is to keep the cut edges from becoming excessively frayed.
Step 12: Turn the Bag Right Side Out
Carefully turn the bag right side out.
Use your fingers to gently push out the bottom corners.
Avoid using sharp objects to push the corners because they can puncture the fabric.
Press the finished bag with an iron if appropriate for the canvas.
Optional: Create a Flat Bottom
A flat bottom can make your canvas bag more useful because it allows the bag to stand more easily.
To create one, turn the bag inside out.
Flatten one bottom corner so that the side seam lines up with the bottom seam.
Mark a line across the corner.
Sew along this line.
Repeat on the opposite corner.
Turn the bag right side out and gently shape the bottom.
Optional: Add an Inside Pocket
An inside pocket is a simple way to make the bag more practical.
Cut a small rectangle of canvas.
Fold and sew the top edge.
Place the pocket on the inside of the bag.
Sew along the bottom and side edges, leaving the top open.
Reinforce the upper corners with extra stitches.
Now you have a convenient place for keys, a phone, or other small items.
Easy Ways to Decorate Your Canvas Bag
A plain canvas bag can become a unique handmade accessory with a few decorations.
Try adding:
- Embroidered flowers
- Hearts
- Stars
- Initials
- Colorful borders
- Fabric appliqué
- Buttons
- Patches
- Decorative stitches
- Fabric paint
You can use running stitch, blanket stitch, or chain stitch to create simple embroidered designs.
Tips for Sewing Canvas by Hand
Canvas can be thicker than ordinary cotton, so work slowly.
Use a strong, sharp needle and durable thread.
A thimble can make pushing the needle through thick fabric more comfortable.
Do not pull the thread excessively tight because this can cause puckering.
When sewing through several layers, make sure the needle is securely positioned before pushing it through the fabric.
If you find the fabric difficult to sew, try using slightly larger stitches and a stronger needle.
Common Beginner Mistakes
Forgetting Seam Allowances
Do not cut your fabric to the exact finished dimensions. Leave extra fabric for the seams and top hem.
Making Uneven Handles
Measure the handle placement carefully so that both sides look symmetrical.
Weak Handle Attachments
The handles receive a lot of stress, so reinforce their attachment points.
Cutting the Fabric Unevenly
Use a ruler and mark your cutting lines before using your scissors.
Sewing Too Quickly
Taking your time is especially important when working with thicker canvas.
A Simple First Version
If this is your first sewing project, keep the design basic.
Skip the pocket and flat bottom and make a simple rectangular tote.
Focus on these five skills:
- Measuring fabric
- Cutting accurately
- Making a folded hem
- Sewing strong seams
- Attaching handles securely
Once you are comfortable with these steps, you can experiment with pockets, linings, different shapes, and decorative embroidery.
Final Thoughts
Learning how to sew a simple canvas bag is an excellent way for beginners to practice essential sewing techniques while making something useful.
Choose a manageable fabric, measure carefully, and reinforce the seams and handles. If you are sewing by hand, strong thread and secure stitches are especially important.
Your first canvas bag does not need to be perfect. Every stitch gives you more experience, and with practice, you can create personalized bags in different sizes, colors, and styles.
