
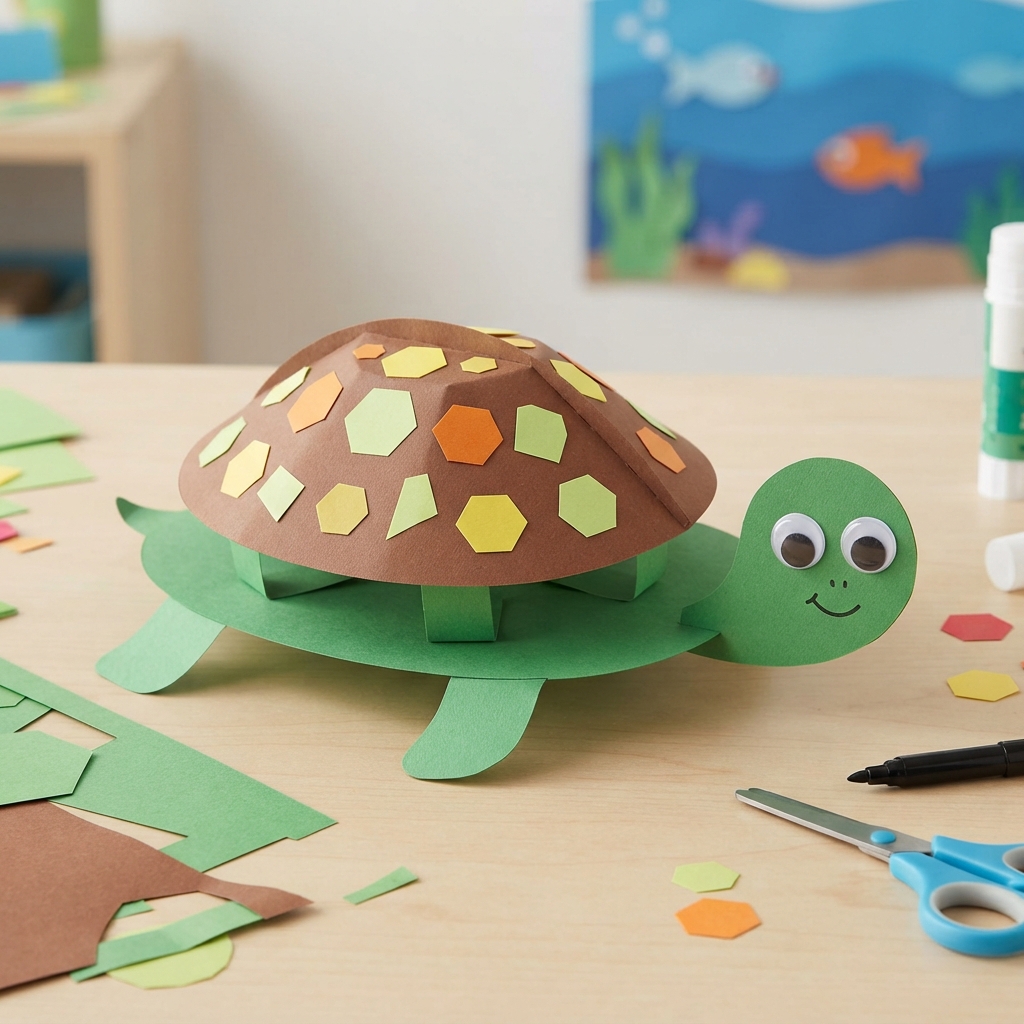
Making a 3D paper turtle is a fun and creative activity that allows children to transform simple sheets of paper into a charming three-dimensional animal. Turtles are wonderful craft subjects because their rounded shells, small heads, short legs, and friendly appearance are easy to represent with paper. With a few basic materials and some imagination, children can create a colorful turtle that looks as if it is ready to crawl across a table or swim through an imaginary ocean.
This craft is suitable for classrooms, homes, libraries, summer camps, and nature-themed activities. It can also become part of a larger project about animals, oceans, recycling, or wildlife. The process of making a 3D paper turtle encourages children to practice cutting, folding, gluing, drawing, and assembling. At the same time, it gives them an opportunity to learn about real turtles and their habitats.
In this essay, we will explore how to make a simple 3D paper turtle step by step. We will also discuss creative decoration ideas, educational benefits, safety tips, and ways to turn the finished turtle into a larger nature display.
Why Make a 3D Paper Turtle?
A three-dimensional paper turtle is more interesting than a flat drawing because it has shape and depth. The shell can be raised above the body, while the head, legs, and tail can extend outward. This gives the finished craft a playful appearance.
Paper is also an excellent material for beginners. It is inexpensive, lightweight, and available in many colors. Children can easily change the design to create turtles that are realistic, cartoon-like, or completely imaginary.
The craft also encourages problem-solving. Children need to think about how different pieces fit together and how to make the shell stand above the body. These small challenges can help develop patience and spatial awareness.
Materials You Will Need
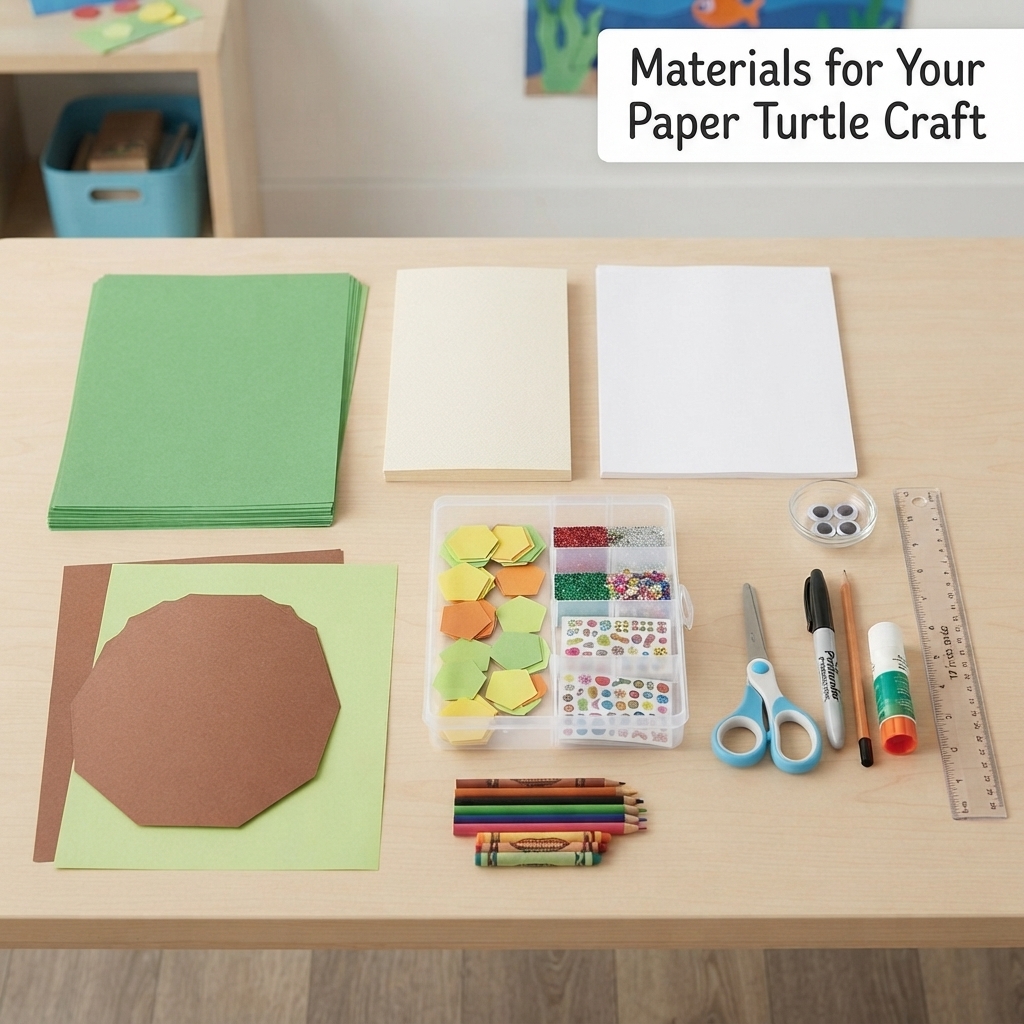
Before beginning, gather all the necessary materials. You can use materials you already have at home or in the classroom.
You will need:
- Green construction paper
- Brown or light-green paper for the shell
- One sheet of thicker paper or cardstock
- White paper
- Black marker
- Pencil
- Child-safe scissors
- Glue
- Ruler
- Optional crayons or colored pencils
- Optional markers
- Optional stickers
- Optional glitter
- Optional googly eyes
You can use other colors if you want to create a fantasy turtle. Blue, yellow, orange, purple, and turquoise can all produce interesting results.
Preparing the Workspace
Before starting, prepare a clean, flat workspace. Cover the table with newspaper or scrap paper if you will be using markers or glue.
Arrange the materials so they are easy to reach. If several children are making turtles together, give each child enough space to work comfortably.
Young children should be supervised when using scissors. Child-safe scissors are recommended.
It is also helpful to prepare a small container for paper scraps. These scraps can sometimes be reused for decoration instead of being thrown away.
Step 1: Draw the Turtle’s Body
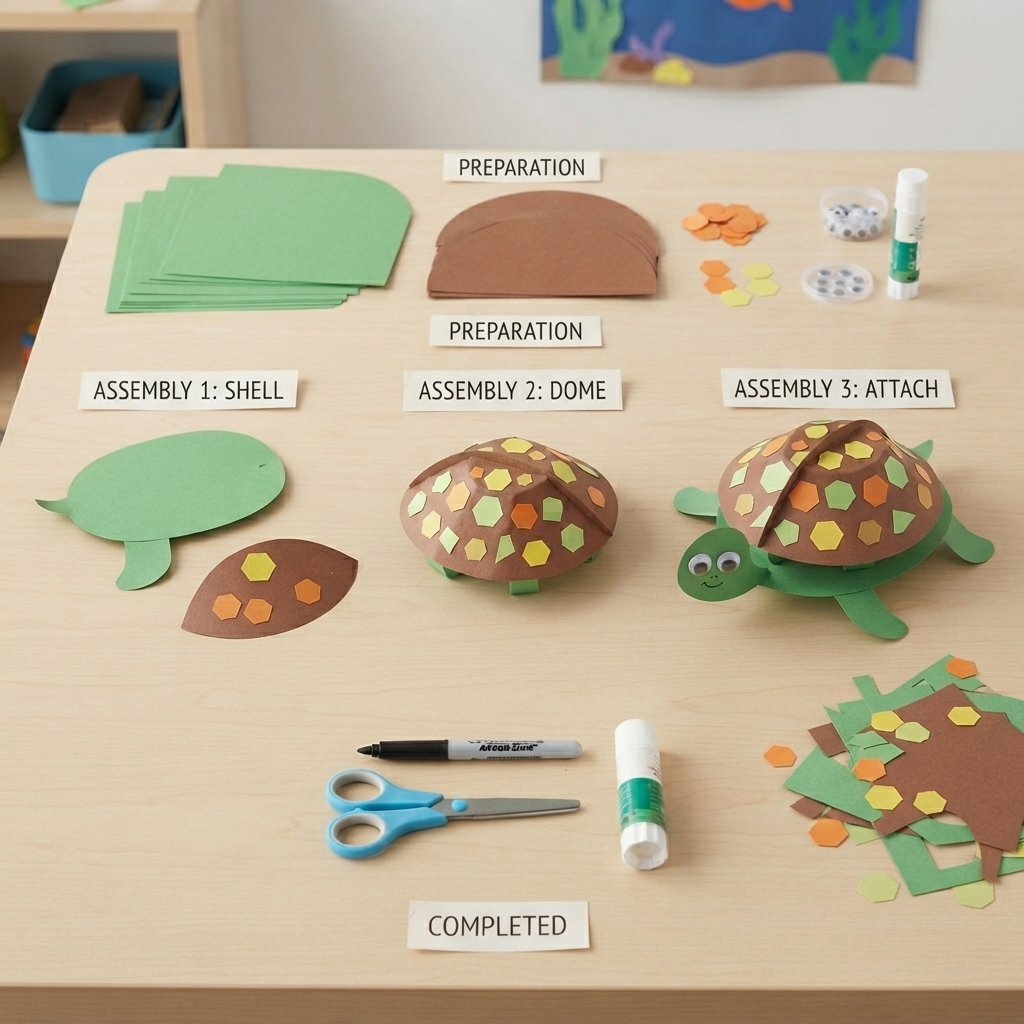
Begin by drawing the basic body of the turtle on green cardstock.
Draw an oval shape for the main body. It should be slightly smaller than the shell because the shell will eventually cover much of it.
The body does not need to be perfectly symmetrical. A simple oval is enough.
Next, draw four short legs. Turtle legs can be shaped like small rounded flippers or simple curved feet.
At one end of the body, draw a small tail. At the opposite end, draw the turtle’s head and neck.
Carefully cut out the entire body shape.
If you are making the turtle with very young children, an adult can prepare the body templates in advance.
Step 2: Make the Head
The head is one of the most important parts of the turtle because it gives the craft its personality.
Cut a rounded head shape from green paper. Add a short neck underneath it so that the head can extend from the shell.
Draw two small eyes using a black marker. You can also glue on googly eyes.
Add a tiny smile if you want your turtle to look friendly.
For a sea turtle, you can make the head slightly flatter and wider. For a cartoon turtle, make the eyes larger.
Glue the head to the front of the body, but leave enough room for the shell.
Step 3: Make the Legs
Cut four similar shapes from green paper for the turtle’s legs.
If you are making a land turtle, you can make the legs relatively short and rounded.
If you are creating a sea turtle, make the front flippers longer and wider. Sea turtles use their strong flippers to move through the water.
Bend each leg slightly near the base. This small fold will help create a three-dimensional appearance.
Glue the legs underneath or along the sides of the body.
Do not cover the entire leg with glue if you want part of it to remain raised. A small glued section can allow the outer part to lift slightly from the surface.
Step 4: Add the Tail
A small tail can be made from a simple triangular piece of green paper.
Cut the triangle and attach it to the back of the turtle.
For a cartoon turtle, you can make the tail slightly longer or more curved.
The tail does not need to be large. Its purpose is simply to complete the body shape.
Step 5: Create the 3D Shell
Now comes the most exciting part of the project: making the raised shell.
Cut a large oval from brown, green, or patterned paper. This will become the top of the turtle’s shell.
To make it three-dimensional, gently fold the oval along its center.
Do not make a sharp crease. Instead, create a soft curve by bending the paper upward.
You can also cut several narrow strips of paper and attach them underneath the shell to create supports. These supports will hold the shell above the body.
Another easy method is to make several small folds around the edge of the shell. These folded tabs can be glued to the turtle’s body, leaving the center raised.
This creates a simple dome shape.
Step 6: Decorate the Shell
A turtle’s shell is perfect for decoration.
Use a pencil to draw several connected shapes across the shell. Hexagons, curved sections, circles, and irregular patterns can all work.
Color the sections with different shades of green, brown, yellow, or orange.
For a realistic turtle, use natural colors.
For a children’s craft, use bright colors and bold patterns.
You can also add small paper shapes to the shell. Cut circles, triangles, or leaf-like pieces and glue them onto the surface.
Another idea is to draw the shell pattern with markers after the paper has been shaped.
Step 7: Attach the Shell
Once the shell is decorated and dry, carefully attach it to the turtle’s body.
Apply glue only to the edges or to several small tabs underneath the shell.
Press the shell gently onto the body.
Make sure the center remains raised.
Hold the shell in place for a few seconds until the glue begins to set.
When finished, the shell should stand above the body rather than lying completely flat.
This raised shell is what gives the craft its three-dimensional appearance.
Step 8: Add Facial Details
Now you can give your turtle a unique personality.
Use a black marker to draw the eyes, nose, and mouth.
You can make the turtle look happy, surprised, sleepy, or curious.
If you are making several turtles, encourage children to give each one a different expression.
Small paper circles can also be used for cheeks.
For a more colorful turtle, add tiny decorative spots around the face and legs.
Step 9: Make the Turtle Stand Up
If you want the turtle to stand on a table instead of lying flat, you can create small supports underneath the body.
Cut two narrow strips of cardstock. Fold each strip into a small rectangular support and glue them underneath the turtle.
The supports should be hidden behind the legs.
Another option is to slightly curve the legs downward so that they touch the table.
A standing turtle can become a cute desk decoration or part of a classroom display.
Creating a Paper Ocean
A 3D turtle becomes even more exciting when placed in a paper habitat.
Use a large sheet of blue paper as an ocean background.
Cut green paper into long strips to create seaweed. Add colorful paper fish, jellyfish, shells, starfish, and bubbles.
Place the turtle in the middle of the scene.
If you make a sea turtle, you can add a paper coral reef.
This creates a complete underwater environment and gives children an opportunity to learn about marine ecosystems.
Making a Land Turtle Scene
Not all turtles live in the ocean. Some live on land.
For a land turtle scene, use green and brown paper to create grass and soil.
Add small flowers, leaves, rocks, and trees.
You can even make a tiny paper pond nearby.
This provides an opportunity to explain the difference between land turtles and sea turtles.
Learning About Real Turtles
The craft can be combined with a short science lesson.
Turtles are reptiles with protective shells. Their shells are made of bony structures covered by a layer of keratin.
Different turtle species live in different environments. Some live on land, while others spend much of their lives in water.
Sea turtles have adapted flippers that help them swim. They can travel long distances through the ocean.
Many turtles are herbivores or omnivores, depending on the species.
Children can research a turtle species and write a few facts next to their paper model.
Educational Benefits
Making a 3D paper turtle offers many educational benefits.
Cutting and folding help children develop fine motor skills.
Measuring and creating symmetrical shapes introduce basic mathematical ideas.
Designing the shell encourages creativity.
Following instructions helps children understand sequencing and organization.
The project can also improve concentration because children need to complete several small steps.
Teachers can use the activity to connect art lessons with science, environmental studies, and geography.
Using Recycled Paper
This project can easily become an environmentally friendly craft.
Instead of buying new paper, use old magazines, packaging, cereal boxes, or discarded colored paper.
A cereal box can provide excellent cardstock for the turtle’s body.
Old green and brown paper can be cut into shell decorations.
Using recycled materials teaches children that craft projects do not always require new supplies.
It also encourages responsible use of everyday materials.
Creative Turtle Ideas
There are many ways to customize your 3D turtle.
You can make a rainbow turtle with every shell section painted a different color.
You can create a jungle turtle using green and brown shades.
You can make a sea turtle with blue flippers and a patterned shell.
You can also create a fantasy turtle with stars, hearts, flowers, or colorful patterns.
For a school project, each student can create a different turtle species. The class can then arrange all the models into a large habitat display.
Turning the Turtle Into a Puppet
With a few additional materials, your 3D turtle can become a puppet.
Attach a craft stick underneath the body.
Children can hold the stick and move the turtle around while telling a story.
They could create a story about a young turtle exploring a beach, searching for food, or meeting other ocean animals.
This adds language and storytelling practice to the craft.
Safety Tips
Always supervise young children when scissors are being used.
Choose child-safe scissors and avoid sharp cutting tools.
Use non-toxic glue and washable markers when possible.
If you use small decorations such as beads or googly eyes, keep them away from very young children who might put them in their mouths.
Give children enough space to work and remind them to handle craft materials carefully.
Troubleshooting Common Problems
Sometimes the shell may collapse instead of staying raised. If this happens, add small cardstock supports underneath it.
If the glue does not hold, use thicker cardstock or allow the glue more time to dry.
If the turtle becomes too heavy, reduce the number of decorations.
If the paper bends after being colored with wet paint, allow it to dry completely before attaching the shell.
Remember that handmade crafts do not have to be perfect. Small differences make each turtle unique.
Conclusion
Making a 3D paper turtle is an enjoyable craft project that combines art, creativity, science, and environmental awareness. With simple materials such as paper, cardstock, glue, scissors, and markers, children can create a turtle with a raised shell, head, legs, and tail.
The three-dimensional shell makes the project especially interesting because children can experiment with folding, shaping, and supporting paper. They can decorate the shell with colorful patterns and create either a realistic turtle or an imaginative character.
The finished turtle can stand alone as a decoration or become part of a larger paper habitat. An ocean scene can include seaweed, fish, coral, shells, and bubbles, while a land scene can feature grass, flowers, trees, and rocks.
Most importantly, this activity gives children a chance to learn while creating. They develop fine motor skills, practice following instructions, explore shapes and colors, and discover interesting facts about turtles.
Whether used for a classroom lesson, a home craft session, or a nature-themed school project, a 3D paper turtle is a simple and rewarding way to turn ordinary paper into a charming little work of art.
