
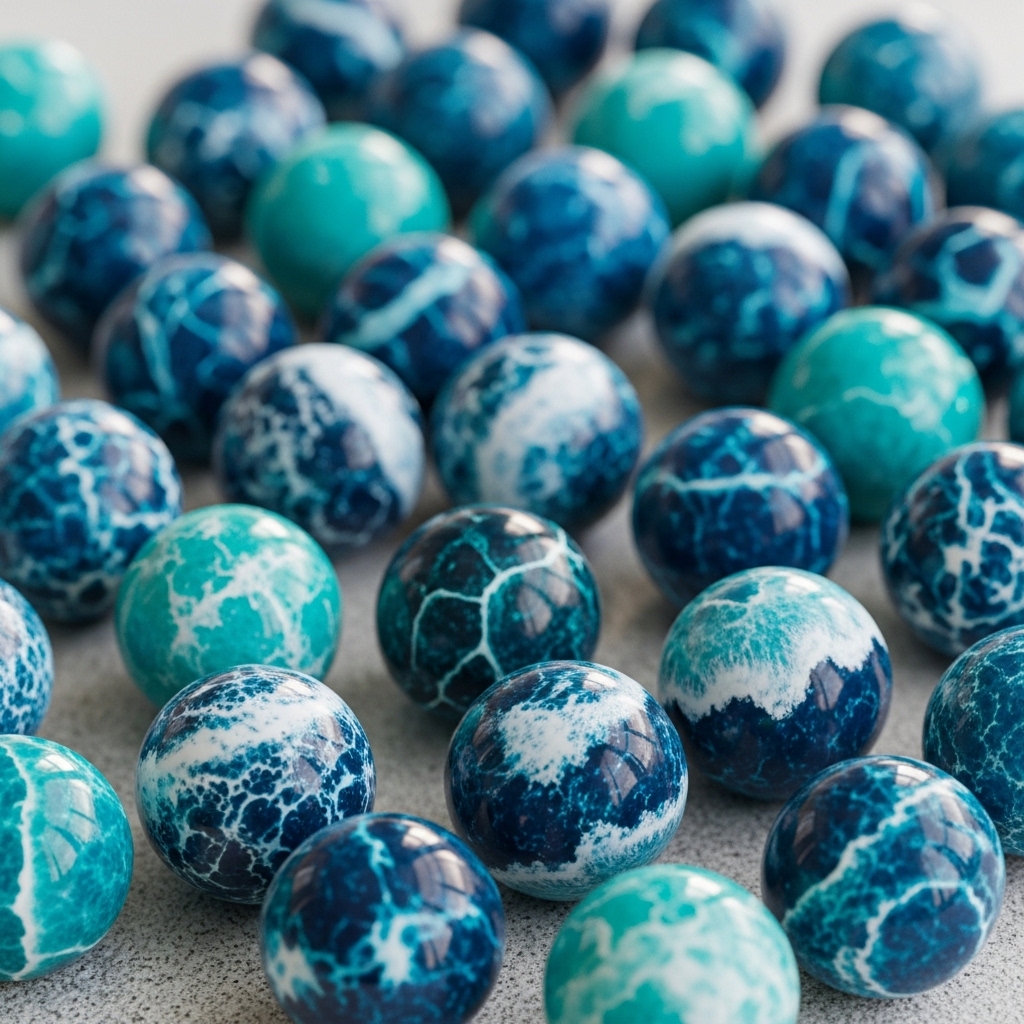
Ocean wave pattern bouncy balls
Have you ever wished you could capture the calming beauty of the ocean and turn it into something playful, colorful, and full of energy? That’s exactly what Ocean wave pattern bouncy balls bring to life. Imagine holding a tiny sphere in your hand that looks like swirling sea waves, then dropping it and watching it bounce with surprising energy. It’s a mix of art, science, and pure fun.
Fun fact: DIY bouncy balls have been a favorite classroom experiment for decades because they combine simple chemistry with creativity. Kids and adults alike love watching liquid turn into a squishy, bouncy solid right before their eyes. What makes Ocean wave pattern bouncy balls extra special is the ocean-inspired design that feels almost hypnotic—like miniature waves frozen in time.
This craft is perfect for families, classrooms, or even solo creative time. It’s quick to prepare, budget-friendly, and incredibly satisfying. If you’ve enjoyed other creative projects like homemade slime or glitter jars on our blog, you’ll love this even more because it adds bounce and motion to your creativity.
Get ready to dive into a hands-on, colorful experience that’s as relaxing as it is exciting. Let’s make something amazing together!
What is Ocean wave pattern bouncy balls?
What exactly are Ocean wave pattern bouncy balls, and why do they sound like something straight out of a science fiction beach movie? Are they toys, experiments, or tiny pieces of art you can bounce on the floor without fear?
In simple words, Ocean wave pattern bouncy balls are DIY craft balls made from basic household or craft materials that create a rubbery texture with a swirling blue-and-white ocean effect. The name comes from the way the colors blend together, mimicking ocean waves trapped inside a bouncing sphere.
Legend has it (well, in DIY classrooms at least) that a science teacher once said, “If the ocean could bounce, it would look like this,” and the name stuck. Kids quickly started calling them ocean balls, wave balls, and eventually the full creative name we use today.
And as the old saying goes, the way to a man’s heart is through his stomach, but in this case, the way to everyone’s heart is through fun, colorful crafts that bounce!
So why not roll up your sleeves and try making your own Ocean wave pattern bouncy balls today?
Why You’ll Love This Ocean wave pattern bouncy balls
There are so many reasons why Ocean wave pattern bouncy balls are becoming a favorite DIY craft around the world.
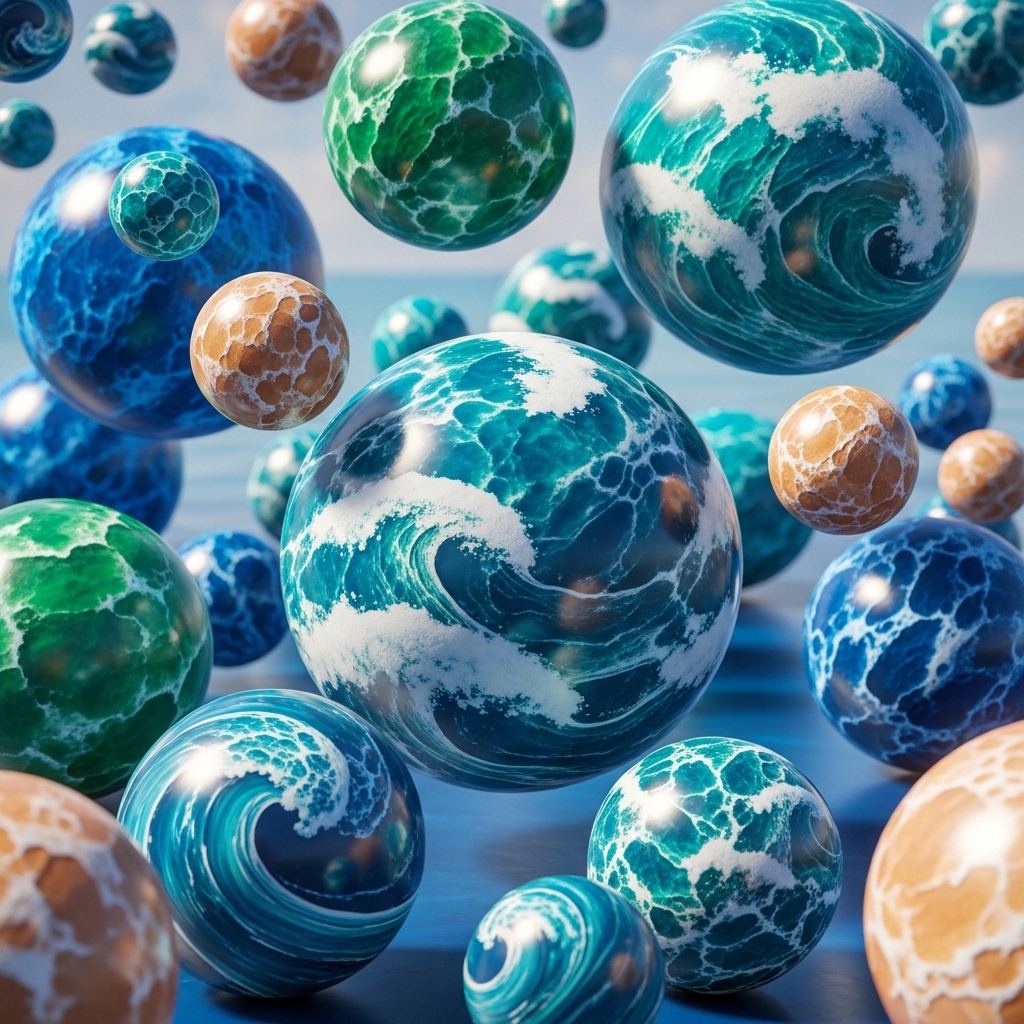
First, the visual effect is absolutely stunning. The swirling ocean colors make each ball unique—no two designs ever look the same. It feels like holding a tiny piece of the sea in your hand.
Second, making them at home is incredibly cost-effective. Instead of buying expensive toys or science kits, you can use affordable craft supplies to create something just as fun, if not better. Parents love this because it keeps kids entertained without breaking the budget.
Third, the materials allow for endless creativity. You can add glitter for sparkling waves, glow-in-the-dark dye for nighttime ocean vibes, or even layered colors for deep-sea effects. It’s like combining art and science in one playful project.
Compared to simple slime recipes or paper crafts, Ocean wave pattern bouncy balls offer something extra: motion. They don’t just sit there—they bounce, roll, and bring your creation to life.
Ready to try something fun, educational, and visually magical? Let’s dive deeper into the process.
How to Make Ocean wave pattern bouncy balls
Quick Overview
Making Ocean wave pattern bouncy balls is easier than you might think. The process is simple, beginner-friendly, and takes around 10–15 minutes per ball. The magic happens when liquid ingredients transform into a flexible, rubber-like texture that can bounce off surfaces. The standout feature is the swirling ocean pattern created by blending blue, white, and sometimes turquoise colors. It’s quick, fun, and extremely satisfying to watch come together.
Key Ingredients for Ocean wave pattern bouncy balls
Here are the basic materials you’ll need to create your own Ocean wave pattern bouncy balls:
- 1 tablespoon white school glue (PVA glue works best)
- 1 tablespoon cornstarch
- 2–3 tablespoons warm water
- 1 teaspoon borax solution (or liquid starch as an alternative)
- Blue food coloring (light and dark shades recommended)
- White acrylic paint or white dye
- Optional: glitter (silver or blue for ocean sparkle effect)
- Small mixing bowls
- Plastic spoon or stir stick
- Disposable gloves (optional but recommended)
Visual idea: Imagine a small setup of glue, cornstarch, and swirling blue dyes arranged neatly on a craft table, ready to transform into ocean magic.
Step-by-Step Instructions
Step 1: Prepare the base mixture
In a bowl, mix white glue and cornstarch until smooth. Add warm water slowly and stir continuously to form a thick, sticky paste.
Step 2: Add the ocean colors
Divide the mixture into two or three parts. Add blue food coloring to one portion, darker blue to another, and leave one white. This creates the ocean wave effect later.
Step 3: Activate the mixture
Slowly add borax solution or liquid starch while stirring. You’ll notice the mixture thickening into a rubbery texture almost immediately.
Step 4: Create the wave pattern
Take small portions of each colored mixture and gently fold them together. Do not overmix—this is key to achieving the swirling ocean look in Ocean wave pattern bouncy balls.
Step 5: Shape the ball
Roll the mixture between your palms to form a smooth sphere. Keep rolling until it becomes firm and round.
Step 6: Let it set
Let the ball rest for 10–15 minutes so it fully stabilizes.
Step 7: Test the bounce
Drop it gently on a flat surface and watch it bounce!
Step 8: Customize your design
Repeat the process with different color combinations or add glitter for extra sparkle.
What to Serve Ocean wave pattern bouncy balls With
While Ocean wave pattern bouncy balls are not edible, they pair perfectly with creative play setups. Here are some fun ideas:
- DIY slime kits for a full sensory experience
- Ocean-themed coloring books for artistic relaxation
- Science experiment kits for educational play
- Beach-themed decorations for parties or classrooms
- Light snacks and juice for kids during craft time
Think of this as building a full creative activity session rather than just a single craft.
Top Tips for Perfecting Ocean wave pattern bouncy balls
To make your Ocean wave pattern bouncy balls look and perform their best, keep these tips in mind:
- Don’t overmix the colors if you want a realistic wave effect. Gentle folding works best.
- Use cold hands or slightly damp palms when shaping the ball to avoid sticking.
- Add glitter sparingly for a natural ocean sparkle instead of overwhelming shine.
- If the mixture is too sticky, add a tiny bit more cornstarch.
- If it becomes too hard, add a drop of warm water to soften it again.
- Always test a small batch first before making multiple balls.
Common mistake: Over-activating the mixture with borax can make the ball too rubbery and less bouncy. Go slow and steady.
Storing and Reusing Tips
To keep your Ocean wave pattern bouncy balls in great condition:
- Store them in a small airtight container or zip bag to prevent drying out.
- Keep them at room temperature away from direct sunlight.
- Avoid placing them on dusty or dirty surfaces, as they can collect debris.
- They typically stay fresh and bouncy for 5–7 days depending on storage conditions.
- If they start to harden, gently knead in a drop of water to restore flexibility.
- You can remake or refresh them anytime using leftover materials.
Unlike food recipes, there’s no reheating needed—but you can “revive” them anytime with a little moisture and reshaping.
Final Thoughts
Ocean wave pattern bouncy balls are more than just a craft—they’re a blend of creativity, science, and fun that anyone can enjoy. Whether you’re making them with kids, using them in classroom experiments, or simply exploring DIY hobbies, they offer a satisfying hands-on experience with beautiful results.
From swirling ocean colors to satisfying bounce effects, this project is a reminder that simple materials can create something truly magical. So gather your supplies, experiment with colors, and start crafting your own ocean-inspired creations today.