Table of Contents
Science experiments designed for children
Science experiments designed for children are one of the best ways to turn an ordinary afternoon into something magical. Imagine the excitement on a child’s face when baking soda bubbles over like a tiny volcano or when colors dance across milk like a rainbow! These simple activities are fun, educational, and full of surprises that make learning feel like play.
One of the best things about these science experiments is how easy they are to set up. Most of them use simple household items you already have, like vinegar, food coloring, soap, or paper cups. No expensive tools, no complicated steps—just quick, hands-on fun for the whole family.
Did you know that many famous scientists first fell in love with science through simple childhood experiments? A small activity today could inspire a future inventor tomorrow! That’s what makes these ideas so special—they create curiosity, confidence, and creativity.
If you enjoyed our easy DIY craft projects, you’ll love these science experiments even more because they mix learning with action. They are perfect for rainy days, school projects, or weekend family fun.
Get ready to explore, test, and discover! These science experiments designed for children are simple, exciting, and guaranteed to make learning unforgettable.
What is Science Experiments Designed for Children?
What exactly are science experiments designed for children? Are they tiny lab projects? Magical kitchen tricks? A little bit of both? Honestly, yes! These are simple, safe, and fun activities that help kids learn how the world works while having a blast.
Why is it called “science experiments designed for children”? Because they are made especially for young curious minds who love asking “why?” and “how?” Maybe your child wonders why volcanoes erupt or how rainbows appear. These experiments help answer those questions in the coolest way possible.
It reminds us of the classic saying, “the way to a man’s heart is through his stomach,” but for kids, the way to their hearts is definitely through fun and messy experiments! A bubbling potion can be much more exciting than a textbook.
So grab your supplies, roll up your sleeves, and let the discovery begin!
Why You’ll Love This Science Experiments Designed for Children
1. The Main Highlight: Learning Through Fun
The best part about science experiments designed for children is that kids learn without even realizing it. They’re too busy watching fizzing reactions, floating eggs, or colorful eruptions to notice they’re learning chemistry, physics, and biology at the same time.
Hands-on learning creates stronger memories than reading alone. Kids remember what they see and touch, making science exciting instead of difficult.
2. Budget-Friendly Family Fun
You don’t need fancy lab tools or expensive science kits. Most experiments use everyday kitchen supplies like vinegar, baking soda, dish soap, salt, and water. That means more fun without spending too much money.
Compared to buying ready-made activity kits, homemade science experiments save money and often work even better.
3. Creative Ingredients Make It Special
The magic comes from simple ingredients that create amazing results. Food coloring makes rainbow reactions brighter, dish soap creates foamy explosions, and balloons turn simple air pressure lessons into exciting games.
If you enjoyed our homemade slime activities, these experiments offer the same fun with even more learning. Try them today and turn your kitchen into a mini science lab!
How to Make Science Experiments Designed for Children
Quick Overview
These science experiments designed for children are quick, easy, and super fun. Most activities take only 10 to 20 minutes to prepare and complete. They are perfect for busy parents, teachers, or anyone looking for simple educational entertainment.
The best part is that the results are often instant—fizzing, bubbling, floating, and colorful reactions happen right away, keeping kids excited and engaged from start to finish.
Key Ingredients for Science Experiments Designed for Children
Here are the basic ingredients you’ll need for several fun science experiments:
- 1 cup baking soda
- 1 cup white vinegar
- 2 tablespoons dish soap
- Food coloring (red, blue, yellow, green)
- 1 glass of milk
- Cotton swabs
- 1 lemon
- Small balloons
- Plastic bottles
- 1 tablespoon salt
- Warm water
- Ice cubes
- Pepper
- Liquid soap
- Empty paper cups
- Plastic spoons
- Small tray or plate
- Paper towels for easy cleanup
These simple ingredients can create multiple science experiments like volcano eruptions, magic milk, floating eggs, and balloon inflation tests.
Step-by-Step Instructions
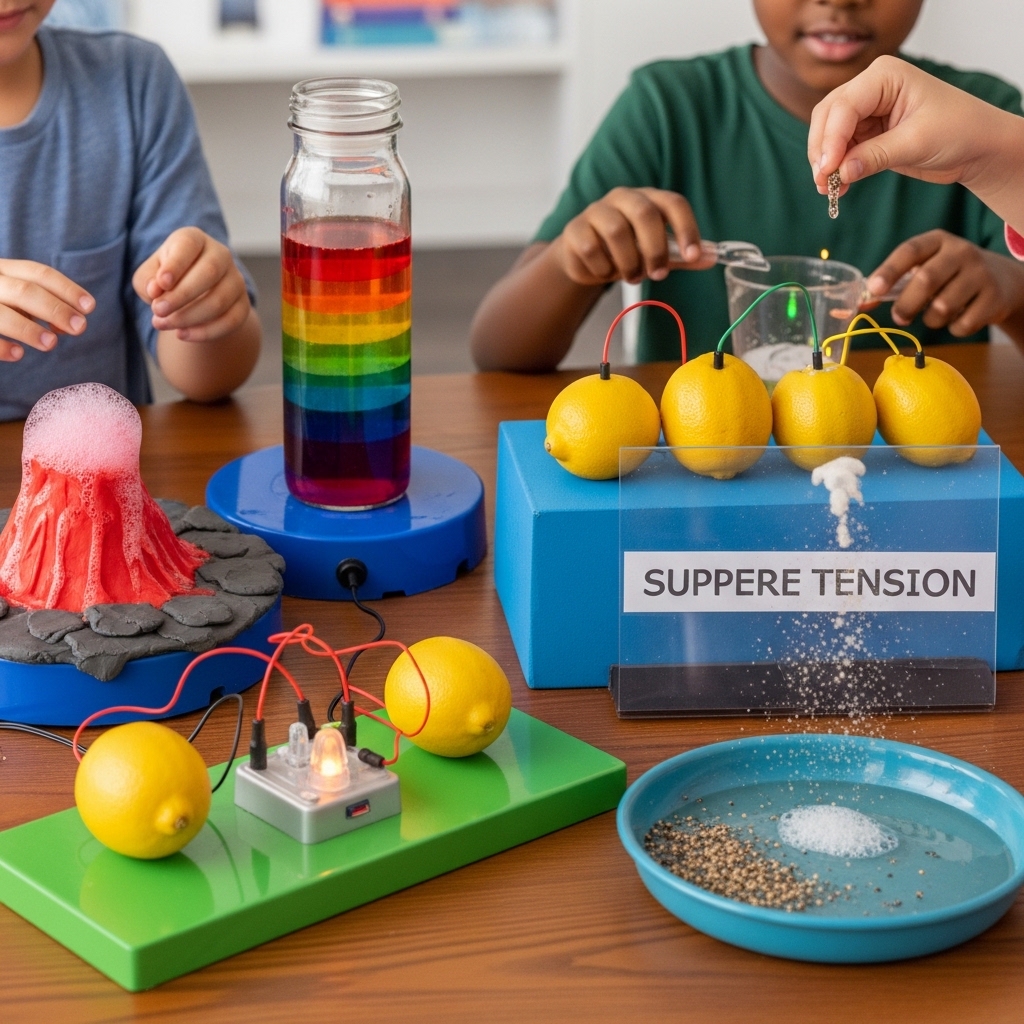
Experiment 1: Baking Soda Volcano
Step 1: Prepare the Volcano
Place a small plastic bottle in the center of a tray. Add 3 tablespoons of baking soda inside the bottle.
Step 2: Add Color
Mix a few drops of red food coloring with half a cup of vinegar. This makes the “lava” look more realistic and exciting.
Step 3: Create the Eruption
Slowly pour the vinegar into the bottle and watch the fizzy eruption happen! Kids love seeing the bubbling foam rise quickly.
Experiment 2: Magic Milk Color Explosion
Step 1: Pour the Milk
Pour enough milk onto a flat plate to cover the bottom.
Step 2: Add Food Coloring
Place several drops of different food colors around the milk surface.
Step 3: Use Soap Magic
Dip a cotton swab into dish soap and gently touch the center of the milk. Watch the colors burst and swirl like magic!
Experiment 3: Floating Egg Test
Step 1: Fill Two Glasses
Fill two glasses with water.
Step 2: Add Salt
Add 6 tablespoons of salt to one glass and stir well.
Step 3: Drop the Eggs
Place one egg in each glass. One sinks, and one floats! This teaches density in a very visual way.
Experiment 4: Lemon Balloon Inflation
Step 1: Add Baking Soda
Use a spoon to place baking soda inside a balloon.
Step 2: Pour Lemon Juice
Add fresh lemon juice into a small bottle.
Step 3: Attach Balloon
Carefully stretch the balloon opening over the bottle neck.
Step 4: Lift and Watch
Let the baking soda fall into the lemon juice. The balloon begins to inflate from the gas created!
What to Serve Science Experiments Designed for Children With
Science fun gets even better with tasty snacks and refreshing drinks nearby.
Fresh Fruit Cups
Healthy fruit cups are perfect because they’re colorful, easy to eat, and mess-free during experiments.
Mini Sandwiches
Simple cheese or peanut butter sandwiches keep kids full and energized for more science fun.
Lemonade
Fresh lemonade matches perfectly with the lemon balloon experiment and keeps everyone refreshed.
Homemade Cookies
A small plate of cookies turns science time into a special family activity.
These snack ideas help balance fun, learning, and happy family memories.
Top Tips for Perfecting Science Experiments Designed for Children
Use Safe, Simple Supplies
Always choose non-toxic household items and avoid anything sharp or dangerous. Safety comes first.
Prepare the Area First
Use trays, old newspapers, or plastic covers to protect tables from spills and messes.
Let Kids Lead
Allow children to pour, mix, and predict results. This builds confidence and keeps them more involved.
Don’t Rush
Give kids time to observe what happens and ask questions. Sometimes the learning comes after the experiment.
Expect Imperfection
Not every experiment works perfectly the first time. That’s part of science! Mistakes help kids learn even more.
Compare Similar Activities
If your child enjoys slime making, try bubble experiments too. Similar hands-on activities keep learning exciting and varied.
Storing and Reheating Tips
Since these are science experiments rather than food recipes, storage works a little differently.
Storing Leftover Supplies
Keep unused baking soda, vinegar, food coloring, and other materials in sealed containers. Store them in a cool, dry place for future use.
Saving Experiment Results
Some projects like crystal growing or slime can be stored in airtight containers for several days.
Cleaning Up
Always wash reusable tools like spoons, trays, and cups right after use. This keeps everything ready for the next experiment.
Freezing Ideas for Later
You can prepare “experiment kits” by placing supplies together in labeled bags for future science days.
Repeating the Fun
The best part is that many experiments can be repeated again and again with new colors, new predictions, and even better results each time.
Science experiments designed for children are not just activities—they are memories, discoveries, and learning adventures waiting to happen. Try these ideas today and turn simple household items into amazing moments of wonder