
Making a hand-operated rubber fan is a simple yet fascinating DIY project that introduces children and beginners to basic engineering, motion, and airflow principles. At first glance, a fan seems like a complex machine powered by electricity. However, building a manual version powered by a rubber band mechanism shows how simple forces can create useful motion.
This project is especially popular in STEM learning because it combines creativity, hands-on building, and scientific understanding. Children can see how stored energy in a rubber band can be converted into rotational movement, which then creates airflow.
Unlike store-bought electric fans, this handmade version teaches how mechanical systems work from the inside out. It encourages curiosity, problem-solving, and experimentation—all essential skills for future learning.
In this article, we will explore how making a hand-operated rubber fan works, why children enjoy it, and the step-by-step process to build one successfully.
Quick Overview Table
| Feature | Details |
| Project Name | Making a Hand-Operated Rubber Fan |
| Type | DIY STEM Mechanical Project |
| Difficulty Level | Easy to Moderate |
| Age Group | 7–14 Years |
| Time Required | 1–2 Hours |
| Key Materials | Cardboard, rubber band, stick, paper, glue |
| Main Concept | Energy transfer & motion |
| Skills Learned | Engineering, physics, creativity |
| Cost | Very low |
| Fun Level | High |
What Is a Hand-Operated Rubber Fan?
A hand-operated rubber fan is a simple mechanical device that uses a stretched rubber band to store energy. When released, the rubber band rotates a shaft connected to fan blades, producing airflow.
Unlike electric fans, this version does not require batteries or electricity. Instead, it relies on mechanical energy stored in the stretched rubber band.
This makes it a perfect educational tool for demonstrating:
- Energy storage
- Motion conversion
- Mechanical rotation
- Air displacement
When children engage in making a hand-operated rubber fan, they experience science in action.
Why Kids Love Making a Hand-Operated Rubber Fan
1. It Feels Like a Real Machine
Children are fascinated by machines. When they build a working fan from scratch, they feel like real inventors.
Watching the blades spin after releasing a rubber band gives them immediate satisfaction and excitement.
This “instant result” effect keeps them engaged throughout the project.
2. It Introduces Real Engineering Concepts
Even though the project is simple, it includes real engineering ideas such as:
- Energy transfer
- Rotational motion
- Mechanical design
- Structural balance
Children begin to understand how machines convert energy into movement.
This builds foundational knowledge for future STEM learning.
3. It Uses Simple, Affordable Materials
One of the best things about making a hand-operated rubber fan is that it does not require expensive tools.
Most materials are already available at home:
- Rubber bands
- Cardboard
- Wooden sticks
- Paper sheets
- Glue or tape
This accessibility makes the project easy for families and schools.
4. It Encourages Creativity
Children can customize their fan in many ways:
- Colorful blades
- Decorative handles
- Unique frame designs
- Creative shapes
Every fan becomes a personal creation.
This creative freedom makes the activity more enjoyable and meaningful.
5. It Provides Instant Feedback
When children turn or release the rubber band, they immediately see the result.
If the fan spins faster, they know they improved the design. If it slows down, they can adjust it.
This feedback loop teaches experimentation and improvement.
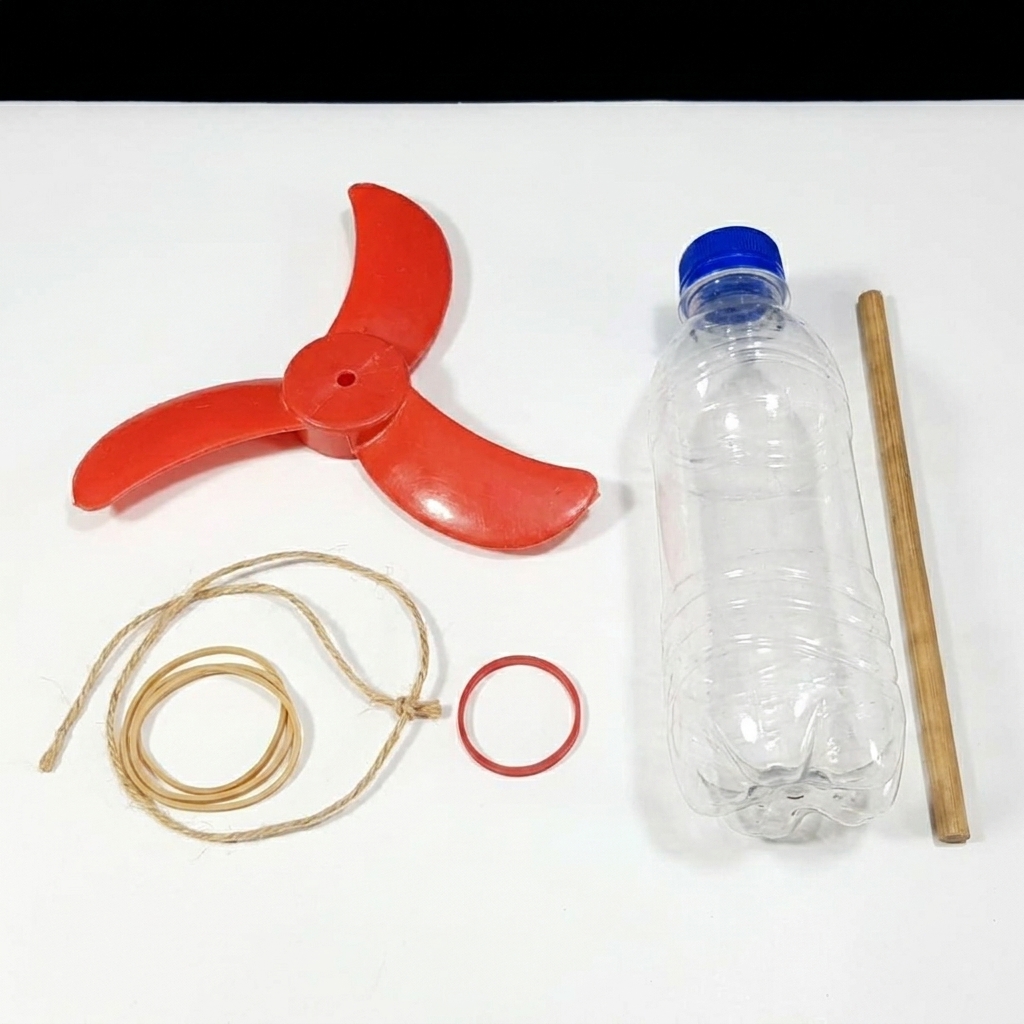
Materials Needed
Before starting making a hand-operated rubber fan, gather the following materials:
- Cardboard or thick paper
- Rubber band
- Wooden stick or pencil
- Bottle cap (optional for axis)
- Glue or tape
- Scissors
- Straw (optional for smoother rotation)
- Colored markers or paint
These items are simple, inexpensive, and easy to find.
How It Works: Basic Science
The science behind making a hand-operated rubber fan is based on energy transformation.
- The rubber band is stretched and stores potential energy.
- When released, this energy converts into kinetic energy.
- The kinetic energy rotates the fan blades.
- The moving blades push air forward, creating airflow.
This simple system demonstrates key physics concepts in a visual and engaging way.
Step-by-Step Guide: 7 Easy Steps
Step 1: Design the Fan Structure
Start by sketching a basic fan design on paper or cardboard.
Decide:
- Size of blades
- Shape of frame
- Handle position
Planning helps ensure smoother construction.
Step 2: Create the Fan Blades
Cut out 3–4 blades from cardboard.
Shape them evenly for balanced rotation.
You can curve the edges slightly to improve airflow.
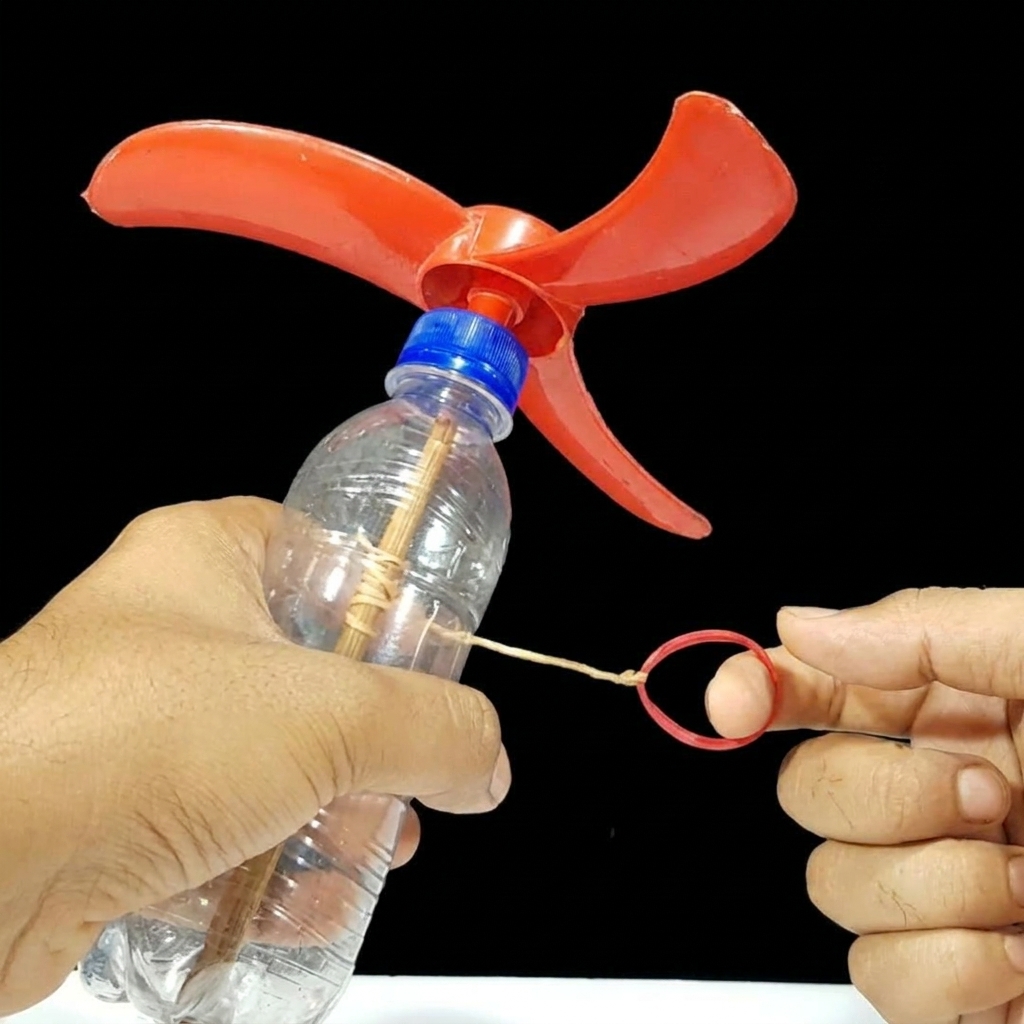
Step 3: Build the Central Axis
Insert a wooden stick or pencil through the center point where blades will rotate.
This will act as the main spinning shaft.
Step 4: Attach the Rubber Band Mechanism
Wrap the rubber band around the stick and attach it to a fixed point on the frame.
When stretched, it will store energy for rotation.
This is the core mechanism of the fan.
Step 5: Assemble the Frame
Build a simple frame using cardboard or sticks to hold everything in place.
Make sure it is stable and balanced.
Step 6: Test the Rotation
Turn or release the rubber band and observe the movement.
Check:
- Speed of rotation
- Smoothness of motion
- Balance of blades
Adjust if needed.
Step 7: Decorate and Improve
Finally, decorate your fan with colors, stickers, or drawings.
You can also improve efficiency by adjusting blade angles.
Educational Benefits
STEM Learning
This project teaches:
- Science: energy and motion
- Technology: simple mechanisms
- Engineering: structural design
- Mathematics: symmetry and balance
Problem-Solving Skills
Children learn how to fix issues like:
- Uneven rotation
- Weak airflow
- Loose components
Creativity Development
Designing and decorating encourages imagination and personal expression.
Understanding Energy Transfer
Kids see firsthand how stored energy becomes motion.
This is a core physics concept.
Why Teachers Use This Project
Teachers prefer making a hand-operated rubber fan because it is:
- Easy to organize
- Low-cost
- Highly educational
- Safe for students
It fits into lessons about:
- Physics
- Mechanical engineering
- Renewable energy basics
Teachers often use it as a classroom demonstration or group project.
How Parents Can Help
Parents can support children by:
- Helping cut materials
- Explaining energy concepts
- Encouraging experimentation
- Asking questions like “What makes it spin faster?”
This enhances learning and bonding.
Common Problems and Solutions
Fan Does Not Spin
Check rubber band tension or alignment.
Weak Rotation
Increase rubber band strength or reduce friction.
Blades Fall Off
Use stronger glue or tape.
Uneven Movement
Balance blades properly.
Creative Variations
Children can experiment with:
- Double rubber band systems
- Larger fan designs
- Mini desk fans
- Color-changing blades
Each variation adds more learning opportunities.
Real-Life Connection
This project helps children understand real fans and machines they use daily.
They begin to appreciate how:
- Air conditioners work
- Electric motors function
- Energy powers devices
This builds practical knowledge about everyday technology.
Long-Term Learning Impact
Making a hand-operated rubber fan builds:
- Engineering thinking
- Scientific curiosity
- Creativity
- Persistence
- Problem-solving ability
These skills are valuable for future education and careers in STEM fields.
Conclusion
Making a hand-operated rubber fan is a simple yet powerful learning experience. It transforms basic materials into a working mechanical device that demonstrates real physics principles.
Children love this project because it is hands-on, creative, and instantly rewarding. They see their ideas come to life as the fan spins and produces airflow.
Beyond fun, this activity teaches important lessons about energy, motion, and design. It encourages children to think like engineers and explore how machines work.
This is why making a hand-operated rubber fan remains one of the most effective and enjoyable STEM activities for young learners.