
Introduction
Looking for a colorful, creative, and budget-friendly craft project that children will absolutely love? A DIY Fun Paper Fan Rainbow Craft Activity is the perfect solution. This exciting paper craft combines bright rainbow colors with simple folding techniques to create a beautiful fan-shaped decoration that can brighten classrooms, bedrooms, playrooms, or party spaces.
Craft activities are more than just fun. They help children develop fine motor skills, improve hand-eye coordination, encourage creativity, and build confidence through hands-on learning. The DIY Fun Paper Fan Rainbow Craft Activity is especially popular because it uses inexpensive materials that are easy to find at home or school.
Whether you’re a parent searching for a weekend activity, a teacher planning a classroom project, or a caregiver looking for an engaging indoor craft, this rainbow paper fan project is suitable for a wide range of ages. Best of all, it can be completed in less than an hour and customized with different colors, decorations, and creative touches.
In this complete guide, you’ll learn how to make a DIY Fun Paper Fan Rainbow Craft Activity in 7 easy steps. You’ll also discover helpful tips, educational benefits, decorating ideas, troubleshooting advice, and creative variations that make this project even more exciting.
Let’s get started and create a colorful rainbow masterpiece!
Quick Overview Table
| Feature | Details |
| Craft Name | DIY Fun Paper Fan Rainbow Craft Activity |
| Difficulty Level | Easy |
| Age Group | 4+ Years |
| Time Required | 30–60 Minutes |
| Materials Needed | Colored Paper, Glue, Scissors |
| Skill Level | Beginner-Friendly |
| Educational Value | Creativity, Fine Motor Skills |
| Cost | Low Budget |
| Indoor Activity | Yes |
| Customizable | Highly Customizable |
Why Kids Love Rainbow Paper Fan Crafts
Rainbow crafts are universally loved because they are colorful, cheerful, and easy to personalize.
Children enjoy:
- Bright rainbow colors
- Folding and creating shapes
- Decorating their finished project
- Displaying their artwork
- Learning through play
The DIY Fun Paper Fan Rainbow Craft Activity combines all these elements into one simple and rewarding project
Benefits of Paper Craft Activities
Crafting isn’t just entertainment. It offers valuable developmental benefits.
Improves Fine Motor Skills
Cutting, folding, and gluing help strengthen hand muscles and improve coordination.
Encourages Creativity
Children can choose colors, decorations, and designs.
Builds Confidence
Completing a craft project gives children a sense of accomplishment.
Supports Focus and Patience
Following step-by-step instructions teaches concentration and persistence.
Promotes Color Recognition
Rainbow crafts help younger children identify and remember colors.
Encourages Family Bonding
Parents and children can enjoy crafting together.
Materials You’ll Need
Before beginning your DIY Fun Paper Fan Rainbow Craft Activity, gather these supplies.
Essential Materials
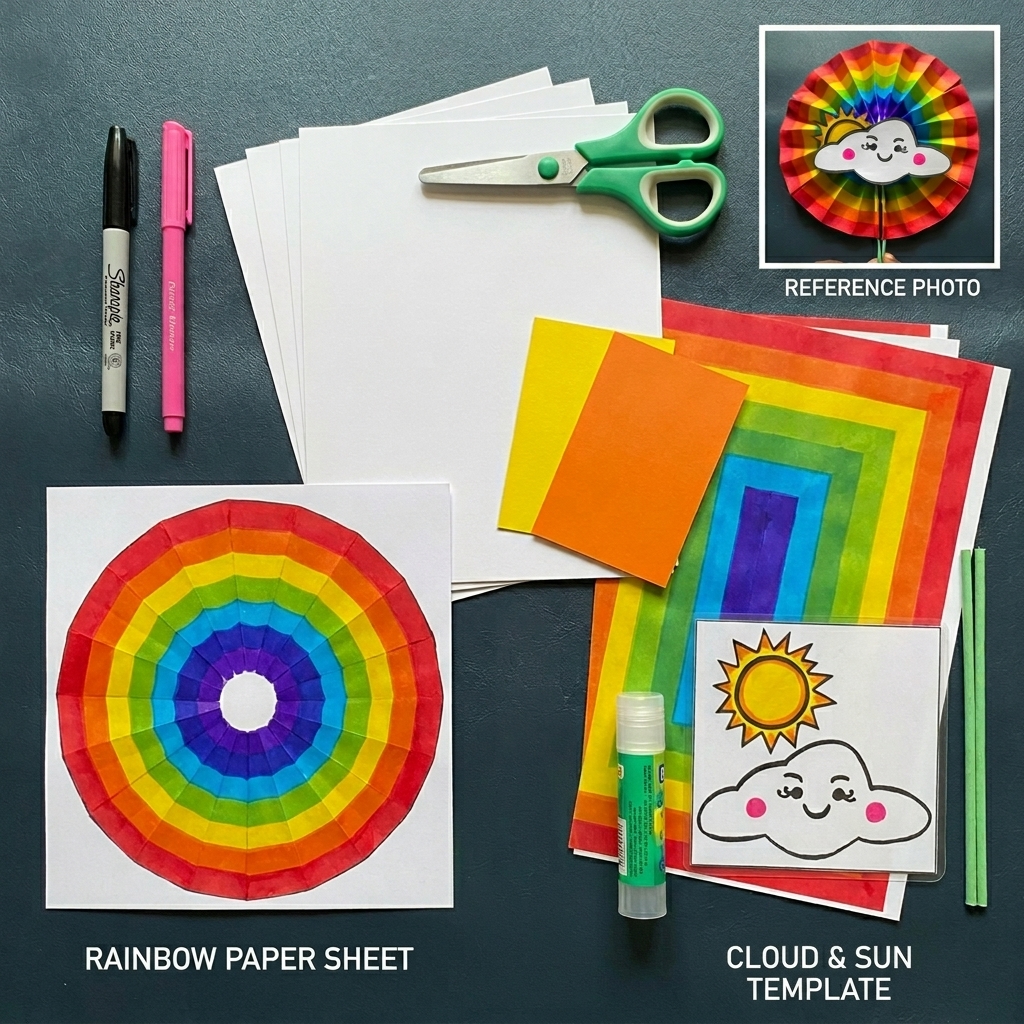
- Red paper
- Orange paper
- Yellow paper
- Green paper
- Blue paper
- Purple paper
- White cardstock
- Child-safe scissors
- Glue stick
- Pencil
- Ruler
Optional Decorations
- Glitter
- Stickers
- Markers
- Googly eyes
- Cotton balls
- Sequins
- Foam shapes
- Ribbon
Having everything prepared beforehand makes the crafting process smoother and more enjoyable.
Step 1: Prepare Your Rainbow Paper
The first step is gathering and organizing your colored paper.
Choose six traditional rainbow colors:
- Red
- Orange
- Yellow
- Green
- Blue
- Purple
Place the papers in rainbow order.
Tips for Success
- Use bright paper for vibrant results.
- Construction paper works well.
- Cardstock creates sturdier fans.
- Avoid overly thin paper.
Organizing materials before starting helps children follow the project more easily.
Step 2: Cut Equal Paper Strips
Using a ruler, measure strips of equal width.
Recommended size:
- Width: 2 inches (5 cm)
- Length: Full sheet length
Cut one strip from each rainbow color.
You should now have six colorful strips ready for folding.
Safety Tips
For younger children:
- Adult supervision is recommended.
- Use child-safe scissors.
- Pre-cut strips if necessary.
This step helps improve measuring and cutting skills.
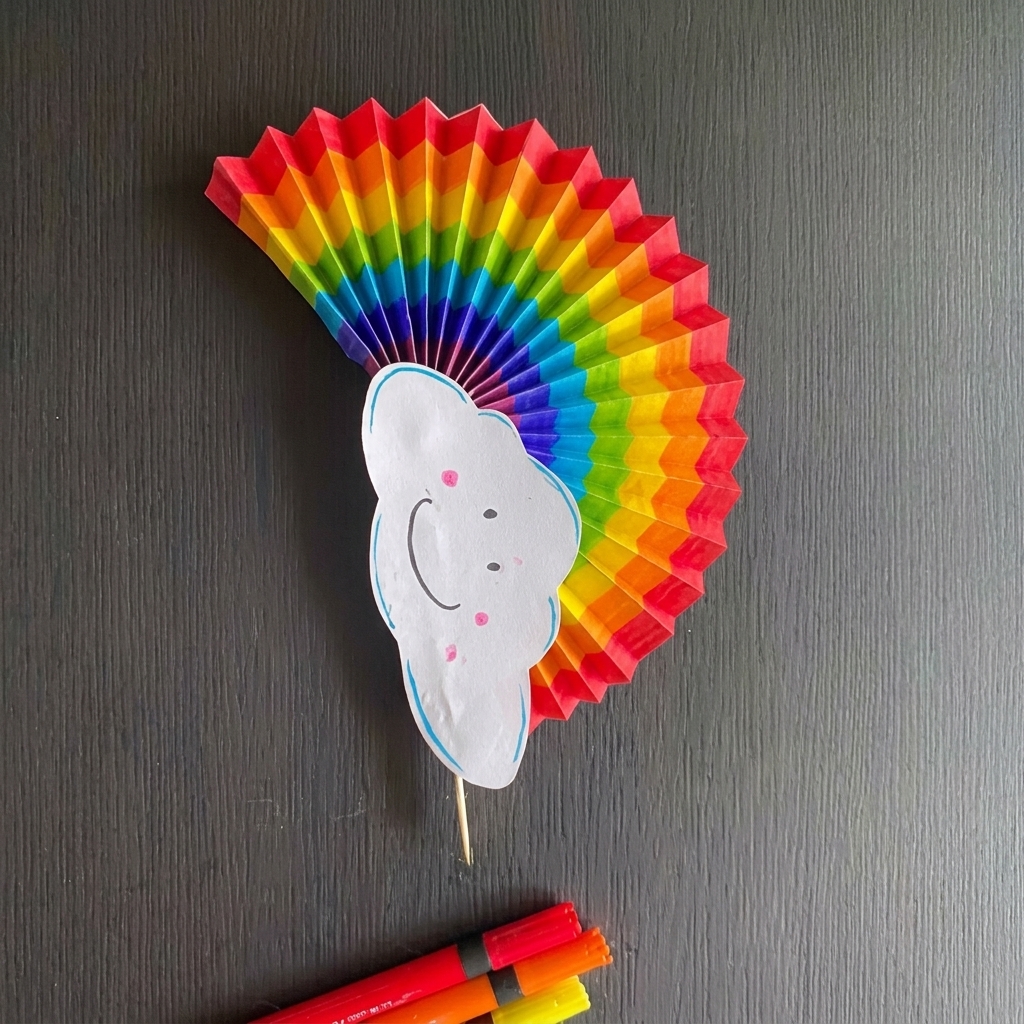
Step 3: Fold Each Strip Into a Fan
Now comes the most exciting part of the DIY Fun Paper Fan Rainbow Craft Activity.
How to Fold
- Take one strip.
- Fold approximately one inch forward.
- Flip paper over.
- Fold another inch backward.
- Continue alternating folds.
This creates an accordion-style fan.
Repeat with all rainbow strips.
Helpful Tip
Try to keep folds evenly spaced for a professional appearance.
Benefits of this step include:
- Improved motor skills
- Better concentration
- Practice with patterns
Step 4: Secure the Center of Each Fan
Once all strips are folded:
- Fold each accordion strip in half.
- Locate the center point.
- Apply glue at the center fold.
- Press gently.
The folded strip will begin to form a fan shape.
Allow glue to dry for several minutes.
Why This Step Matters
Securing the center helps:
- Maintain shape
- Increase durability
- Create a cleaner design
Children often enjoy watching the fan shape appear during this stage.
Step 5: Arrange the Rainbow Pattern
Lay the completed fan sections side by side.
Arrange them in traditional rainbow order:
Red → Orange → Yellow → Green → Blue → Purple
Check spacing before gluing.
Creative Variations
Try:
- Pastel rainbow colors
- Neon rainbow colors
- Glitter paper
- Patterned paper
This stage encourages creativity and design thinking.
Step 6: Glue the Fans Together
Carefully attach the fan sections.
Instructions
- Apply glue along one edge.
- Press the next fan section against it.
- Hold for a few seconds.
- Continue until all sections connect.
The individual pieces will combine into one beautiful rainbow fan.
Pro Tip
Use a small amount of glue to avoid wrinkles.
At this point, the DIY Fun Paper Fan Rainbow Craft Activity starts looking impressive.
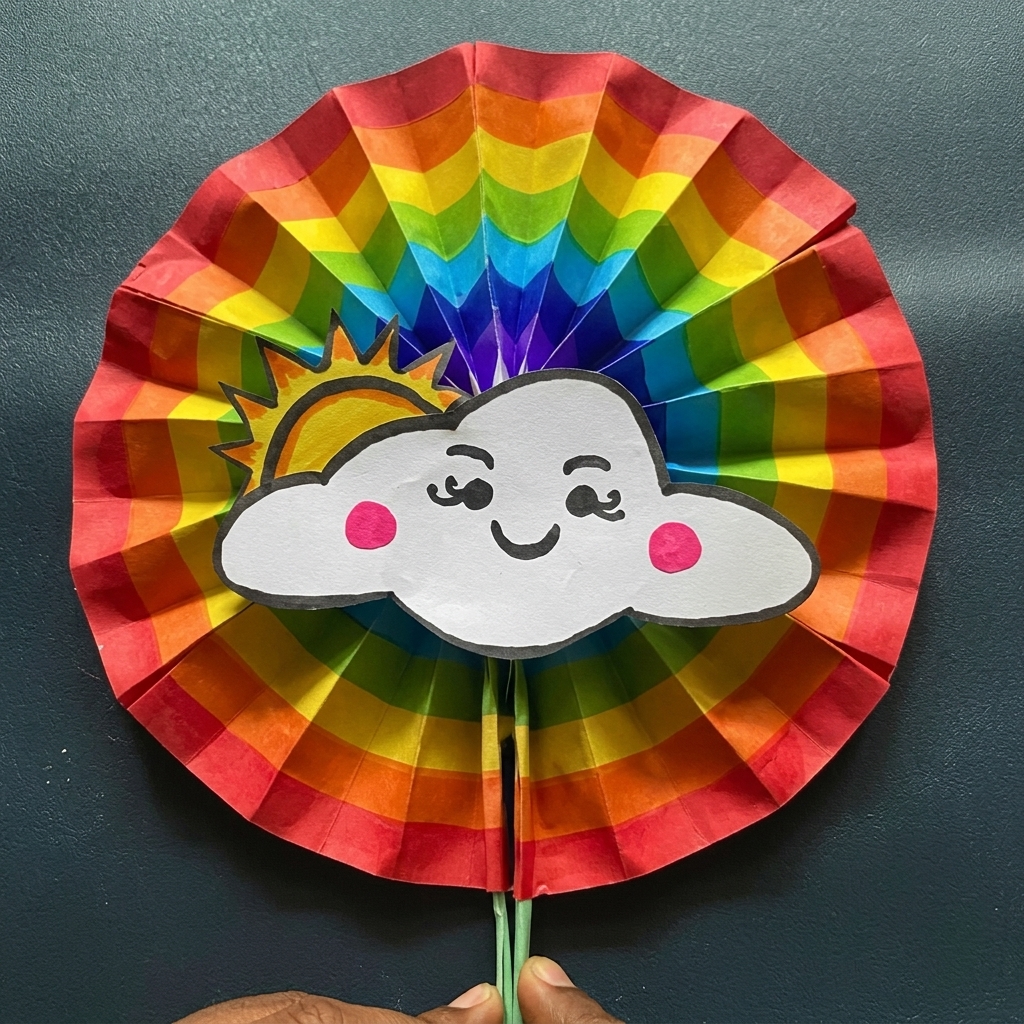
Step 7: Decorate and Display
Now it’s time to personalize your masterpiece.
Decoration Ideas
Add Cotton Ball Clouds
Glue fluffy cotton balls at both ends of the rainbow.
Draw Smiling Faces
Create cheerful characters.
Use Glitter
Add sparkle along rainbow sections.
Add Inspirational Words
Examples:
- Dream
- Smile
- Shine
- Imagine
Attach Ribbon
Hang the rainbow fan as a decoration.
Add Stickers
Stars, hearts, and flowers work beautifully.
Allow everything to dry completely before displaying.
Creative Display Ideas
Your finished rainbow fan deserves to be shown off.
Bedroom Wall Decoration
Brightens children’s rooms instantly.
Classroom Bulletin Board
Perfect for seasonal displays.
Birthday Party Decor
Adds colorful charm to celebrations.
Reading Corner Decoration
Creates a cheerful atmosphere.
Playroom Display
Encourages creativity every day.
Educational Lessons Hidden Inside the Craft
The DIY Fun Paper Fan Rainbow Craft Activity can also support learning objectives.
Color Recognition
Children identify rainbow colors.
Sequencing Skills
They learn proper color order.
Measuring Practice
Using rulers improves math skills.
Pattern Recognition
Accordion folds create repeating patterns.
Creativity Development
Kids experiment with design choices.
Teachers often incorporate rainbow fan crafts into educational activities.
Fun Variations to Try
After mastering the basic project, try these creative alternatives.
Seasonal Rainbow Fan
Add:
- Snowflakes for winter
- Flowers for spring
- Suns for summer
- Leaves for autumn
Animal-Themed Rainbow Fan
Decorate with:
- Butterflies
- Birds
- Ladybugs
Unicorn Rainbow Fan
Add:
- Unicorn horn
- Glitter accents
- Sparkly stickers
Ocean Rainbow Fan
Include:
- Fish
- Seashells
- Waves
Space Rainbow Fan
Decorate with:
- Stars
- Planets
- Rockets
These variations keep the project fresh and exciting.
Common Mistakes and How to Avoid Them
Uneven Folding
Problem:
The fan looks crooked.
Solution:
Measure folds carefully.
Too Much Glue
Problem:
Paper wrinkles.
Solution:
Apply thin layers.
Incorrect Color Order
Problem:
Rainbow appears inconsistent.
Solution:
Arrange colors before gluing.
Thin Paper
Problem:
Fan collapses easily.
Solution:
Choose thicker paper.
Rushing the Project
Problem:
Pieces shift before drying.
Solution:
Allow proper drying time.
Why Parents and Teachers Love This Craft
The DIY Fun Paper Fan Rainbow Craft Activity is a favorite because it is:
- Affordable
- Educational
- Easy to organize
- Suitable for groups
- Mess-free
- Highly customizable
It provides meaningful engagement without requiring expensive supplies.
Budget-Friendly Crafting Tips
You don’t need to spend much money.
Save Paper Scraps
Use leftover paper from previous projects.
Buy Supplies in Bulk
Ideal for classrooms.
Recycle Materials
Repurpose old craft items.
Use Household Decorations
Buttons, ribbons, and stickers can add charm.
Creativity matters far more than cost.
Frequently Asked Questions
What age is this craft suitable for?
Children aged 4 and older can enjoy this activity.
Can toddlers participate?
Yes, with adult assistance.
How long does the project take?
Typically 30–60 minutes.
Can I use cardstock?
Absolutely. It creates sturdier fans.
Is this suitable for classrooms?
Yes. It’s ideal for group activities.
Can the fan be hung on a wall?
Yes. Add ribbon or string for easy hanging.
Making the Activity Even More Fun
Turn crafting into a complete experience.
Play Rainbow Songs
Music creates excitement.
Read Rainbow-Themed Books
Combine literacy with creativity.
Teach Color Facts
Discuss how rainbows form.
Host a Craft Contest
Celebrate everyone’s creativity.
These activities enhance learning and engagement.
Final Thoughts
The DIY Fun Paper Fan Rainbow Craft Activity is a simple yet rewarding project that combines creativity, education, and fun. With just a few sheets of colorful paper, basic craft supplies, and seven easy steps, children can create a stunning rainbow decoration they’ll be proud to display.
This project helps develop fine motor skills, encourages creative expression, teaches color recognition, and provides a wonderful opportunity for family or classroom bonding. Best of all, it’s affordable, beginner-friendly, and adaptable to countless themes and occasions.
Whether you’re crafting at home, in a classroom, at a birthday party, or during a rainy afternoon, this rainbow fan project is guaranteed to bring smiles and brighten any space. Gather your supplies, follow the steps, and enjoy creating your own colorful masterpiece today.