
Quick Overview Table
| Topic | Details |
| Focus Keyword | Create an amazing rainbow projector at homes |
| Project Type | DIY Science Craft |
| Skill Level | Beginner |
| Time Required | 20–45 Minutes |
| Age Group | Kids, Teens, and Families |
| Main Concept | Light Refraction and Color Spectrum |
| Materials Needed | Flashlight, CD/DVD, Cardboard, Tape |
| Educational Value | STEM Learning |
| Cost | Low Budget |
| Outcome | Colorful Rainbow Projection |
Introduction
Have you ever wondered how rainbows appear in the sky after a rainstorm? The beautiful colors of a rainbow may seem magical, but they are actually the result of fascinating science. Even better, you don’t need a rainy day to enjoy rainbow colors. You can create an amazing rainbow projector at homes using simple materials that are probably already available around your house.
This fun DIY science project combines creativity, learning, and entertainment. Children can discover how light behaves while creating stunning rainbow effects that brighten walls, ceilings, and rooms. Parents and teachers love this activity because it turns science into an engaging hands-on experience.
Unlike complicated science experiments, a homemade rainbow projector is easy to build and inexpensive. It provides a wonderful introduction to concepts such as light reflection, refraction, and the visible color spectrum.
In this complete guide, you’ll learn how to create an amazing rainbow projector at homes in just five simple steps. You’ll also discover the science behind rainbows, troubleshooting tips, creative variations, and educational activities that make this project even more exciting.
Let’s bring a rainbow indoors and explore the colorful world of light.
What Is a Rainbow Projector?
A rainbow projector is a device that separates white light into its individual colors and projects them onto a surface.
Normally, white light appears colorless. However, white light actually contains all the colors of the rainbow:
- Red
- Orange
- Yellow
- Green
- Blue
- Indigo
- Violet
When light passes through certain materials or reflects at specific angles, these colors separate and become visible.
A DIY rainbow projector uses this principle to create colorful displays indoors.
Why Create an Amazing Rainbow Projector at Homes?
There are many reasons families and educators enjoy this project.
Educational Value
Children learn about:
- Light
- Optics
- Color science
- Reflection
- Refraction
Affordable Fun
Most materials are inexpensive or recycled from household items.
Encourages Creativity
Kids can experiment with different projection designs and colors.
STEM Learning
The project combines science, technology, engineering, and creativity.
Family Activity
Parents and children can build and explore together.
The Science Behind Rainbows
Before building the projector, it helps to understand how rainbows form.
White Light Contains Many Colors
Sunlight appears white, but it contains multiple wavelengths of light.
Each wavelength corresponds to a different color.
Refraction
When light passes through a transparent material, it bends.
This bending process is called refraction.
Color Separation
Different colors bend at different angles.
As a result, white light separates into a spectrum of colors.
This process creates the rainbow effect.
Natural Rainbows
In nature, water droplets act like tiny prisms that separate sunlight into rainbow colors.
Your DIY projector recreates a similar effect indoors.
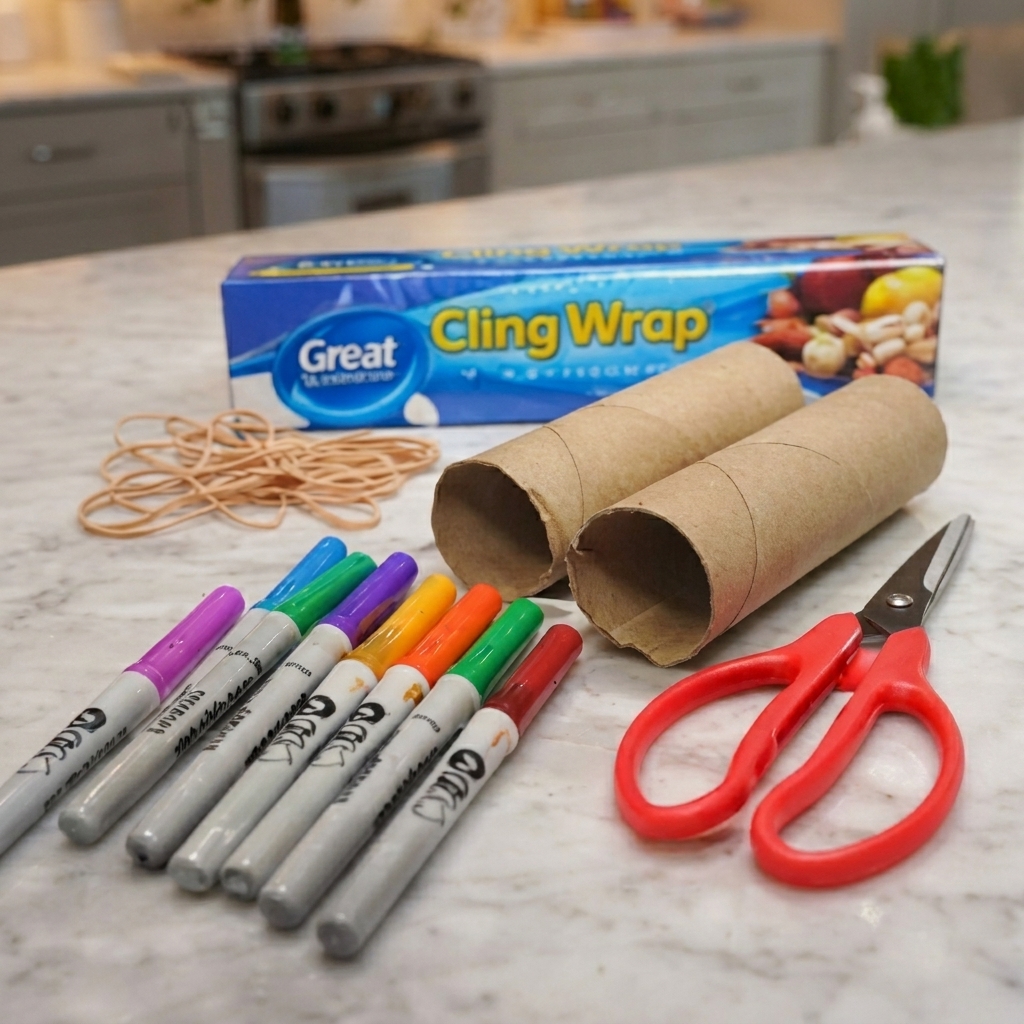
Materials You’ll Need
To create an amazing rainbow projector at homes, gather the following supplies.
Basic Materials
- Flashlight
- Old CD or DVD
- Cardboard box
- Scissors
- Tape
- Pencil
- White wall or screen
Optional Materials
- Colored cellophane
- Prism
- LED flashlight
- Decorative stickers
- Paint markers
Most households already have many of these items available.
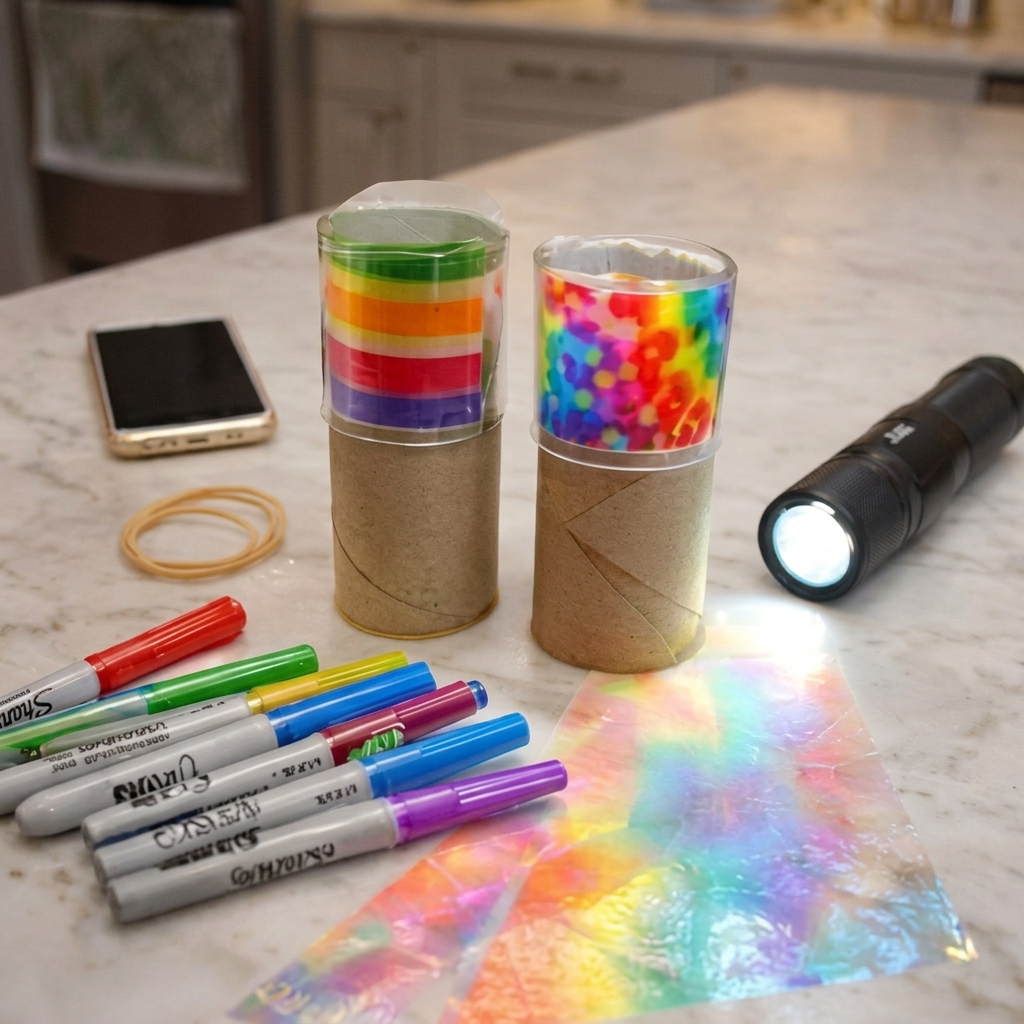
Step 1: Prepare the Cardboard Projector Base
The first step is creating the projector structure.
Instructions
- Choose a small cardboard box.
- Cut a circular hole on one side.
- The hole should be slightly smaller than your flashlight.
- Insert the flashlight so it points inside the box.
Why This Step Matters
The box helps direct the light and makes the rainbow effect easier to control.
Tips
- Use sturdy cardboard.
- Keep the flashlight secure.
- Avoid oversized openings.
A stable projector produces better results.
Step 2: Prepare the CD or DVD
The CD is the key component responsible for creating rainbow colors.
Why CDs Work
The tiny grooves on a CD surface act like a diffraction grating.
These grooves separate white light into individual colors.
Instructions
- Clean the CD surface.
- Remove fingerprints and dust.
- Check for scratches.
A clean surface improves color quality.
Safety Note
Handle CDs carefully to avoid sharp edges if broken.
Step 3: Position the CD Inside the Projector
Correct placement is important.
Instructions
- Place the CD at an angle inside the box.
- Secure it using tape.
- Aim the reflective side toward the flashlight beam.
Experiment with Angles
Different angles produce different rainbow patterns.
Try:
- 30 degrees
- 45 degrees
- 60 degrees
Adjust until you achieve the best rainbow effect.
Step 4: Create a Projection Surface
The rainbow must appear on a visible surface.
Best Surfaces
- White wall
- White poster board
- Ceiling
- Projection screen
Lighting Conditions
For best results:
- Dim the room lights.
- Close curtains.
- Reduce background brightness.
The darker the room, the brighter the rainbow appears.
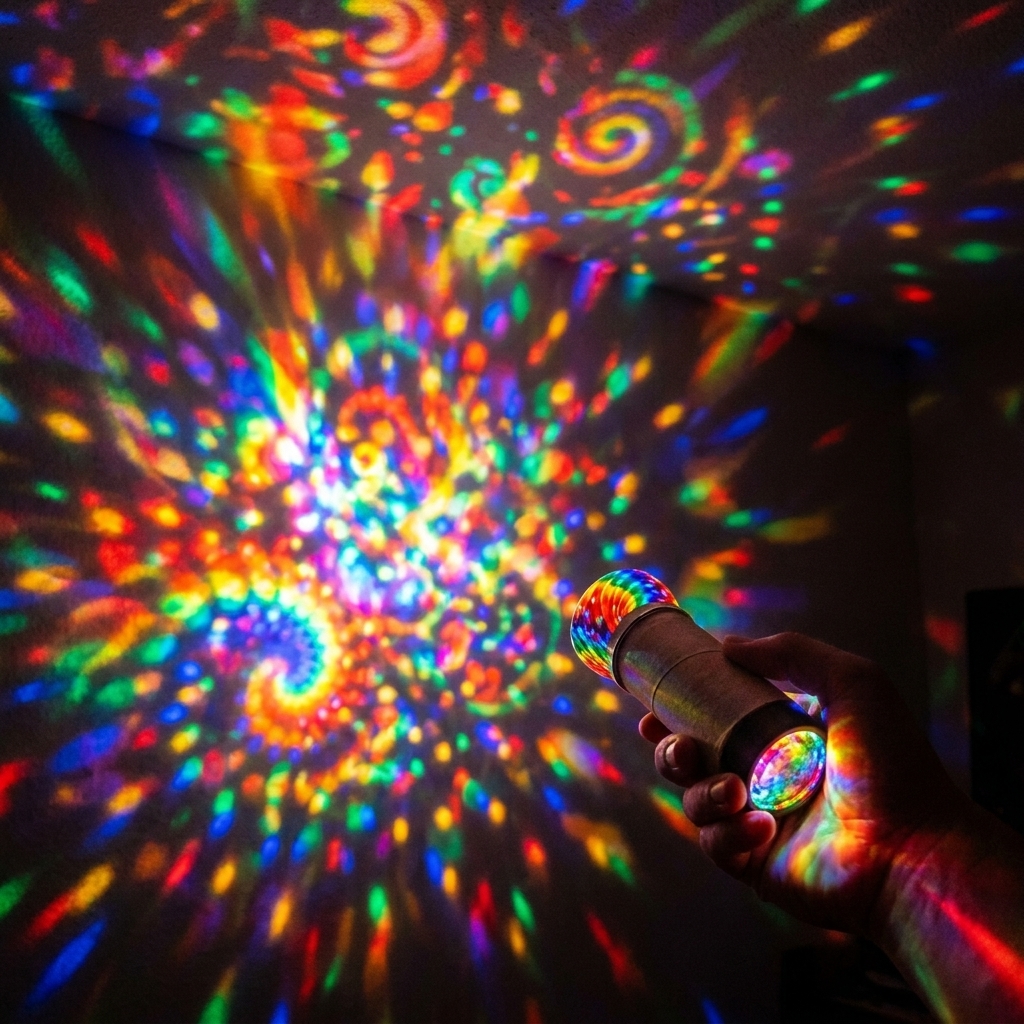
Step 5: Project and Adjust Your Rainbow
Now comes the exciting part.
Turn On the Flashlight
Aim the light toward the CD.
Observe the Colors
You should begin to see colorful rainbow reflections.
Fine-Tune the Setup
Adjust:
- Flashlight position
- CD angle
- Distance from wall
Small changes can dramatically improve the projection.
Celebrate Your Success
Congratulations! You’ve successfully learned how to create an amazing rainbow projector at homes.
Understanding the Color Spectrum
As you use your projector, you’ll notice several colors.
Red
Longest visible wavelength.
Orange
Warm and energetic.
Yellow
Bright and cheerful.
Green
Often appears near the center.
Blue
Shorter wavelength.
Indigo
Deep blue-purple shade.
Violet
Shortest visible wavelength.
Together these colors form the visible spectrum.
Creative Rainbow Projector Variations
Once you’ve mastered the basic version, try these fun upgrades.
Prism Projector
Replace the CD with a glass prism.
Prisms create especially clear rainbow effects.
Rotating Rainbow Projector
Attach the CD to a simple rotating mechanism.
The moving colors create dynamic displays.
Decorative Rainbow Box
Decorate the projector with:
- Stickers
- Paint
- Glitter
- Colorful paper
Kids love personalizing their projects.
Multiple Light Sources
Use two flashlights to create overlapping rainbow patterns.
Educational Activities Using Your Rainbow Projector
This project can become a complete science lesson.
Color Identification
Ask children to name each color.
Spectrum Ordering
Arrange colors in the correct rainbow sequence.
Light Experiments
Test different light sources.
Compare:
- LED lights
- Flashlights
- Sunlight
Angle Investigation
Observe how changing the CD angle affects the rainbow.
Scientific Observation Journal
Record:
- Colors observed
- Angle changes
- Brightness levels
- Projection sizes
This encourages scientific thinking.
Common Problems and Solutions
Problem: No Rainbow Appears
Solution
- Darken the room.
- Reposition the CD.
- Increase flashlight brightness.
Problem: Colors Are Faint
Solution
- Move closer to the wall.
- Use a stronger light source.
- Clean the CD.
Problem: Rainbow Looks Blurry
Solution
- Adjust projection distance.
- Stabilize the flashlight.
- Reduce movement.
Problem: Colors Are Incomplete
Solution
- Experiment with different angles.
- Try another CD or DVD.
Benefits of This DIY STEM Project
Creating a rainbow projector offers numerous educational advantages.
Hands-On Learning
Children learn by doing rather than simply reading.
Critical Thinking
Kids experiment and solve problems independently.
Scientific Curiosity
The project encourages questions about light and color.
Creativity
Children enjoy designing and decorating their projectors.
Family Bonding
Building together creates meaningful shared experiences.
Safety Tips
Always follow basic safety guidelines.
Avoid Direct Eye Exposure
Never shine bright lights directly into eyes.
Supervise Young Children
Adults should assist with cutting tools.
Handle Materials Carefully
Avoid cracked or broken CDs.
Use Appropriate Lighting
Do not stare into powerful light sources.
Simple precautions help ensure a safe experience.
Why STEM Projects Matter
Science projects like this help children develop essential skills.
Observation
Noticing patterns and changes.
Experimentation
Testing ideas through trial and error.
Problem-Solving
Finding solutions when challenges arise.
Creativity
Designing unique project variations.
Confidence
Successfully completing projects builds self-esteem.
STEM learning becomes much more enjoyable when children actively participate.
Fun Facts About Rainbows
Here are some fascinating rainbow facts.
- Every rainbow is unique.
- Rainbows are circles, not just arcs.
- Double rainbows can occur under certain conditions.
- Moonlight can create rare moonbows.
- Rainbows appear opposite the sun.
Learning these facts adds even more excitement to your rainbow projector project.
Frequently Asked Questions
Can I Use a Smartphone Flashlight?
Yes. Smartphone flashlights often work well.
Do I Need a CD?
No. Prisms and diffraction gratings can also create rainbow effects.
Is This Project Suitable for Young Children?
Yes, with adult supervision.
How Long Does It Take?
Most people complete the projector within 20–45 minutes.
Can I Use Sunlight?
Yes. Natural sunlight often produces very bright rainbow effects.
Conclusion
Learning how to create an amazing rainbow projector at homes is a fun and rewarding project that combines creativity with science. Using simple materials such as a flashlight, cardboard box, and old CD, you can transform ordinary white light into a spectacular display of rainbow colors.
Beyond the visual beauty, this project provides valuable lessons about optics, color theory, refraction, and the visible light spectrum. Children gain hands-on STEM experience while exploring the fascinating science behind rainbows.
Whether you’re a parent looking for an educational activity, a teacher planning a classroom experiment, or simply someone who loves creative DIY projects, this rainbow projector offers hours of learning and entertainment.
Gather your materials, follow the five simple steps, and enjoy the colorful magic of creating your own indoor rainbow today.