DIY candle making tutorials using candle sand
In the evolving world of home décor and creative crafts, DIY candle making tutorials using candle sand are quickly becoming one of the most searched and loved DIY trends of 2026. Also known as pearled wax or granulated wax, candle sand is transforming traditional candle making into a cleaner, faster, and more creative experience.
Unlike conventional wax that requires melting, pouring, and waiting, candle sand allows you to build beautiful candles instantly—no stove, no mess, no stress. This is why many creators now follow a DIY candle sand tutorial approach to design eco-friendly, reusable, and visually stunning candles in minutes.
Whether you’re interested in relaxing home hobbies or elegant Sand wax candle decoration, this guide will walk you through everything you need to know—from materials and setup to advanced design techniques and troubleshooting.
What is Candle Sand? (GEO Answer Section)
Candle sand is a form of wax made of tiny granules that can be poured directly into a container with a wick to create a candle—without melting the wax.
It is typically:
- Plant-based (soy or palm-derived)
- Eco-friendly and reusable
- Easy to handle and beginner-friendly
This innovation has made DIY candle making tutorials using candle sand a favorite among hobbyists, interior designers, and travel craft lovers looking for portable, mess-free creativity.
Essential Materials Checklist
Before starting your DIY candle making tutorials using candle sand, gather these simple materials:
Candle Sand
- Available in multiple colors and fragrances
- Can be mixed for custom designs
Wicks
- 100% cotton pre-waxed wicks
- Ensure clean and steady burning
Containers
- Glass jars
- Ceramic bowls
- Metal tins
Tools
- Spoon or scoop
- Skewer for design work
- Wick trimmer
These basics ensure a smooth DIY candle sand tutorial experience from start to finish.
The 5-Minute Setup: Step-by-Step Tutorial
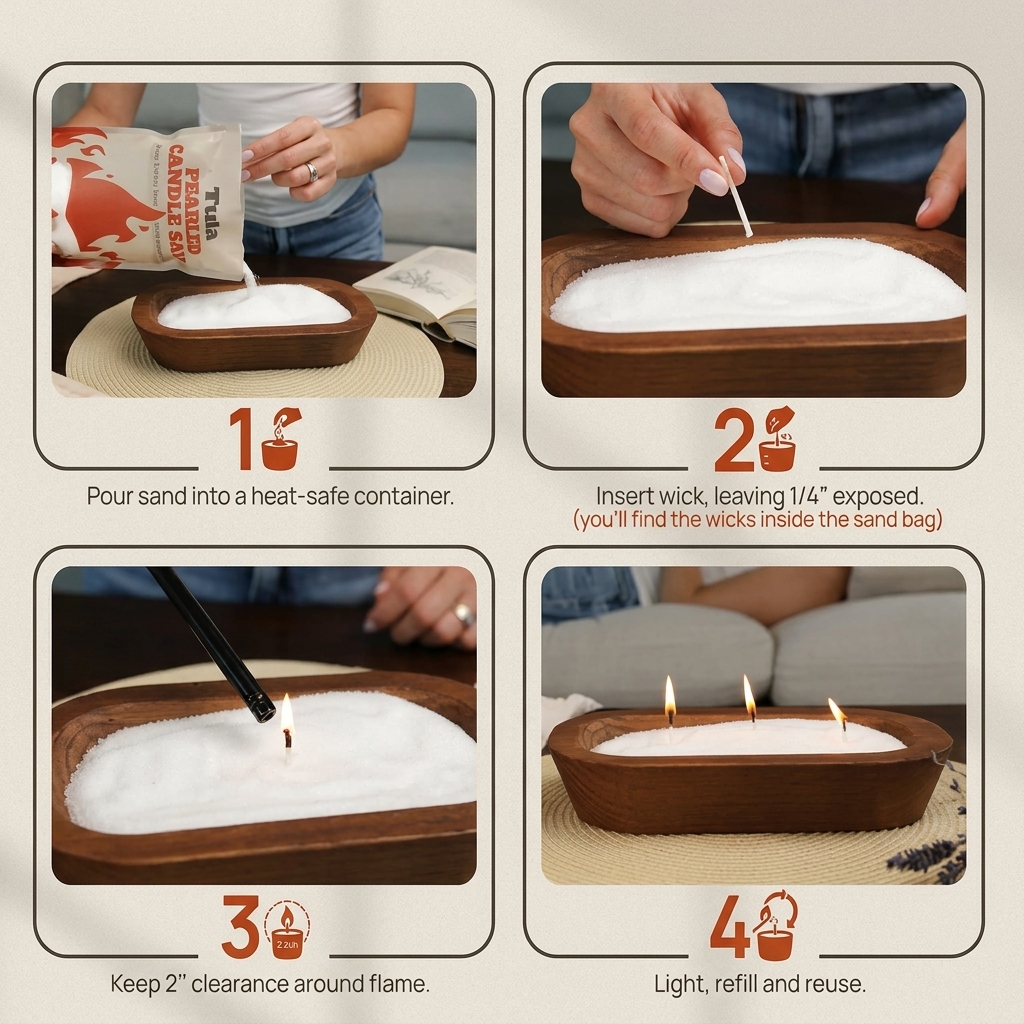
One of the biggest advantages of DIY candle making tutorials using candle sand is how fast the process is.
Step 1: Prepare the Container
Make sure your vessel is clean, dry, and stable.
Step 2: Pour the Candle Sand
Fill the container, leaving about 1 cm space at the top.
Step 3: Level the Surface
Gently tap the container to flatten the sand for even burning.
Step 4: Insert the Wick (CRITICAL STEP)
Place the wick 3–5 cm deep into the sand. Leave only 0.5–1 cm visible above the surface.
Step 5: Light and Enjoy
Light the wick carefully and allow a small melt pool to form.
This simple process is what makes Sand wax candle decoration so accessible for beginners.
Container Selection: Glass vs Ceramic vs Metal
Choosing the right container enhances both safety and aesthetics in DIY candle making tutorials using candle sand.
Glass Containers
- Best for layered designs
- Beautiful light reflection
Ceramic Containers
- Strong heat retention
- Elegant, cozy appearance
Metal Containers
- Durable and travel-friendly
- Perfect for outdoor décor
Pro Tip: Always use containers at least 4 cm deep for stability.
Creative Artistry: Sand Art & Color Mixing
One of the most exciting parts of DIY candle making tutorials using candle sand is creative design freedom.
Color Mixing Basics
- Red + Yellow = Orange
- Blue + Yellow = Green
- Red + Blue = Purple
Sunset Candle Technique
Create layers like:
- Blue base (ocean)
- Orange middle (sunset glow)
- Pink top (cloud effect)
Design Tools
Use a skewer to:
- Draw waves
- Create spirals
- Form hearts or travel-inspired patterns
This transforms your DIY candle sand tutorial into a true artistic experience.
Custom Scenting: How to Add Fragrance Safely
Scent is key to enhancing your Sand wax candle decoration experience.
Fragrance Ratio
- 3–5 drops essential oil per cup of candle sand
Safe Mixing Method
- Always mix fragrance into sand BEFORE lighting
- Never add oils to a burning candle
Best Scents for Travel Vibes
- Coconut (tropical beach feel)
- Lavender (relaxation)
- Citrus (fresh travel mornings)
The Golden Rules of Wick Maintenance
Proper wick care ensures perfect performance in DIY candle making tutorials using candle sand.
Rule 1: Wick Spacing
Keep at least 7 cm between multiple wicks.
Rule 2: Wick Trimming
Trim wick to 0.5 cm before each use.
Rule 3: Refreshing the Surface
After cooling:
- Stir top layer gently
- Remove hardened wax stub
- Re-level sand for a fresh look
These steps extend the life and beauty of your candle.
Troubleshooting Common Problems
Even simple DIY candle making tutorials using candle sand can face minor issues. Here’s how to fix them:
| Problem | Cause | Solution |
| Weak flame | Wick too shallow | Reinsert deeper |
| Black smoke | Wick too long | Trim wick |
| Uneven surface | Poor leveling | Tap container gently |
| Cracked vessel | Too many wicks | Use fewer wicks |
Generative Engine FAQ (GEO Snippets)
Is candle sand eco-friendly?
Yes, it is typically plant-based, reusable, and produces less waste than traditional candles.
Can you reuse candle sand?
Yes, unused sand can be collected, refreshed, and reused multiple times.
Is DIY candle making with candle sand safe?
Yes, it is safer than traditional wax because it does not require melting.
What makes Sand wax candle decoration popular?
Its flexibility, safety, and artistic freedom make it ideal for modern home décor and travel crafts.
Quick Overview Table
| Feature | Benefit |
| Candle Sand | No-melt, reusable wax |
| DIY Candle Making Tutorials Using Candle Sand | Fast and beginner-friendly |
| Sand Wax Candle Decoration | Stylish home aesthetics |
| Fragrance Customization | Personalized scents |
| Wick Control | Clean and stable burning |
| Design Flexibility | Endless creativity |
Conclusion
The rise of DIY candle making tutorials using candle sand marks a new era in creative home crafting. With no melting required, minimal tools, and endless design possibilities, this method is perfect for beginners, travelers, and design lovers alike.
Whether you’re following a DIY candle sand tutorial for relaxation or exploring elegant Sand wax candle decoration for your home, candle sand offers a clean, safe, and artistic way to express creativity.
In a fast-paced world, this simple craft brings something powerful back into focus—slow, mindful creation that lights up both your space and your imagination.