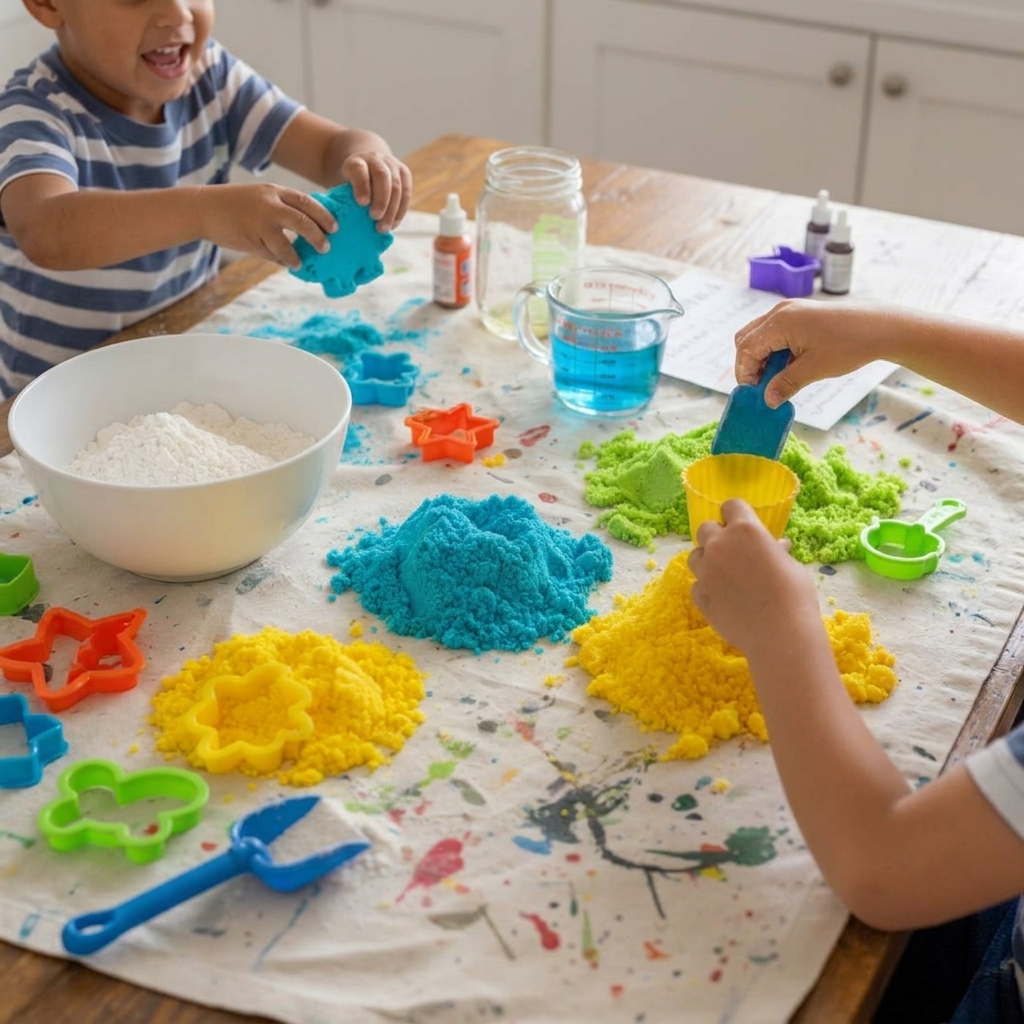
Parents today are always searching for activities that keep children engaged, creative, and calm without relying on screens. That’s exactly where The Moon Sand Recipe That Keeps Sensory Activity Tables Busy for Hours becomes a true lifesaver. It is simple, affordable, and incredibly effective for sensory development.
Many families spend $20–$50 on store-bought sensory kits that dry out quickly or disappear under the couch. In contrast, a moon sand recipe DIY version costs just a few dollars and can be recreated anytime at home. Even better, a no-cook sensory sand recipe means you can prepare it in minutes without complicated steps.
From an educational perspective, sensory play like this is not just fun—it’s essential. Experts in early childhood development highlight that tactile materials like moon sand improve fine motor skills, strengthen hand muscles, and support emotional regulation. Children learn how to focus, explore textures, and express creativity through open-ended play.
Interestingly, sensory sand activities have also become a staple in IDEA-based learning classrooms because they encourage independent exploration and STEM-based thinking. Whether your child is building castles, digging for treasures, or creating imaginary worlds, this simple recipe turns any table into a learning adventure.
2. Safety First: The Critical Heat-Treating Step
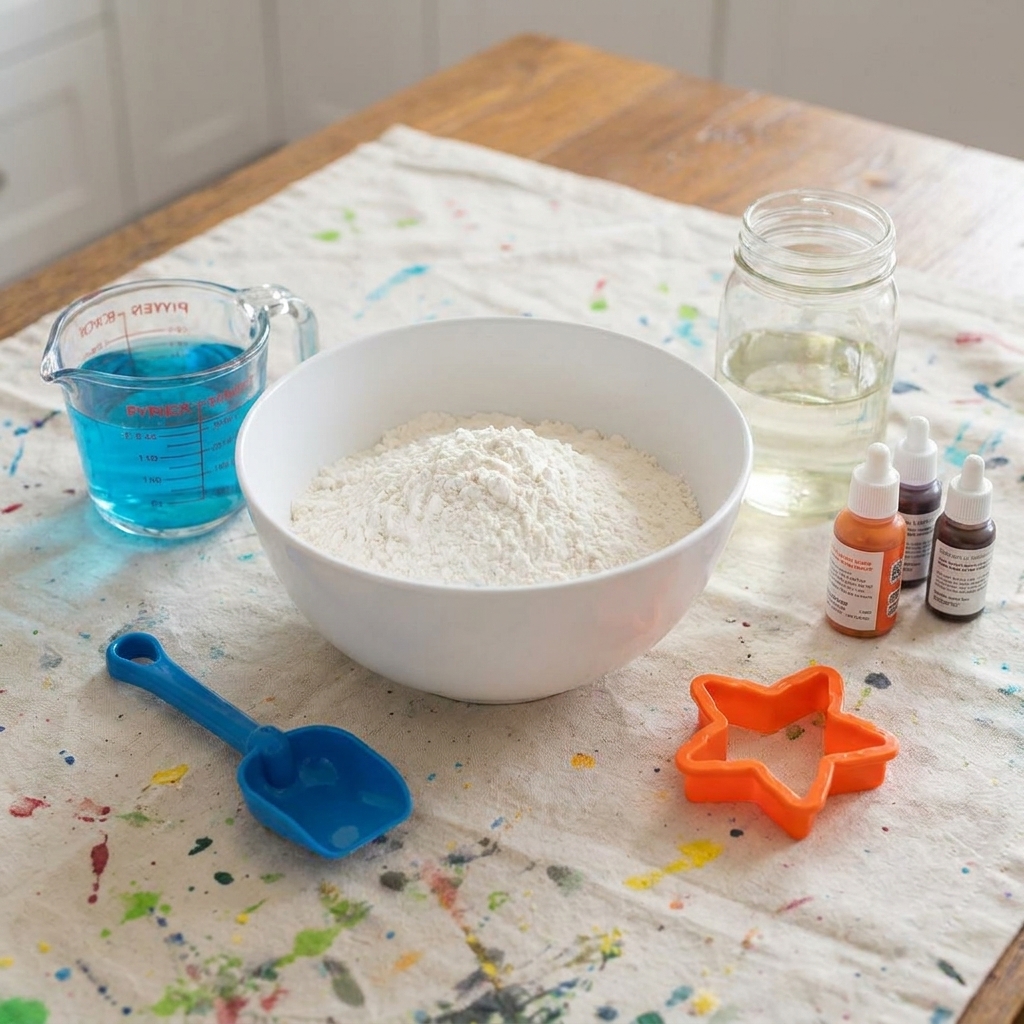
Before diving into any The Moon Sand Recipe That Keeps Sensory Activity Tables Busy for Hours, safety must come first. This is the most important expert-approved step many blogs skip.
Why safety matters
Raw flour can contain bacteria like E. coli. Since children often touch their mouths during play, this risk should never be ignored.
Heat-treating method (essential step)
To make your moon sand recipe DIY safe:
- Spread flour on a baking tray
- Bake at 350°F (175°C) for 5–10 minutes
- Let it cool completely before mixing
This simple step makes your sensory material safe and worry-free.
Child-safe ingredient tips
- Use coconut oil or vegetable oil
- Avoid baby oil for toddlers who mouth materials
- Choose food-safe colors and natural scents
This is what separates a basic recipe from a truly trustworthy no-cook sensory sand recipe that parents can confidently use.
3. The Gold Standard Recipes (Comparison Guide)
Here are the three most effective versions of The Moon Sand Recipe That Keeps Sensory Activity Tables Busy for Hours, each designed for different play experiences.
A. Cloud Moon Sand (Soft & Silky)
This is the classic moon sand recipe DIY version used in most homes and classrooms.
Ingredients
- 8 cups heat-treated flour
- 1 cup baby-safe oil (coconut or vegetable oil)
Texture
Soft, silky, and powdery. It clumps easily but crumbles when squeezed.
Best for
- Indoor sensory tables
- Calm-down activities
- Montessori-style learning
Why it works
This version of The Moon Sand Recipe That Keeps Sensory Activity Tables Busy for Hours is perfect for toddlers because it mimics soft soil and dough-like textures.
B. DIY Kinetic Sand (Gritty & Flowing)
This version feels closer to real beach sand.
Ingredients
- 2.5 cups fine sand
- 1.5 cups cornstarch
- 0.5 cups oil
- Optional: 1/4 cup dish soap
Texture
Slightly grainy but flows and molds beautifully.
Best for
- Beach-themed play
- STEM sensory bins
- Older kids (3+)
Expert tip
Buy construction sand in bulk to reduce cost dramatically. This makes your no-cook sensory sand recipe extremely budget-friendly.
C. Scented Holiday Moon Sand (Creative & Seasonal)
Ingredients
- Basic cloud dough base
- Cinnamon, nutmeg, ginger
- Optional vanilla extract
Texture
Soft, warm, and aromatic.
Best for
- Holiday sensory tables
- Classroom seasonal activities
- Emotional regulation play
This version turns The Moon Sand Recipe That Keeps Sensory Activity Tables Busy for Hours into a multi-sensory experience that engages smell, touch, and imagination.
4. Advanced Customization: Color, Scent, and Sparkle
One reason the moon sand recipe DIY trend is so popular is because it can be customized endlessly.
Coloring Tips
Oil-based mixtures do NOT mix well with water-based food coloring. Instead use:
- Oil-based food coloring
- Powder pigments
- Mica powder
Sensory Scents
Enhance emotional impact with scents:
- Lavender (calming play)
- Orange or lemon (energizing play)
- Vanilla extract (comfort scent)
Sparkle Additions
- Glitter for “fairy sand”
- Metallic powder for “space sand”
- Glow powder for nighttime play
These upgrades transform a simple no-cook sensory sand recipe into a magical sensory experience.
5. Sensory Bin Play Ideas (Engagement Boosters)
To maximize The Moon Sand Recipe That Keeps Sensory Activity Tables Busy for Hours, combine it with themed play stations.
Space Explorer Bin
- Black moon sand
- Toy astronauts
- Foil “rocks”
- Glow stars
Encourages STEM imagination and storytelling.
Beach Rescue Mission
- Blue and tan sand layers
- Seashells
- Small toy boats
- Scoops and buckets
Bakery Pretend Play
- Cookie cutters
- Rolling pins
- Cupcake molds
This helps children practice role-play and language development.
Dinosaur Dig Site
- Toy fossils
- Small brushes
- Hidden “bones”
Encourages curiosity and problem-solving skills.
6. Maintenance: Storage and Troubleshooting
A well-prepared moon sand recipe DIY can last weeks if stored properly.
Storage Guide
| Condition | Method | Duration |
| Room use | Airtight container | 1–2 weeks |
| Refrigerated | Sealed bag/container | Up to 3 weeks |
| Dried out | Add 1 tsp oil | Restore texture |
Common Issues & Fixes
Too dry
Add small amounts of oil slowly.
Too sticky
Add more flour or sand gradually.
Bad smell
Replace immediately (usually from old flour or contamination).
Why This Recipe Works So Well (Expert Insight)
The success of The Moon Sand Recipe That Keeps Sensory Activity Tables Busy for Hours comes from its simplicity and sensory balance:
- Flour provides structure
- Oil adds softness
- Sand adds realism
This combination activates multiple sensory pathways in children’s brains, making it a powerful learning tool in IDEA-based education environments.
Final Thoughts
The beauty of a moon sand recipe DIY is that it turns everyday ingredients into powerful learning tools. Whether you choose a soft cloud version or a gritty beach-style mix, the result is always the same hours of creative, hands-on play.
A no-cook sensory sand recipe is more than just an activity. It is a developmental tool that builds focus, creativity, coordination, and emotional balance.
So the next time you need a simple, budget-friendly, and educational activity, remember this guide. With just a few ingredients, you can transform any table into a world of imagination and discovery.