
Table of Contents
How to make a homemade volcano for children: 2 fun ways
There is nothing quite like the moment a homemade volcano erupts. The fizz, the pop, the colorful foam spilling over the sides like real lava it is pure magic for little eyes. Creamy? Not exactly. Delicious? Definitely not. But juicy, bubbly, and absolutely unforgettable? You bet.
Here is a funny memory: the first time I tried this with my niece, I forgot to put a tray underneath. Red foam shot everywhere on the table, the floor, even the family cat. Let us just say the cat was not impressed. But my niece? She laughed for ten minutes straight and asked to do it again.
So what makes this activity so special? It is simple, fast, and uses everyday kitchen ingredients. No fancy science kits required. You probably already have baking soda and vinegar in your cupboard right now.
If you enjoyed our rainbow baking soda experiment last month, you are going to love this volcano version. It is messier, louder, and twice as fun. So grab your supplies and let us get started. Your little scientist will thank you.
What Is This Volcano Recipe?
Why do we call it a volcano anyway? I mean, it is not edible. You cannot serve it for dinner. And yet, the name fits perfectly. A volcano erupts. This thing erupts. Simple, right?
But here is a funny question: if it explodes foam instead of hot rock, should we call it a “faux-icano”? Or a “soapcano”? Probably not. The name stuck because kids love drama. And nothing says drama like red bubbles shooting into the air.
There is an old saying: “The way to a man’s heart is through his stomach.” Well, the way to a child’s heart is through their curiosity. And a homemade volcano opens that door wide open. No fancy baking. No complicated measurements. Just pure, fizzy joy.
So do not overthink it. Call it a volcano. Call it an explosion. Call it a mess in the making. Just try it once, and you will see why this name has lasted for generations.
Why You Will Love This Recipe
The Main Advantage
Quick school project? Here is how to make a homemade volcano for kids with tips that actually work. The biggest advantage of this activity is how fast it comes together. From start to first eruption, you are looking at less than 15 minutes. That is shorter than most cartoon episodes. And unlike store-bought science kits, you do not need to wait for shipping or hunt down weird chemicals. Everything is already in your kitchen.
The Money-Saving Benefits
Making a volcano at home saves you real money. A typical volcano kit from a toy store costs $15 to $25 and gives you maybe two eruptions. Our version costs pennies per explosion. Baking soda is about $1 per box. Vinegar is even cheaper. And you can erupt the same volcano over and over again. That means more fun for less cash. Plus, you avoid plastic waste from disposable kits.
The Ingredients
What makes these ingredients so special? Baking soda feels soft and powdery between your fingers. Vinegar smells sharp and clean. When they meet, they dance. The bubbles are tiny at first, then they grow into a foamy river that looks just like real lava. Add red food coloring, and suddenly your kitchen becomes a science lab. If you liked our fizzing lemon volcano, you will love this two-method version even more. It gives you choices. It gives you control. And it gives you twice the wow factor. So go ahead clear the table and get ready to make some magic.
How to Make a Quick School Project? Here Is How to Make a Homemade Volcano for Kids, with Tips
Quick Overview
What makes this project so easy and satisfying? First, there is no cooking involved. No hot stoves. No sharp knives. Just mixing, pouring, and watching. Second, the flavor is not the point the fizz is. And the fizz is always perfect. Third, the texture is thick, foamy, and oddly satisfying to touch.
Preparation time is about 10 to 15 minutes for the classic method. The fizzy playdough method takes closer to 20 minutes because you have to cook the dough. But both are beginner-friendly and require zero experience.
You will need a clean table, a few simple tools, and a child who loves to say “whoa.” That is it.
Main Ingredients for This Volcano Project
Here is everything you need for both methods. Pick one or try both.
For the Classic Volcano:
- Baking soda – 2 tablespoons
- White vinegar – ½ cup
- Dish soap – 1 teaspoon
- Red food coloring – 5 to 10 drops
- Water – 2 tablespoons (optional)
For the Fizzy Playdough Volcano:
- Flour – 1 cup
- Salt – ½ cup
- Cream of tartar – 2 teaspoons
- Vegetable oil – 1 tablespoon
- Water – ½ cup
- Baking soda – ½ cup
- Lemon juice or citric acid solution – ¼ cup
- Red food coloring – optional
Tools You Will Need:
- Large tray or baking sheet with edges
- Small plastic bottle or cup
- Mixing bowls
- Measuring spoons and cups
- Spoon for stirring
- Saucepan (for playdough method)
Step-by-Step Instructions
Method 1: The Classic Erupting Volcano
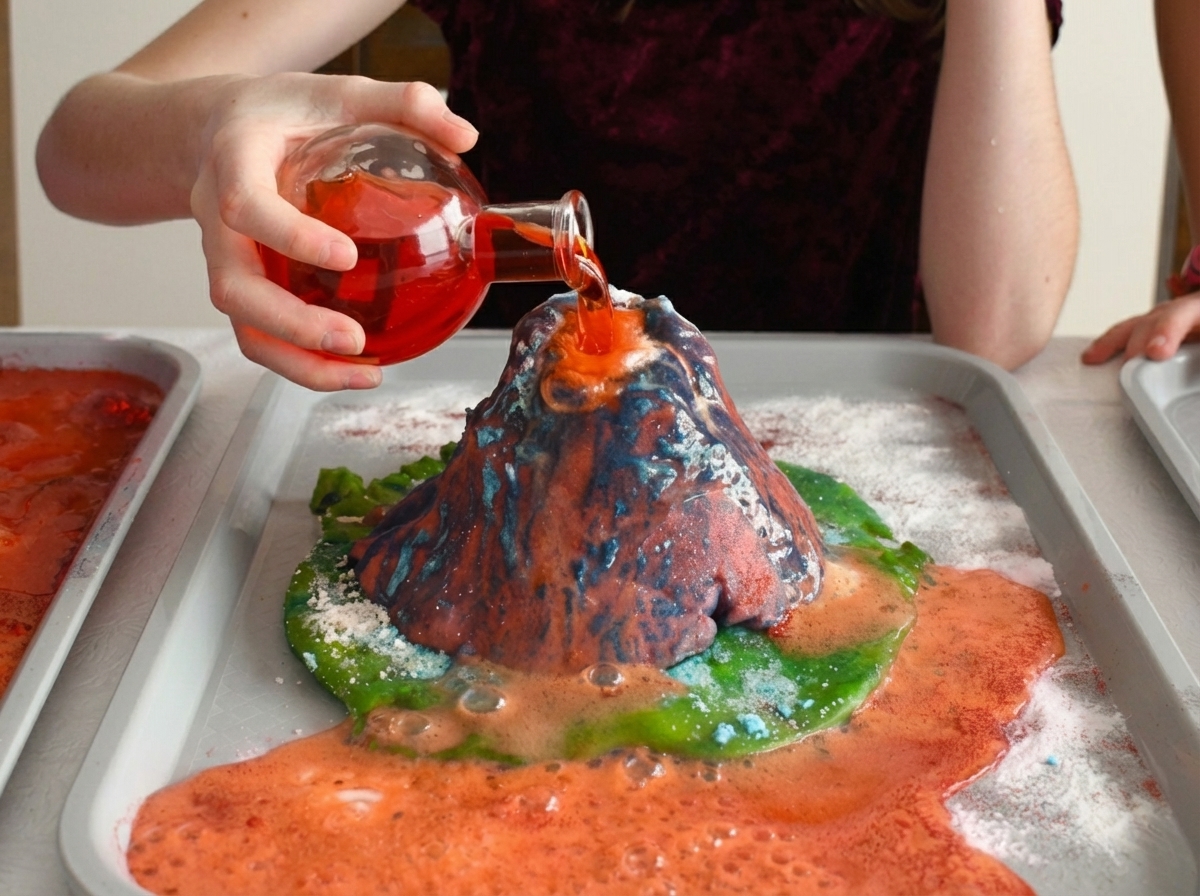
Step 1: Set up your tray. Place the tray on a flat surface. Put your small bottle or cup in the center.
Step 2: Build the volcano shape. Use sand, dirt, playdough, or crumpled newspaper to form a mountain around the bottle. Leave the top opening uncovered.
Step 3: Add the dry ingredients. Put 2 tablespoons of baking soda into the bottle. Add 1 teaspoon of dish soap. Drop in 5 to 10 drops of red food coloring.
Step 4: Prepare the vinegar. Measure ½ cup of white vinegar. If you want a bigger eruption, warm the vinegar in the microwave for 15 seconds.
Step 5: Erupt! Pour the vinegar quickly into the bottle and step back. Watch the colorful foam explode out of the volcano.
Method 2: The No-Vinegar Fizzy Playdough Volcano
Step 1: Make the playdough. In a saucepan, combine flour, salt, cream of tartar, oil, water, and ½ cup of baking soda. Add red food coloring if desired.
Step 2: Cook the dough. Stir over medium heat for 2 to 3 minutes until it forms a ball. Remove from heat and let it cool.
Step 3: Shape the volcano. Knead the dough until smooth. Form it into a volcano shape around a small cup. Leave the cup opening exposed.
Step 4: Prepare the eruption liquid. Pour ¼ cup of lemon juice into a small measuring cup. You can also mix 1 teaspoon of citric acid powder with ¼ cup of water.
Step 5: Erupt slowly. Pour or spray the lemon juice into the cup. Watch the gentle, long-lasting fizz bubble up through the dough.
What to Serve With This Volcano
Since you cannot eat a volcano, think about what to pair with it for a full activity day.
- A science journal: Let kids draw what they see and write down their observations.
- A second volcano: Make a mini version using an ice cube tray for multiple small eruptions.
- A baking soda and vinegar sensory bin: Pour leftover ingredients into a bin with plastic dinosaurs.
- Homemade slime: Keep the messy fun going with a simple glue and borax slime recipe.
- A volcano-themed snack: Serve “lava” yogurt tubes or “rock” chocolate chip cookies.
Pairing this project with other hands-on activities turns one fun hour into an entire afternoon of learning and play.
Top Tips for Mastering This Volcano Project
Tip 1: Use warm vinegar for a bigger blast. Cold vinegar works fine, but warm liquid speeds up the chemical reaction. Your volcano will erupt faster and higher.
Tip 2: Add glitter to the baking soda. It looks like sparkling minerals shooting out with the lava. Kids love this extra touch.
Tip 3: Do not skip the tray. Foam can travel farther than you think. A rimmed baking sheet saves your table and floors.
Tip 4: Store leftover playdough properly. Keep the fizzy playdough in a sealed plastic bag or airtight container. It will stay fresh for up to two weeks.
Tip 5: Reuse your volcano shape. For the classic method, you do not need to rebuild the volcano each time. Just rinse the bottle, add fresh baking soda and vinegar, and watch it erupt again.
Tip 6: Adjust for age. Toddlers do better with the playdough method. Older kids love the speed of the classic eruption.
Tips and Reuse
Now let us talk about how to make a homemade volcano for children more than once. Because let us be honest—kids will want to do this again and again.
Storage for the Classic Volcano: You cannot really store the eruption mixture. But you can store the volcano structure. If you built your volcano using playdough or paper mache, let it dry completely. Wrap it in plastic wrap or store it in a large container. It will be ready for next time.
Storage for the Fizzy Playdough Volcano: This one is reusable. After the fizzing stops, rinse the playdough with water and pat it dry. Store it in a sealed bag in the refrigerator. It will keep for up to two weeks. When you are ready to erupt again, just add more lemon juice.
Freezing instructions: You can freeze the fizzy playdough. Wrap it tightly in plastic wrap, then place it in a freezer bag. It will last for up to three months. Thaw it in the refrigerator overnight before using.
Reusing ingredients: Leftover baking soda and vinegar can be used for cleaning. Vinegar is great for windows. Baking soda deodorizes carpets and sinks. Nothing goes to waste.
Common mistake to avoid: Do not pour vinegar directly onto the playdough itself. Always pour it into the cup inside the volcano. Otherwise, the dough will get soggy and fall apart.
Frequently Asked Questions
Can I reuse the same volcano for multiple eruptions?
Yes. For the classic method, just add fresh baking soda and vinegar. For the playdough method, add more lemon juice.
What if I do not have vinegar for Method 1?
Use lemon juice, lime juice, or a citric acid solution instead.
Is this activity safe for toddlers?
Method 2 is safer for toddlers because it has no vinegar fumes. Always supervise young children.
How long does each eruption last?
The classic eruption lasts 10 to 20 seconds. The playdough eruption lasts 2 to 5 minutes.
Can I make the volcano without food coloring?
Yes. The eruption will be white foam. It still looks cool.
Why did my volcano not erupt?
Your baking soda might be old. Or you did not use enough vinegar. Try fresh baking soda and warm vinegar.
Conclusion
You now know two fun and easy ways to bring science to life. Whether you choose the fast and explosive classic volcano or the gentle and reusable fizzy playdough version, you are guaranteed to create a memorable experience.
Quick school project? Here is how to make a homemade volcano for kids with tips that actually work. Both methods use safe, simple ingredients. Both are easy to clean up. And both will make your kids ask to do it again immediately.
The best part? You do not need a science degree or a craft room. You just need a little curiosity and a few kitchen staples.
So what are you waiting for? Grab your baking soda and vinegar. Clear off the kitchen table. And get ready to hear the sweetest sound in the world: your child shouting, “It worked! Do it again!”
Try one of these methods this weekend, then come back and leave a comment. Tell us which version your family liked best. Share your eruption photos. And if the cat runs away again, definitely let us know. Happy erupting.
https://www.ideaaschool.com/imple-science-experiments-for-children-at-home