
Few DIY projects combine creativity, science, and entertainment quite like bouncy glitter balls. These colorful creations are exciting to make, fascinating to watch, and incredibly fun to play with. Whether you’re planning a craft day with kids, looking for an educational science experiment, or simply searching for a unique homemade toy, bouncy glitter balls are an excellent choice.
The best part is that making your own bouncy glitter balls requires only a handful of simple materials. By adding glitter, colors, and creative design ideas, you can transform ordinary bouncing balls into sparkling works of art. Kids love the bright colors and shiny effects, while adults enjoy the hands-on crafting experience and the opportunity to explore basic chemistry concepts.
In this guide, you’ll learn how to create five exciting designs, discover the science behind bouncing balls, and pick up useful tips for achieving the best results. Let’s dive into the colorful world of DIY bouncy glitter balls.
Quick Overview Table
| Feature | Details |
| Project Name | Bouncy Glitter Balls |
| Difficulty Level | Beginner |
| Time Required | 20–40 Minutes |
| Main Materials | Glue, borax solution, cornstarch, glitter |
| Cost | Low Budget |
| Suitable Age | Kids, Teens, Adults |
| Educational Value | Science and Crafting |
| Number of Designs | 5 Creative Styles |
| Benefits | Creativity, STEM learning, fun play |
What Are Bouncy Glitter Balls?
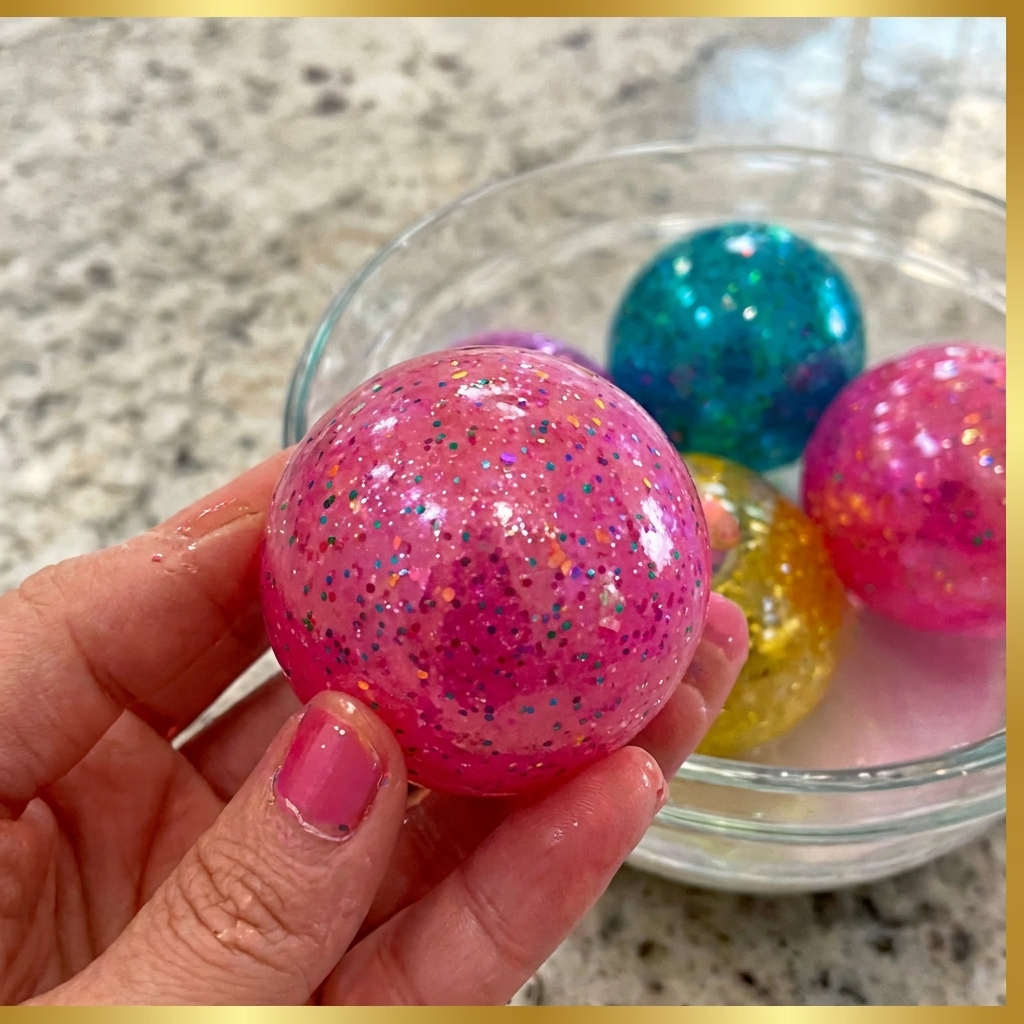
Bouncy glitter balls are homemade rubber-like balls created by combining glue with specific ingredients that trigger a chemical reaction. The result is a flexible, elastic material capable of bouncing when dropped on a hard surface.
The addition of glitter makes the balls visually appealing and allows crafters to personalize them with unique colors and patterns.
These projects are especially popular because they combine:
- Science experiments
- Arts and crafts
- Sensory play
- DIY toy making
- STEM education
Unlike store-bought bouncing balls, homemade versions allow complete creative freedom.
Why Make Your Own Bouncy Glitter Balls?
There are many reasons why DIY bouncy glitter balls have become a favorite project among families and teachers.
Encourages Creativity
Children can choose colors, glitter types, and decorative themes to create one-of-a-kind designs.
Introduces Basic Science
The process demonstrates polymer formation and chemical reactions in a safe and engaging way.
Affordable Entertainment
Most ingredients are inexpensive and easily available.
Great for Parties
Homemade glitter balls make excellent party activities and take-home favors.
Improves Fine Motor Skills
Mixing, shaping, and decorating help develop hand coordination and dexterity.
Materials You’ll Need
Before making your bouncy glitter balls, gather these supplies.
Basic Ingredients
- White school glue
- Warm water
- Borax powder
- Cornstarch
- Glitter
- Food coloring
Tools
- Mixing bowls
- Measuring spoons
- Craft sticks
- Disposable gloves
- Airtight storage container
Understanding the Science
One reason bouncy glitter balls are so popular in classrooms is the science behind them.
When borax is mixed with glue, a chemical process called cross-linking occurs. The molecules in the glue connect together, creating a stretchy polymer network.
This network gives the ball its unique properties:
- Elasticity
- Flexibility
- Bounce
- Shape retention
The more balanced the mixture, the better the bounce.
Basic Bouncy Glitter Ball Recipe
Before exploring the five designs, start with a simple base recipe.
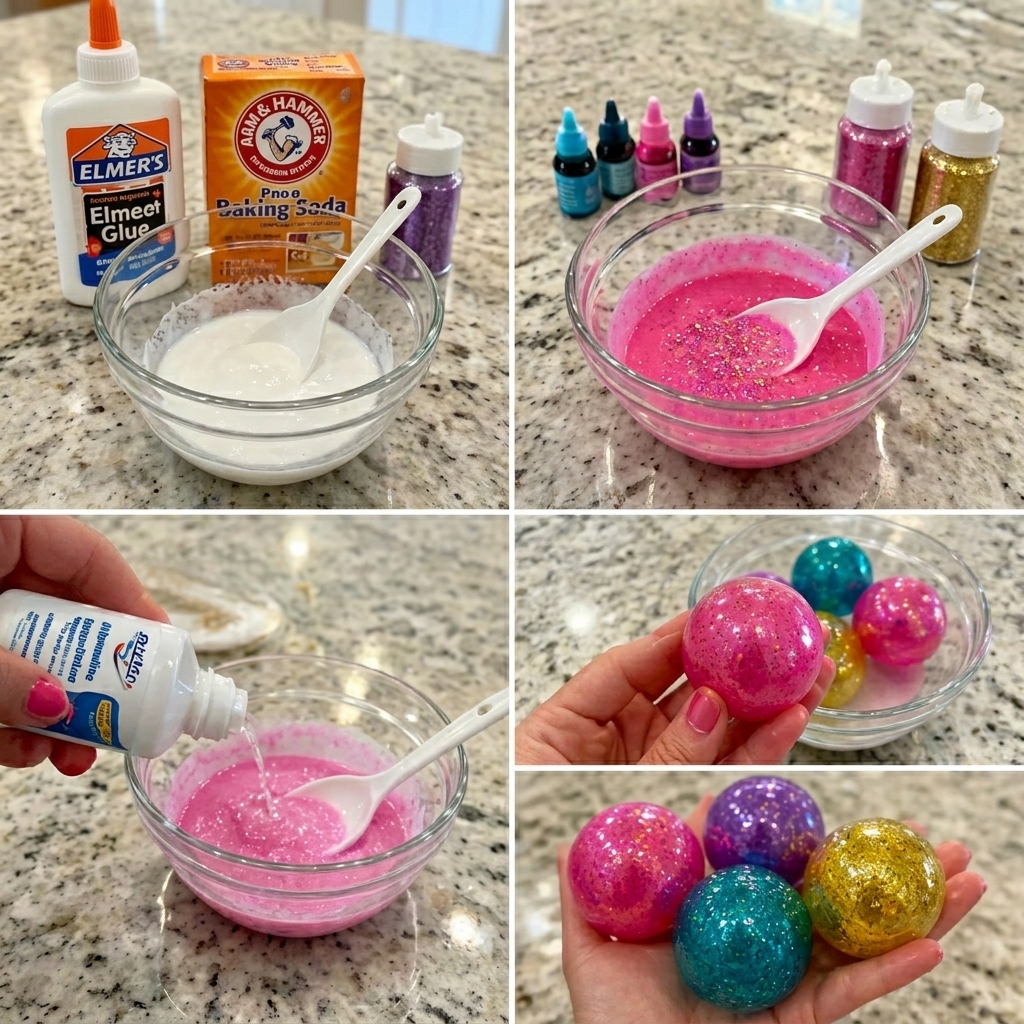
Step 1: Make the Borax Solution
Mix:
- 1 teaspoon borax
- 1/2 cup warm water
Stir until dissolved.
Step 2: Prepare the Glue Mixture
Combine:
- 2 tablespoons white glue
- 1 tablespoon cornstarch
- Glitter
- Food coloring
Mix thoroughly.
Step 3: Combine Mixtures
Add a small amount of borax solution to the glue mixture.
Stir until it begins to solidify.
Step 4: Shape the Ball
Remove the material and roll it between your hands.
Continue shaping until smooth and round.
Step 5: Let It Set
Allow the ball to rest for several minutes before testing its bounce.
Design 1: Rainbow Sparkle Ball
Bright colors make this one of the most popular bouncy glitter balls.
Materials
- Multiple food colors
- Rainbow glitter
- White glue
Instructions
- Divide glue into several small bowls.
- Color each bowl differently.
- Swirl the colors together gently.
- Add rainbow glitter.
- Complete the basic recipe.
Why It Works
The colorful patterns create a unique appearance every time.
No two rainbow balls look exactly alike.
Design 2: Galaxy Glitter Ball
This design mimics the beauty of outer space.
Materials
- Black food coloring
- Blue coloring
- Purple coloring
- Silver glitter
- Holographic glitter
Instructions
- Create a dark base color.
- Add swirls of blue and purple.
- Mix lightly to preserve the galaxy effect.
- Add silver and holographic glitter.
- Shape into a ball.
Visual Appeal
The finished result resembles a miniature universe filled with stars.

Design 3: Mermaid Shine Ball
Inspired by ocean colors and magical themes.
Materials
- Aqua coloring
- Teal coloring
- Fine iridescent glitter
Instructions
- Color glue with ocean-inspired shades.
- Add iridescent glitter.
- Mix gently.
- Follow the standard recipe.
- Roll until smooth.
Why Kids Love It
The shimmering surface resembles mermaid scales under sunlight.
Design 4: Neon Glow Ball
Bright colors make these balls stand out.
Materials
- Neon food coloring
- Bright glitter
Instructions
- Select fluorescent colors.
- Add matching glitter.
- Mix thoroughly.
- Complete the polymer reaction.
- Shape carefully.
Best Features
These vibrant balls are easy to spot and photograph beautifully.
Design 5: Gold Treasure Ball
Elegant and eye-catching, this design is perfect for older crafters.
Materials
- Gold glitter
- Yellow coloring
- Metallic glitter
Instructions
- Create a golden base color.
- Add metallic glitter.
- Mix evenly.
- Shape into a smooth sphere.
- Allow extra drying time.
Final Appearance
The ball sparkles like a miniature treasure chest filled with gold.
Tips for Better Bouncy Glitter Balls
Creating high-quality bouncy glitter balls takes practice.
Use Fine Glitter
Fine glitter distributes more evenly throughout the mixture.
Measure Carefully
Incorrect proportions can affect elasticity.
Mix Thoroughly
Uneven mixing can create weak spots.
Shape Quickly
The material becomes firmer as it cools.
Store Properly
Keep finished balls in airtight containers.
Common Problems and Solutions
Ball Won’t Bounce
Cause:
- Too much water
- Incorrect borax ratio
Solution:
- Add slightly more glue
- Follow measurements carefully
Ball Too Sticky
Cause:
- Not enough borax solution
Solution:
- Add a small amount gradually
Ball Too Hard
Cause:
- Excess borax
Solution:
- Reduce borax in future batches
Glitter Clumping
Cause:
- Large glitter pieces
Solution:
- Use finer glitter
Educational Benefits
Bouncy glitter balls are excellent STEM activities.
Chemistry Learning
Students observe chemical reactions firsthand.
Observation Skills
Children compare bounce heights and textures.
Critical Thinking
Experimenting with ingredients teaches problem-solving.
Creativity
Decorating encourages artistic expression.
Fun Experiments to Try
Once your bouncy glitter balls are complete, try these activities.
Bounce Test
Compare different designs.
Height Challenge
Measure maximum bounce heights.
Texture Comparison
Test different glitter types.
Color Mixing
Explore new combinations.
Durability Experiment
Track performance over time.
Safety Tips
Although the project is beginner-friendly, supervision is important.
Adult Assistance Recommended
Especially when working with younger children.
Avoid Eye Contact
Borax solutions should not contact eyes.
Wash Hands
Always wash thoroughly after crafting.
Keep Materials Away From Pets
Store ingredients safely.
Follow Directions Carefully
Accurate measurements produce safer and better results.
Creative Decoration Ideas
Want your bouncy glitter balls to stand out?
Seasonal Themes
- Halloween colors
- Christmas sparkle
- Spring pastels
- Summer neon
Character Themes
- Unicorn
- Dragon
- Mermaid
- Space explorer
Special Effects
- Glow-in-the-dark pigments
- Metallic glitter
- Color-changing elements
How to Store Your Bouncy Glitter Balls
Proper storage extends their lifespan.
Use Airtight Containers
Prevents drying out.
Avoid Direct Sunlight
Protects colors from fading.
Keep Away From Heat
High temperatures can affect elasticity.
Clean Before Storage
Remove dirt and dust.
With proper care, homemade bouncy glitter balls can remain enjoyable for weeks.
Why This Craft Is Perfect for Families
Parents often look for activities that combine learning and fun.
Bouncy glitter balls provide:
- Hands-on science
- Creative design opportunities
- Affordable entertainment
- Family bonding time
- Educational value
Unlike many screen-based activities, this project encourages active participation and imagination.
Conclusion
Making bouncy glitter balls is a fun and rewarding craft that blends creativity, science, and play into one exciting activity. From rainbow sparkle designs to galaxy-inspired creations, there are endless ways to customize these colorful bouncing toys.
Whether you’re crafting with children, teaching a classroom science lesson, or simply exploring a new hobby, bouncy glitter balls offer hours of entertainment and learning. Their bright colors, sparkling effects, and satisfying bounce make them a favorite among crafters of all ages.
Start with the basic recipe, experiment with the five fun designs, and discover how enjoyable homemade bouncy glitter balls can be. With a little creativity and a handful of simple supplies, you’ll soon have a collection of sparkling creations ready to bounce into action.