
Building a mini elevator using cardboard and string is one of the most exciting DIY science projects for kids and beginners. It combines creativity, engineering, and hands-on learning in a way that feels like play but teaches real-world concepts. With just simple household materials like cardboard, string, tape, and a few basic tools, children can create a working model of an elevator that moves up and down smoothly.
This type of project is especially popular in STEM education because it introduces mechanical systems in a fun and visual way. Instead of reading about pulleys or forces in a textbook, learners can actually build and test them. The result is a deeper understanding of how machines work in everyday life, such as in buildings, factories, and transportation systems.
Beyond education, building a mini elevator using cardboard and string also encourages creativity. Kids can design their elevator towers, decorate cabins, and experiment with different lifting mechanisms. Each version becomes unique, which makes the learning experience more engaging and personal.
In this article, we will explore how this project works, step-by-step building ideas, and nine creative DIY variations that can make the activity even more exciting.
Quick Summary Table
| Feature | Details |
| Project Name | Building a mini elevator using cardboard and string |
| Difficulty Level | Easy to Medium |
| Age Group | 6–14 Years |
| Time Required | 45–90 Minutes |
| Materials Needed | Cardboard, string, glue, scissors, straw, tape |
| STEM Focus | Engineering, Physics, Design |
| Key Concept | Pulley system and mechanical motion |
| Learning Outcome | Problem-solving and creativity |
| Cost | Very Low |
| Fun Factor | Very High |
What Is a Cardboard Elevator Project?
A cardboard elevator is a simple mechanical model that simulates how real elevators move inside buildings. It typically uses a pulley system made from string and cardboard supports. When the string is pulled, the elevator cabin moves up or down along a guided track.
This project is not just about crafting—it is about understanding motion, force, and balance. Learners see how pulling one side of a string affects movement on the other side, demonstrating basic physics principles in action.
Why Kids Love Building a Mini Elevator Using Cardboard and String
Children are naturally fascinated by moving objects. Elevators are especially interesting because they are part of everyday life but often feel mysterious in how they work.
Here are some reasons kids enjoy this project:
- It moves in real time
- It feels like a real machine
- It allows hands-on construction
- It includes decorating and creativity
- It encourages experimentation
Most importantly, children feel like engineers when they complete the project.
Materials Needed

To start building a mini elevator using cardboard and string, gather these simple materials:
- Cardboard sheets or boxes
- Strong string or yarn
- Scissors
- Glue or hot glue (adult supervision recommended)
- Tape
- Straw or pencil (for pulley shaft)
- Small box or paper cup (elevator cabin)
- Ruler and pencil
These materials are easy to find and inexpensive, making the project accessible for classrooms and home activities.
How the Elevator System Works
The elevator model uses a basic pulley system.
When the string is pulled, it rotates or slides over a support point, causing the elevator cabin to move up or down. The key idea is converting pulling force into vertical motion.
This introduces learners to concepts like:
- Tension
- Gravity
- Force balance
- Mechanical advantage
Even though the system is simple, it demonstrates the same principles used in real elevators.
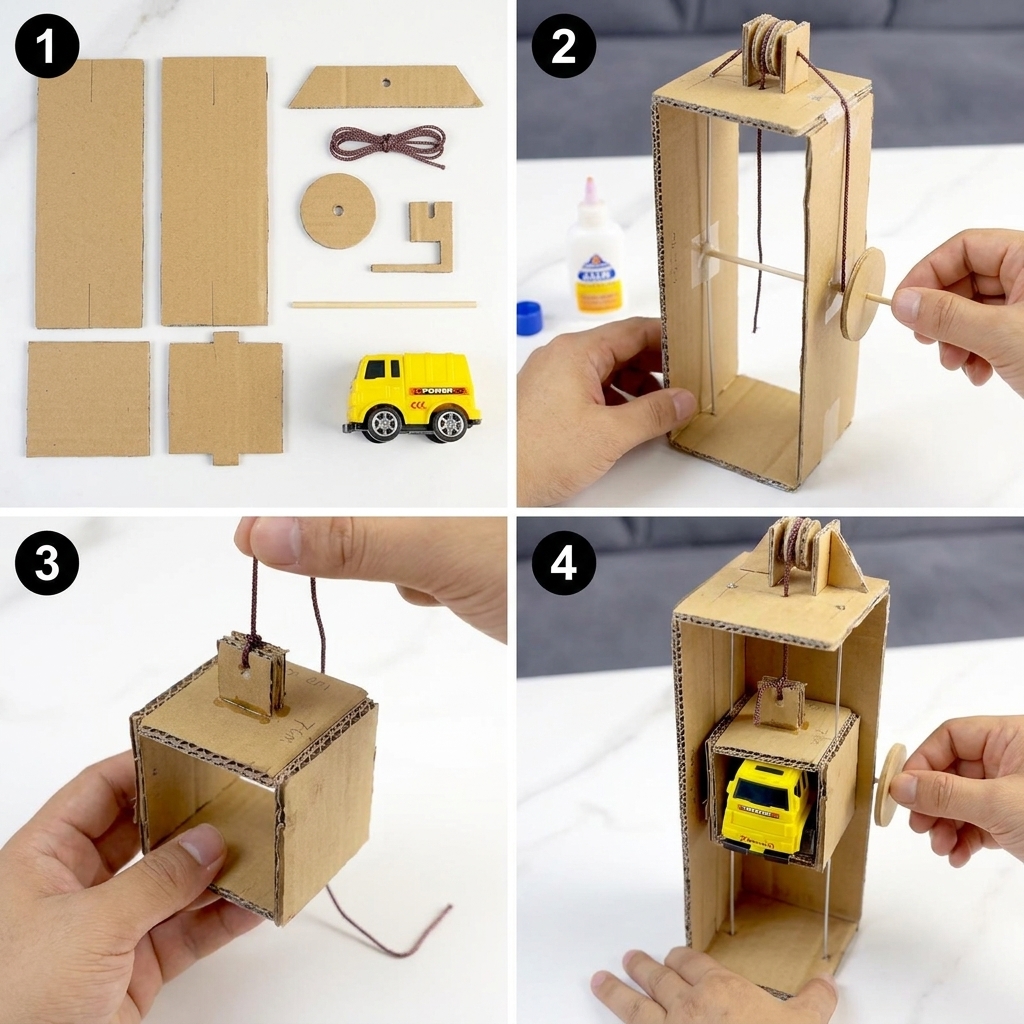
Step-by-Step Basic Build
Step 1: Build the Frame
Create a tall rectangular frame using cardboard. This will support the elevator movement.
Step 2: Make the Elevator Cabin
Use a small box or paper cup as the cabin where passengers (toys or paper figures) will sit.
Step 3: Attach the String
Tie string securely to the cabin and thread it through the top of the frame.
Step 4: Create the Pulley System
Use a straw or pencil at the top to guide the string smoothly.
Step 5: Test Movement
Pull the string gently to move the elevator up and down.
Step 6: Stabilize the Structure
Make sure everything is balanced to avoid tilting.
Step 7: Decorate
Add colors, windows, and signs to make it look like a real building.
9 Cool DIY Ideas for Building a Mini Elevator Using Cardboard and String
Now let’s explore creative variations to make the project even more exciting.
1. Glass Tower Elevator Design
Create a transparent-style elevator shaft using clear plastic wrap over cardboard windows. Kids can see the elevator moving inside like a real skyscraper.
2. Multi-Floor Elevator System
Build a tall structure with multiple stops. Add labels for each floor and test stopping points.
3. Toy Passenger Elevator
Use small toys or LEGO figures as passengers. This makes the project more playful and interactive.
4. Double String Pulley Elevator
Use two strings for more stability and smoother movement. This improves balance and control.
5. Colored LED Elevator
Add small battery-powered LED lights inside the cabin for a glowing elevator effect.
6. Spiral Movement Elevator
Design the string path in a spiral pattern to simulate advanced movement mechanics.
7. Cargo Lift Elevator
Build a strong elevator designed to carry small objects like coins or blocks.
8. Emergency Stop Elevator
Add a simple clip or stopper mechanism that allows the elevator to pause at different levels.
9. Smart Label Learning Elevator
Turn each floor into a learning station (math, science, reading). Kids “travel” between learning zones using the elevator.
Educational Benefits
Building a mini elevator using cardboard and string is more than just a craft—it is a learning experience.
STEM Learning
Children explore science, technology, engineering, and math in one activity.
Problem-Solving Skills
Kids adjust designs when things don’t work properly.
Creativity
Every elevator design is unique and personalized.
Motor Skills
Cutting, tying, and assembling improves coordination.
Logical Thinking
Children understand cause and effect through movement.
Common Mistakes to Avoid
- Using weak cardboard that bends easily
- Loose string connections
- Poor pulley alignment
- Overloading the cabin
- Skipping testing steps
Avoiding these mistakes improves performance and durability.
Tips for Better Results
- Use strong, straight cardboard
- Keep string tight but smooth
- Test movement frequently
- Balance the cabin weight
- Decorate after testing
- Work step-by-step slowly
Real-World Connection
This project helps children understand how real elevators work in buildings. In real life, elevators use motors, steel cables, and counterweights instead of string and cardboard. However, the basic principle of controlled vertical movement remains the same.
Conclusion
Building a mini elevator using cardboard and string is a powerful educational DIY project that combines fun, creativity, and science. It allows children to explore engineering concepts in a hands-on way while enjoying the process of building something interactive.
With nine creative DIY variations, the project can be adapted for different ages and learning goals. Whether used at home or in classrooms, this activity encourages curiosity, innovation, and problem-solving skills.
Most importantly, it transforms simple materials into a meaningful learning experience that children will remember long after the project is complete.