
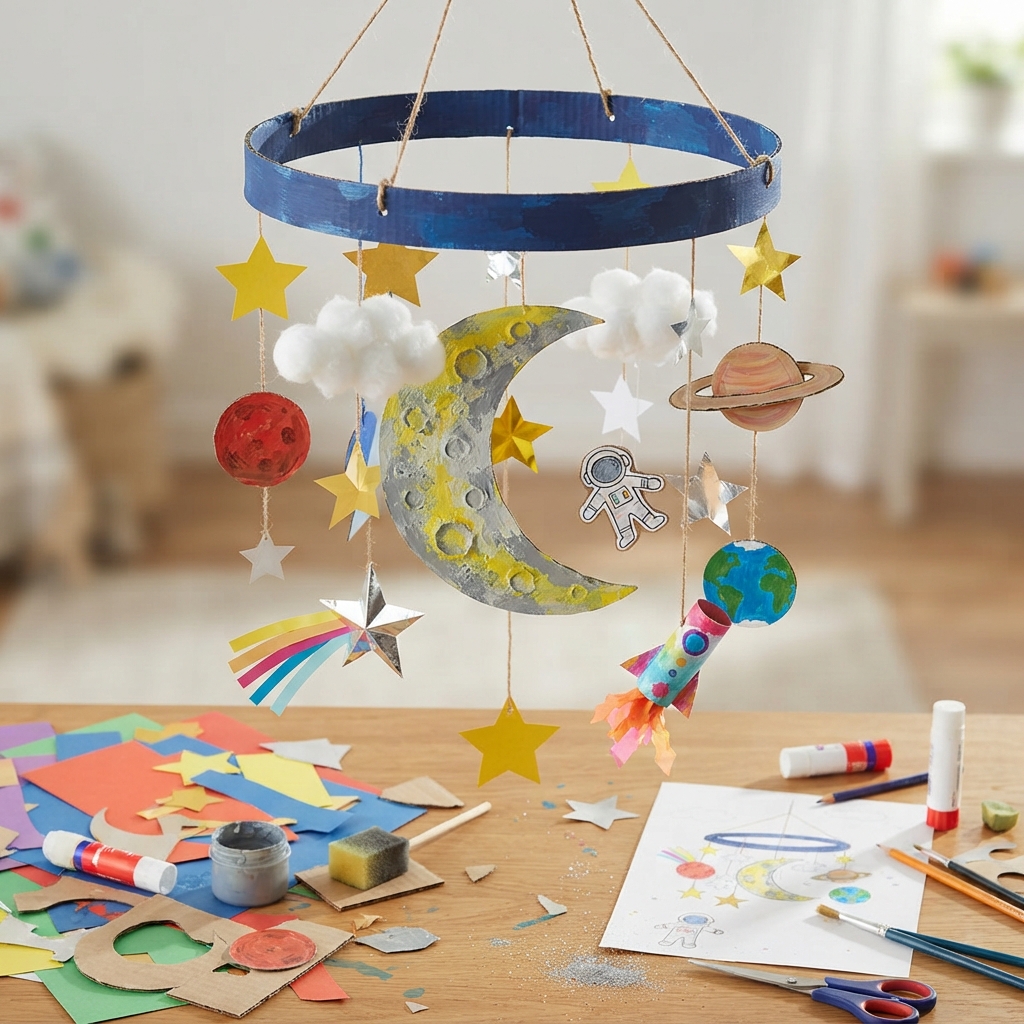
Making a moon and stars model is a fun, creative, and educational craft project for children. With simple materials such as cardboard, paper, cotton, paint, glue, and string, children can create their own miniature night sky. This project is perfect for classrooms, bedrooms, science lessons, school projects, rainy afternoons, or creative activities at home.
The moon and stars have fascinated people for thousands of years. Children often enjoy looking at the night sky and wondering about the planets, stars, astronauts, and distant galaxies. Creating a handmade model gives them a chance to explore these ideas through art and imagination.
A moon and stars model can be very simple or highly detailed. Younger children can make a basic moon surrounded by paper stars, while older children can create a three-dimensional space scene with hanging stars, planets, clouds, and even a small astronaut. The finished model can be displayed on a wall, placed on a shelf, or hung from the ceiling.
Why Make a Moon and Stars Model?
A moon and stars craft is more than a decorative activity. It gives children an opportunity to develop creativity while learning about space.
Cutting, drawing, painting, folding, and gluing help children practice fine motor skills. Choosing colors and arranging the decorations encourages creativity and decision-making.
The activity can also introduce basic astronomy concepts. Children can learn that the Moon is Earth’s natural satellite and that stars are enormous objects in space that produce their own light.
The craft is also inexpensive. Many of the materials can be recycled from cardboard boxes, old paper, and packaging.
Materials You Will Need
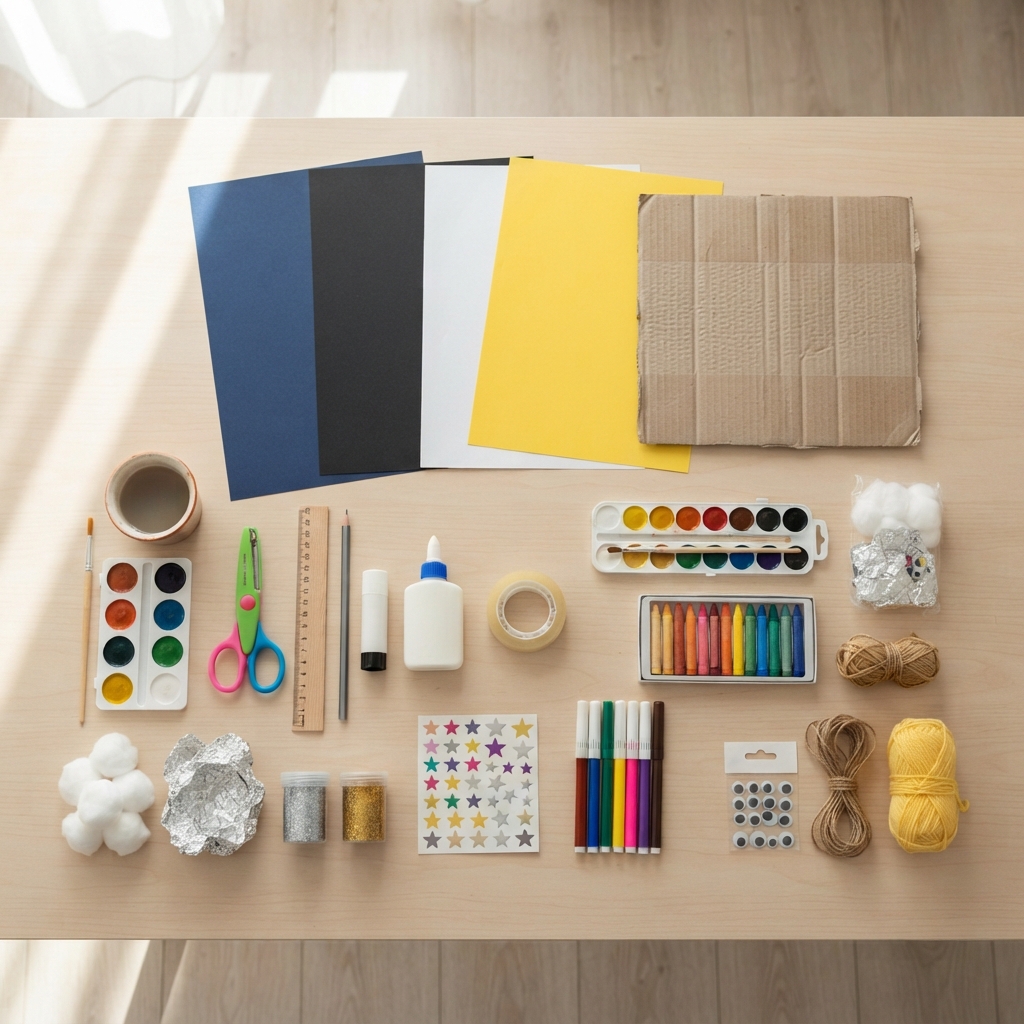
You can make a beautiful moon and stars model with materials that are easy to find.
You may need:
- Cardboard
- White paper
- Yellow or gold paper
- Dark blue or black paper
- Cotton balls
- Pencil
- Ruler
- Child-safe scissors
- Glue
- Tape
- Paint
- Paintbrushes
- Markers or crayons
- String or yarn
- Aluminum foil
- Optional glitter
- Optional stickers
- Optional googly eyes
For a more environmentally friendly project, use recycled cardboard from cereal boxes or shipping packages.
Younger children should always have adult supervision when using scissors, glue, or other craft supplies.
Step 1: Plan Your Night Sky
Before making the model, decide what you want your finished scene to look like.
Will the Moon be large or small? Will you have five stars or twenty? Will the stars hang from strings, or will they be attached to a cardboard background?
Children can draw a quick plan on paper before beginning.
A simple model might contain one large Moon and several stars.
A larger project could include:
- A crescent Moon
- A full Moon
- Stars
- Clouds
- Planets
- Shooting stars
- A rocket
- An astronaut
- A space station
Planning the design helps children think about how the different pieces will fit together.
Step 2: Make the Moon
The Moon can be created from cardboard, paper, or a lightweight paper plate.
For a simple full Moon, place a round object such as a cup or plate on cardboard and trace around it.
Cut out the circle carefully.
Paint the circle gray, white, cream, or pale yellow.
A cartoon-style Moon can also be painted yellow and given a friendly face.
Allow the paint to dry before adding details.
Step 3: Add Moon Craters
One of the most recognizable features of the Moon is its craters.
You can create simple craters using darker gray paint.
Dip a small sponge into the paint and gently press it onto the Moon.
Make circles of different sizes.
You can also draw craters using a pencil or marker.
For a more three-dimensional effect, glue small pieces of crumpled paper onto the Moon before painting it.
Cover them with gray paint to create raised crater shapes.
Children can experiment with large and small craters to make the Moon look more interesting.
Step 4: Make a Crescent Moon
Instead of making a full Moon, children can create a crescent Moon.
Draw two overlapping circles on cardboard.
Cut around the outside and then remove the inner section to leave a curved crescent shape.
Paint it yellow, silver, white, or pale gray.
A crescent Moon can look especially beautiful when surrounded by stars.
Children can also make several Moon phases and arrange them in order.
Step 5: Create Paper Stars
Stars are easy to make from colored paper or cardboard.
Draw star shapes on yellow, white, silver, or gold paper.
Cut them out carefully.
Make stars in several different sizes.
Large stars can be placed near the Moon, while smaller stars can fill the background.
Children can decorate the stars with dots, lines, glitter, or markers.
For a shiny effect, cover some stars with aluminum foil.
Step 6: Make Three-Dimensional Stars
To make the stars look three-dimensional, cut two identical star shapes.
Fold each star gently down the middle.
Glue the two shapes together along one side.
When opened slightly, the star will have a raised shape.
Another method is to fold the points of a star slightly upward.
These simple techniques can make a flat paper model look much more interesting.
Step 7: Add Hanging Stars
A hanging model is a wonderful way to create a three-dimensional night sky.
Cut several pieces of string or yarn.
Attach one end of each piece to a star.
Attach the other end to the top of a cardboard frame, paper plate, or another support.
Use different lengths of string so that the stars hang at different heights.
Some stars can be close to the Moon while others can hang lower.
This creates the appearance of stars floating in space.
Step 8: Create a Cardboard Space Background
For a larger model, use a piece of cardboard as the background.
Paint it dark blue, navy, or black.
Allow it to dry completely.
Then add stars, planets, clouds, and the Moon.
White paint can be used to create tiny stars.
A toothbrush can also be used to make small dots of paint, creating the appearance of a star-filled sky. Make sure this technique is supervised and used in a suitable craft area.
Step 9: Add Clouds
Clouds can make the night-sky model look softer and more imaginative.
Use cotton balls to create fluffy clouds.
Pull the cotton apart gently and glue small pieces onto the background.
You can create clouds around the Moon or place them along the bottom of the model.
For a nighttime effect, use a small amount of gray or blue paint on the cotton.
Step 10: Add Shooting Stars
Shooting stars can make the model look exciting.
Cut a star from yellow or white paper.
Then cut several thin strips of paper to create its glowing trail.
Glue the strips behind the star.
Use different lengths to make the trail look like it is moving across the sky.
Children can also create several shooting stars traveling in different directions.
Step 11: Add Planets
A moon and stars model can easily become a miniature solar system.
Use colored paper or cardboard circles to create planets.
Make each planet a different size and color.
For example, you can create a red planet, a blue planet, a yellow planet, and a planet with rings.
Children can decorate the planets with stripes, spots, or swirling patterns.
This provides a fun introduction to the idea that planets are different from stars and have different characteristics.
Step 12: Create Saturn’s Rings
A planet with rings can be especially fun to make.
Cut a circle from cardboard for the planet.
Then cut a larger oval shape from paper or cardboard to create the ring.
Place the ring behind the planet.
Paint the planet and ring in different colors.
Attach the finished planet to the space background.
Children can learn that Saturn is famous for its beautiful ring system.
Step 13: Add an Astronaut
An astronaut can make the model feel like a real space adventure.
Draw a small astronaut on white paper or cardboard.
Cut it out and decorate the suit.
Add a helmet, boots, gloves, and a small backpack.
Attach the astronaut to the background or hang it from a string.
Children can imagine that the astronaut is exploring the Moon or traveling between the stars.
Step 14: Make a Small Rocket
A small cardboard rocket can be added to the model.
Use a cardboard tube or rolled paper for the body.
Add a pointed paper nose, small fins, windows, and tissue-paper flames.
Paint the rocket silver, white, blue, or any other color.
Place it near the Moon or among the stars.
This can connect the craft to lessons about space exploration.
Making a Moon Phases Model
An educational version of this craft can show the different phases of the Moon.
Children can make several circles representing:
- New Moon
- Crescent Moon
- First Quarter
- Gibbous Moon
- Full Moon
- Waning Gibbous
- Last Quarter
- Waning Crescent
Arrange the Moon shapes in a line or circle.
This gives children a visual way to understand how the Moon appears to change shape during its cycle.
Educational Benefits
Making a moon and stars model provides many learning opportunities.
Children develop artistic skills by drawing, painting, cutting, and decorating.
They practice fine motor skills when handling scissors, glue, paper, and string.
The project also encourages concentration and patience.
From a science perspective, children can learn about the Moon, stars, planets, space exploration, and the solar system.
Teachers can use the craft as part of a larger astronomy lesson. Parents can ask simple questions while children work.
For example:
“Why does the Moon appear to change shape?”
“What is a star?”
“Which planet has rings?”
“What do astronauts wear?”
These questions can turn a simple craft into an engaging learning experience.
Using Recycled Materials
This project is perfect for recycling.
Old cereal boxes can become moons, stars, and planets. Packaging cardboard can become the background. Empty paper tubes can become rockets.
Instead of buying every material, encourage children to look around the house for safe items that can be reused.
This teaches children that creative projects do not always require expensive supplies.
Recycling also introduces the idea of reducing waste and making better use of everyday materials.
Create a Hanging Space Mobile
A moon and stars model can also be turned into a beautiful hanging mobile.
Use a cardboard circle, paper plate, or wooden craft frame as the top.
Attach the Moon, stars, planets, and clouds using different lengths of string.
Make sure the objects are balanced so the mobile hangs properly.
A hanging space mobile can be displayed in a child’s room or classroom.
It should be securely attached and placed where young children cannot pull it down.
Turn the Craft Into a Story
After completing the model, encourage children to create a story about their space scene.
They might imagine an astronaut traveling to the Moon.
Perhaps the astronaut discovers a new planet surrounded by colorful stars.
Children can draw their characters and write a short story about the adventure.
This combines arts and crafts with language development and storytelling.
Safety Tips
Safety is important when children are working with craft materials.
Always use child-safe scissors and non-toxic glue and paint.
Adults should assist younger children with cutting cardboard.
Be careful when using string or yarn, especially around very young children.
Small items such as beads and tiny decorations should not be used with children who may put them in their mouths.
If glitter is used, work over a protected surface and avoid getting it near the eyes.
Make sure hanging models are securely attached and placed safely.
Creative Variations
There are many ways to customize a moon and stars model.
Children can make:
- A glowing Moon
- A colorful galaxy
- A solar-system model
- A space adventure scene
- An astronaut on the Moon
- A rocket flying past the stars
- A night sky with clouds
- A fantasy planet
- A galaxy with shooting stars
- A Moon and stars bedroom decoration
Glow-in-the-dark stars can also be used if appropriate, creating an exciting nighttime display.
Conclusion
Making a moon and stars model is a wonderful craft activity that combines creativity, science, recycling, and imagination. With cardboard, paper, paint, cotton, string, and glue, children can transform simple materials into a beautiful miniature night sky.
The project can be adapted for different ages and skill levels. Younger children can make simple paper stars and a painted Moon, while older children can create detailed Moon craters, different Moon phases, planets, astronauts, rockets, and three-dimensional decorations.
The finished model can become a classroom display, school science project, bedroom decoration, or imaginative play scene. It can also inspire children to learn more about astronomy and the fascinating universe beyond Earth.
Most importantly, the activity gives children the freedom to create their own version of space. They can choose the colors, shapes, characters, and decorations they like. With a little cardboard, some paper, and plenty of imagination, an ordinary craft table can become the starting point for an exciting journey among the Moon and stars. 🌙⭐
