Making a maze game out of cardboard is one of the most enjoyable DIY activities for children and families. It combines creativity, problem-solving, and hands-on learning in a simple project that requires only a few inexpensive materials. Whether you are looking for a rainy-day activity, a classroom project, or a fun weekend craft, making a maze game out of cardboard can provide hours of entertainment.
Unlike many modern toys that rely on batteries or screens, a cardboard maze game encourages children to think critically and develop fine motor skills. Players guide a small ball through a series of pathways, avoiding dead ends and obstacles until they reach the finish line. The project is easy to customize, allowing kids to create unique designs and challenges.
This guide explains how making a maze game out of cardboard works in seven easy steps. By following these instructions, anyone can create a durable and exciting maze game at home.
Quick Summary Table
| Step | Activity | Purpose |
| 1 | Gather Materials | Prepare everything needed |
| 2 | Design the Maze | Plan pathways and obstacles |
| 3 | Cut the Cardboard Base | Create the game foundation |
| 4 | Build Maze Walls | Form pathways for the ball |
| 5 | Add Obstacles | Increase challenge and fun |
| 6 | Decorate the Maze | Make the game visually appealing |
| 7 | Test and Play | Ensure smooth gameplay |
Why Making a Maze Game Out of Cardboard Is Popular
Many parents and teachers appreciate activities that combine fun with learning. Making a maze game out of cardboard does exactly that. Children learn how to plan, measure, and solve problems while expressing their creativity.
Some benefits include:
- Improves hand-eye coordination
- Encourages logical thinking
- Supports creativity and design skills
- Provides screen-free entertainment
- Uses recycled materials
- Suitable for different age groups
Because cardboard is easy to find and inexpensive, this project is also environmentally friendly. Old shipping boxes, cereal boxes, and packaging materials can be transformed into an exciting game.
Materials Needed
Before starting, gather the following materials:
- Cardboard sheets
- Pencil
- Ruler
- Scissors or craft knife
- Glue or hot glue gun
- Small marble or ball
- Colored markers
- Paint (optional)
- Decorative stickers (optional)
Having all materials ready before beginning makes the project smoother and more enjoyable.
Step 1: Gather Your Materials
The first step in making a maze game out of cardboard is collecting the necessary supplies. Choose sturdy cardboard that can support the maze walls and withstand repeated play.
A larger piece of cardboard works best for the base because it provides enough room for creative pathways. If possible, use recycled cardboard to make the project more eco-friendly.
Once all materials are organized, you can begin planning your maze.
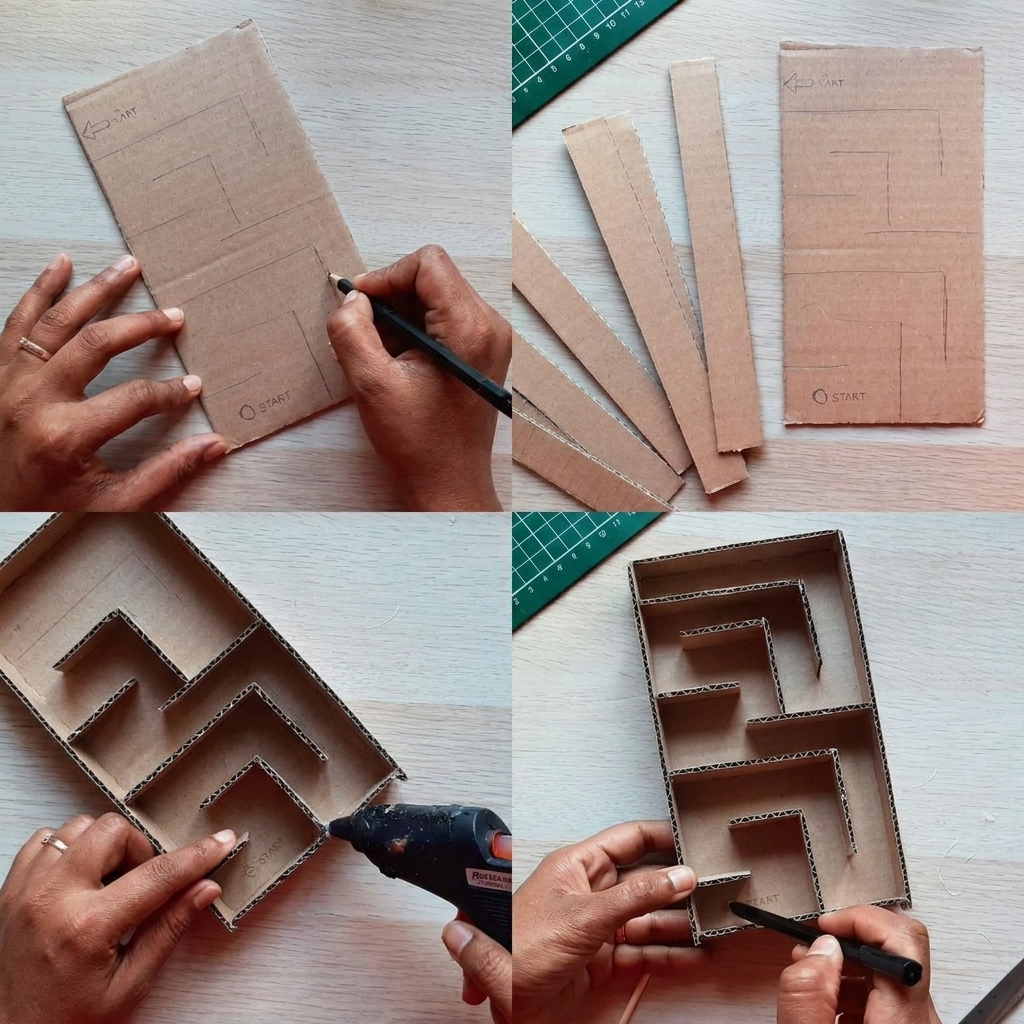
Step 2: Design the Maze Layout
Designing the maze is one of the most exciting parts of the project. Use a pencil and ruler to sketch pathways directly onto the cardboard.
Think carefully about:
- Starting point
- Ending point
- Dead ends
- Turns and corners
- Challenge level
Younger children may enjoy simple mazes with wide paths, while older kids can create more complex designs featuring multiple obstacles and confusing routes.
A well-planned maze makes the game both challenging and enjoyable.
Tips for Better Maze Design
- Avoid extremely narrow paths.
- Include several turns.
- Balance difficulty and playability.
- Test the route mentally before building.
Good planning saves time later and helps create a more successful game.
Step 3: Cut the Cardboard Base
After drawing the maze layout, cut the cardboard to the desired size.
Common dimensions include:
- Small maze: 20 x 20 cm
- Medium maze: 30 x 30 cm
- Large maze: 40 x 40 cm
The size depends on the available materials and the complexity of the maze.
If children are helping, an adult should handle any cutting tools that require extra care.
The base serves as the foundation of the entire project, so make sure it remains flat and sturdy.
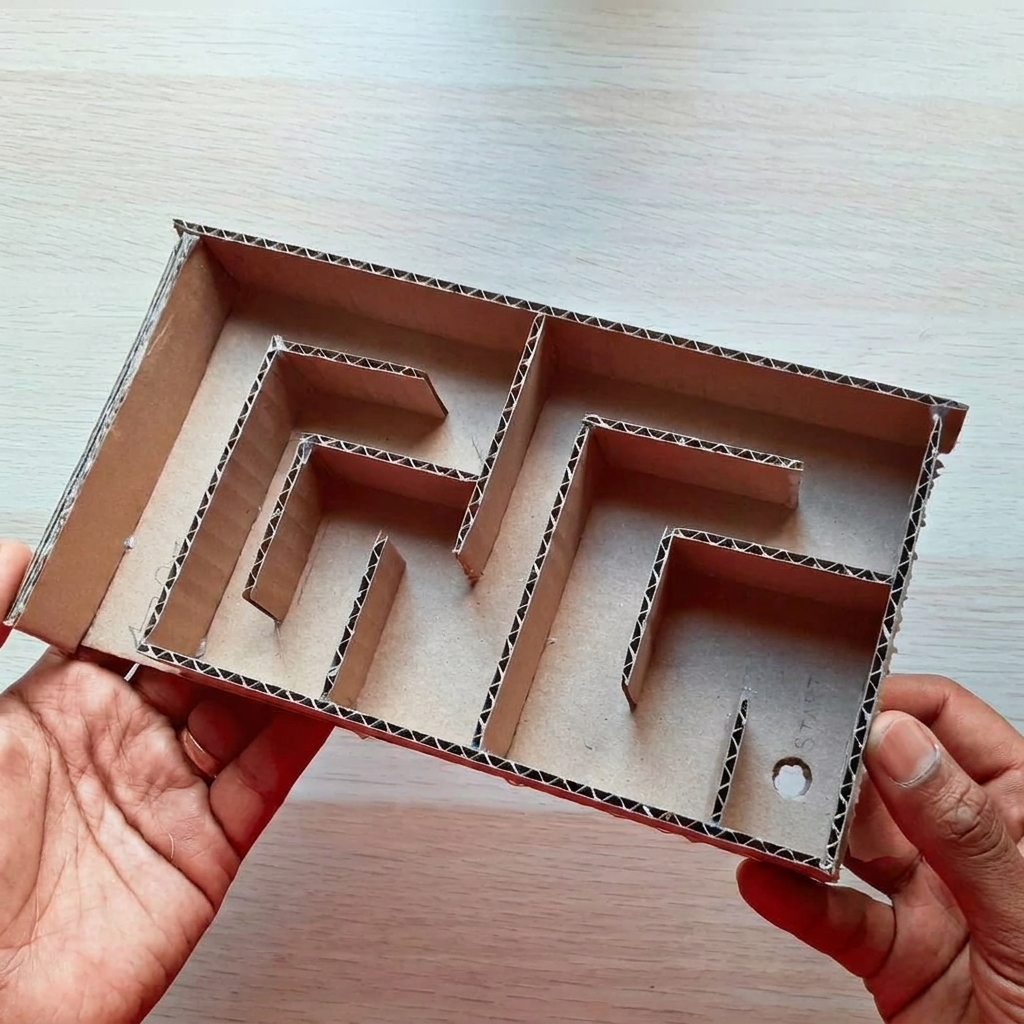
Step 4: Build the Maze Walls
Now it is time to transform the drawing into a real maze.
Cut narrow strips of cardboard to create walls. These strips should be approximately 2 to 4 centimeters high.
Carefully glue the strips along the lines you drew earlier.
As you work:
- Keep walls straight
- Allow glue to dry completely
- Leave enough room for the marble to roll
- Check that pathways remain open
This stage brings the maze to life and allows players to visualize the final game.
Why Maze Walls Matter
The walls determine the challenge level of the maze. Well-placed walls create interesting routes and force players to make strategic movements.
Strong walls also improve durability and ensure the game lasts longer.
Step 5: Add Obstacles and Challenges
To make the maze more exciting, add obstacles along the pathways.
Popular obstacle ideas include:
Bridges
Create small bridges that the marble must cross.
Tunnels
Add cardboard tunnels that partially hide the ball.
Ramps
Use folded cardboard to create gentle slopes.
Trap Areas
Design sections where players can easily get stuck.
Moving Barriers
Attach small cardboard pieces that can rotate and block paths.
These additions increase difficulty and make gameplay more engaging.
Children often enjoy experimenting with different obstacle designs and discovering creative ways to challenge friends and family.
Step 6: Decorate the Maze
Decoration transforms a simple cardboard project into a colorful and personalized game.
Use markers, paint, stickers, or colored paper to enhance the appearance.
Popular themes include:
- Space adventure
- Jungle exploration
- Pirate treasure hunt
- Race track
- Fantasy castle
- Underwater world
For example, a pirate-themed maze might include treasure chests, ships, and ocean waves.
Decorating also gives children an opportunity to express creativity and develop artistic skills.
Educational Opportunities
Teachers can connect maze decorations to classroom lessons.
Examples include:
- Geography-themed mazes
- Science-themed mazes
- Historical adventure mazes
- Alphabet learning mazes
Combining art and education makes the activity even more valuable.
Step 7: Test and Play
The final step in making a maze game out of cardboard is testing the completed maze.
Place a marble at the starting point and attempt to guide it to the finish line.
During testing, look for:
- Blocked pathways
- Weak walls
- Excess glue
- Areas that are too easy
- Areas that are too difficult
Make adjustments as needed.
Testing helps ensure the game is balanced and enjoyable.
Once everything works properly, invite friends or family members to try the maze and compare completion times.
Creative Variations
After mastering the basic project, consider trying advanced versions.
Multi-Level Maze
Build additional layers above the main maze using cardboard supports.
Magnetic Maze
Move a metal ball using a magnet beneath the board.
Tilting Maze
Attach the maze to a movable platform that tilts in different directions.
Puzzle Maze
Add questions or challenges that must be solved before continuing.
Team Maze
Create a giant maze that multiple players can navigate together.
These variations keep the activity fresh and encourage continued creativity.
Educational Benefits for Children
Making a maze game out of cardboard offers much more than entertainment.
Problem-Solving Skills
Children learn how to plan routes and identify solutions.
Fine Motor Development
Guiding a marble through the maze strengthens hand control.
Critical Thinking
Players evaluate pathways and make decisions.
Creativity
Designing layouts and decorations encourages imagination.
Patience
Building and testing the maze teaches perseverance.
These skills can support learning in school and everyday life.
Environmental Benefits
One of the best aspects of making a maze game out of cardboard is sustainability.
Instead of throwing away packaging materials, families can reuse them creatively.
Benefits include:
- Reducing waste
- Encouraging recycling
- Teaching environmental responsibility
- Saving money
Children gain a better understanding of how everyday materials can be transformed into useful projects.
Common Mistakes to Avoid
Beginners often encounter a few challenges.
Walls Too Close Together
The marble may become stuck.
Weak Glue
Walls can detach during gameplay.
Overly Complex Design
An impossible maze may frustrate players.
Skipping Testing
Undetected problems can reduce enjoyment.
Thin Cardboard
Weak materials may bend or break.
Avoiding these mistakes increases the chances of creating a successful game.
Making the Activity More Fun
Try these ideas to add excitement:
- Hold family maze competitions
- Time each player’s performance
- Create multiple difficulty levels
- Award prizes for completion
- Let children exchange maze designs
These activities encourage social interaction and friendly competition.
Conclusion
Making a maze game out of cardboard is an affordable, creative, and educational project that children and adults can enjoy together. With only a few simple materials, anyone can build a unique game that develops problem-solving skills, creativity, and hand-eye coordination.
By following the seven easy steps—gathering materials, designing the maze, cutting the base, building walls, adding obstacles, decorating, and testing—you can create a fun and reusable activity that provides hours of entertainment.
Whether used at home, in classrooms, or during family craft sessions, making a maze game out of cardboard remains one of the best DIY projects for combining learning and fun. Start building your own maze today and discover just how rewarding this simple cardboard craft can be.