
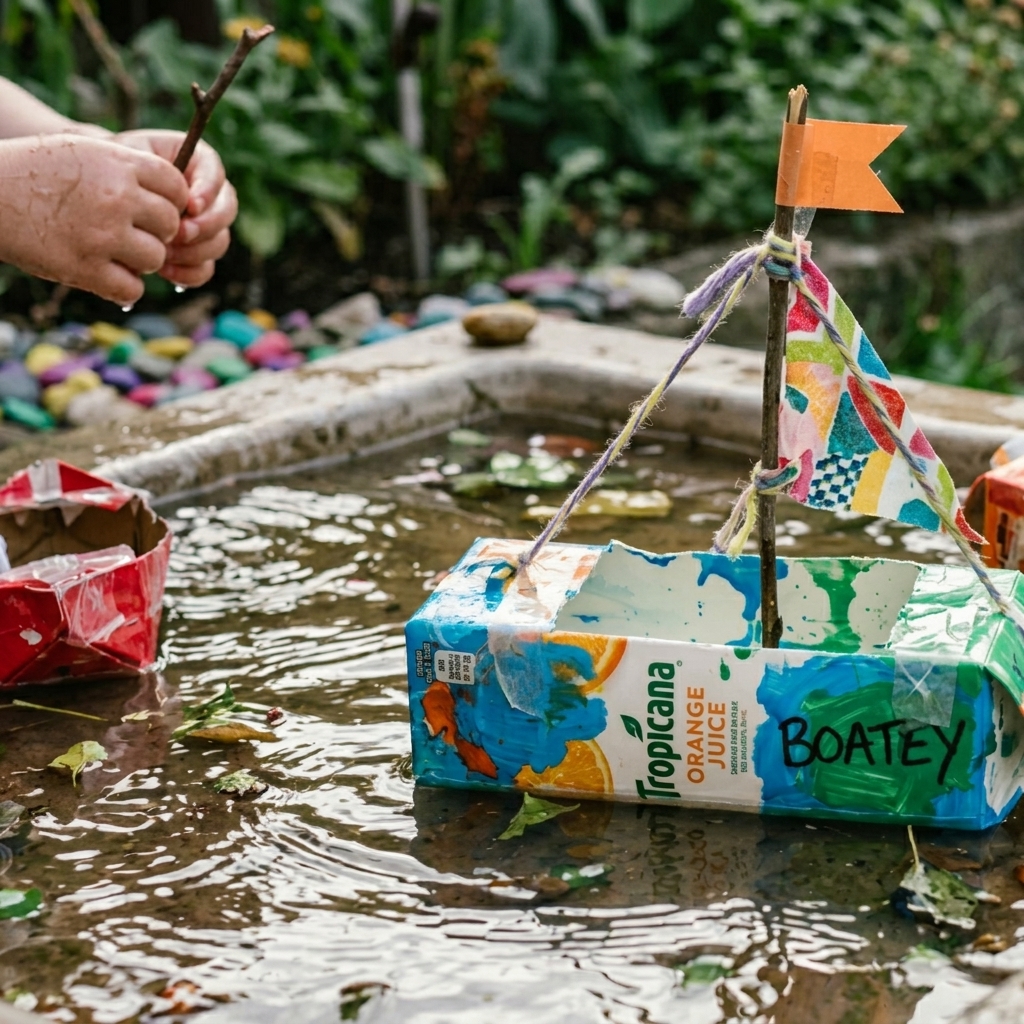
School projects provide students with exciting opportunities to transform classroom knowledge into real-life experiences. Instead of only reading about scientific concepts, students can design, build, test, and improve creative inventions using simple materials. One of the most enjoyable STEM (Science, Technology, Engineering, and Mathematics) activities is building an unsinkable boat using household materials. This hands-on project introduces important scientific principles such as buoyancy, density, balance, stability, and engineering design while encouraging creativity and teamwork.
Boats have played an important role throughout human history. They have been used for transportation, fishing, trade, exploration, and rescue missions for thousands of years. Whether crossing rivers, sailing across oceans, or carrying heavy cargo, every boat relies on the same basic scientific principles to remain afloat. Understanding these principles helps students appreciate how engineers design vessels that safely transport people and goods across water.
The challenge of building an unsinkable boat encourages students to think like engineers. Rather than purchasing a ready-made model, they create their own design using recycled and inexpensive household materials. Throughout the project, they observe how different shapes, sizes, and materials affect the boat’s ability to float and carry weight.
Because there is no single correct solution, every student can create a unique design. Some may build wide flat-bottom boats, while others may design catamarans, barges, or small rescue boats. Each version provides valuable learning experiences through testing and improvement.
This project also teaches environmental responsibility by encouraging the use of recycled materials. Empty plastic bottles, cardboard, foam trays, plastic containers, corks, wooden sticks, and aluminum foil can all become useful building materials instead of waste. Students learn that creativity and scientific thinking are often more valuable than expensive supplies.
The following sections explain how to plan, construct, test, and improve a simple unsinkable boat while exploring the science that makes floating possible.
Project Objectives
The primary objective of this project is to design and build a boat that floats successfully while carrying the greatest possible load without sinking. Students also learn to follow the engineering design process, which includes identifying a problem, planning a solution, constructing a prototype, testing its performance, evaluating the results, and making improvements.
Beyond scientific knowledge, the project strengthens communication, creativity, patience, teamwork, and critical thinking. Students learn that successful engineering depends on careful observation and continuous improvement rather than perfection on the first attempt.
Choosing Household Materials
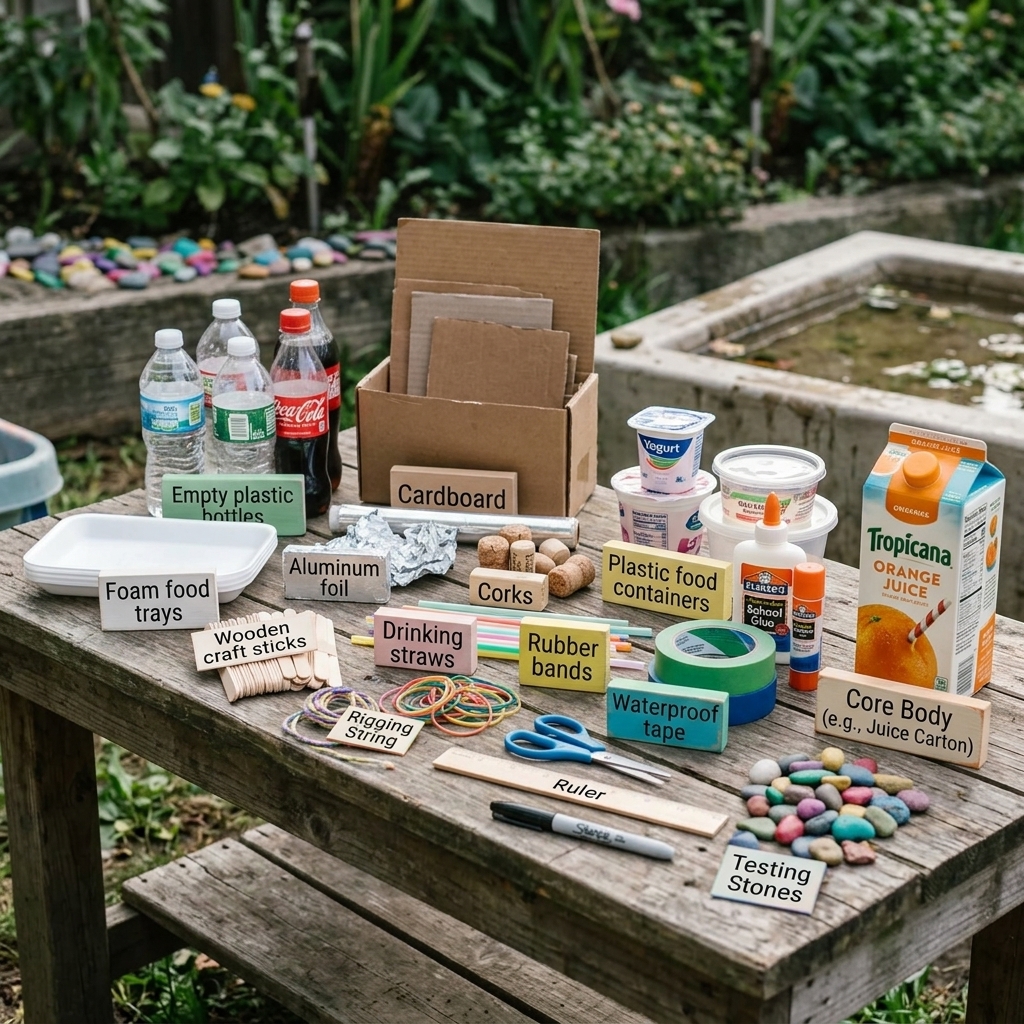
One of the greatest advantages of this project is that nearly all of the required materials can be found at home.
Useful materials include:
- Empty plastic bottles
- Cardboard
- Aluminum foil
- Wooden craft sticks
- Foam food trays
- Corks
- Plastic food containers
- Drinking straws
- Rubber bands
- Glue
- Waterproof tape
- Scissors
- Ruler
- Marker
- Coins or small stones for testing
Using recycled materials reduces costs while teaching students the importance of protecting the environment.
Planning the Boat Design
Before building begins, students should draw a simple sketch of their boat. The drawing should show the overall shape, the position of the floating materials, and the location where test weights will be placed.
Several important questions help guide the planning process:
- Which materials float best?
- How wide should the boat be?
- How can the weight be distributed evenly?
- Which design will remain stable on water?
Planning allows students to identify possible problems before construction begins.
Understanding Buoyancy
The success of the project depends on understanding buoyancy. When an object is placed in water, the water pushes upward against it. This upward force is called buoyancy.
If the buoyant force is greater than the weight of the object, the object floats. If the object weighs more than the upward force provided by the displaced water, it sinks.
Students quickly discover that shape is just as important as weight. A flat, wide boat often floats better than a narrow one because it displaces more water.
Building the Base
The base forms the foundation of the boat. A strong base provides stability and supports the entire structure.
Cardboard covered with waterproof tape can serve as a lightweight platform. Foam trays or several empty plastic bottles attached beneath the base increase buoyancy.
Students should ensure that every part is firmly connected before continuing.
Creating the Floating Structure
Plastic bottles are excellent flotation devices because they trap air inside them. Air is much less dense than water, helping the boat remain afloat.
Students may arrange bottles side by side to form a raft or place them underneath a cardboard platform. Another option is to build two separate floating sections connected together to create a catamaran.
Each design has advantages and disadvantages that become clear during testing.
Constructing the Boat
Once the floating structure is ready, students can begin assembling the rest of the boat. The platform should be attached securely to the flotation devices using waterproof tape, glue, or rubber bands. Every connection should be checked carefully because loose parts may cause the boat to become unstable in the water.
If the boat includes side walls, they should be lightweight and evenly balanced. Cardboard covered with clear tape or thin plastic sheets works well because it adds very little weight. Wooden craft sticks can also be used to strengthen the frame without making the boat too heavy.
Some students may wish to add a small mast, a paper sail, or a flag for decoration. Although these features make the boat look attractive, they should not make it top-heavy. Engineers always consider both appearance and performance when designing real boats.
Quick Overview Table
| Feature | Description |
|---|---|
| Project Name | Building an Unsinkable Boat Using Household Materials |
| Project Type | STEM Engineering Project |
| Difficulty Level | Easy to Intermediate |
| Recommended Age | 9 years and older |
| Main Materials | Plastic bottles, cardboard, foam trays, aluminum foil, tape, glue |
| Science Concepts | Buoyancy, density, displacement, balance, stability |
| Estimated Build Time | 2–4 hours |
| Skills Developed | Engineering, creativity, teamwork, problem-solving |
| Cost | Low (mostly recycled materials) |
| Final Goal | Build a boat that floats and carries weight without sinking |
Testing the Boat
After construction is complete, the exciting part begins testing the boat. A large basin, bathtub, or container filled with clean water is ideal for this experiment. Before adding any weight, students should gently place the boat on the surface of the water and observe its behavior.
Questions to consider include:
- Does the boat float level?
- Does it lean to one side?
- Does water enter the boat?
- Does it remain stable when lightly pushed?
If the boat floats successfully, students can begin adding small weights such as coins, marbles, washers, or pebbles one at a time. After each addition, they should observe how deeply the boat sits in the water.
The goal is to discover the maximum weight the boat can safely carry before it begins to sink or lose balance.
Recording the results after every test helps students compare different designs and identify the strongest one.
Improving the Design
Very few engineering projects succeed perfectly on the first attempt. Engineers constantly improve their designs, and this project gives students the opportunity to do the same.
If the boat tips over, the base may need to be wider. If it sinks too quickly, additional flotation materials such as empty bottles or foam pieces can be added. If water enters through gaps, waterproof tape or glue can seal the openings.
Students may also experiment with different hull shapes. A wider hull generally increases stability, while a longer hull may improve balance. Testing several versions helps students understand how design choices affect performance.
Each improvement teaches an important lesson: successful engineering depends on observation, experimentation, and continuous refinement.
The Science Behind Floating
Several scientific principles work together to keep a boat on the surface of the water.
The most important principle is Archimedes’ Principle, which states that an object floating in water is supported by an upward force equal to the weight of the water it displaces. In simple words, the boat pushes water aside, and the displaced water pushes back upward.
Density is another important concept. Materials such as plastic bottles and foam contain trapped air, making them less dense than water. This allows them to float easily.
Weight distribution is equally important. If all the weight is placed on one side, the boat becomes unbalanced and may tip over. Evenly distributing the load increases stability and allows the boat to carry more weight safely.
Students also learn about center of gravity. Keeping heavy objects low inside the boat helps prevent it from overturning, just as engineers do when designing ships and ferries.
Collecting Data
Scientists and engineers record their observations carefully. Students can create a simple data table showing:
- Boat design
- Materials used
- Maximum weight carried
- Number of coins supported
- Floating stability
- Improvements made
Comparing these results helps identify which design performs best and why.
Graphs showing the relationship between added weight and floating depth can also be created, introducing students to data analysis and scientific reporting.
Working as a Team
Many classroom projects are completed in small groups. Team members can divide responsibilities by planning the design, collecting materials, building the boat, recording data, and presenting the final results.
Working together develops communication, cooperation, leadership, and respect for different ideas. Students often discover that combining everyone’s creativity leads to stronger and more successful designs than working alone.
Engineers in the real world also collaborate in teams, making teamwork one of the most valuable lessons of the project.
Real-World Applications
Although this project uses simple household materials, the engineering concepts behind it are the same ones used in designing real boats and ships. Naval architects carefully calculate buoyancy, weight distribution, stability, and displacement before building fishing boats, ferries, cargo ships, submarines, and even aircraft carriers.
Large cargo ships carry thousands of shipping containers across oceans without sinking because their hulls are carefully designed to displace enormous amounts of water. Passenger ferries safely transport hundreds of people every day because engineers understand how to balance weight and maintain stability.
Rescue boats also rely on these same principles. During floods and other emergencies, rescue teams depend on strong, stable boats to transport people and supplies safely. Lifeboats are designed to remain afloat even in difficult conditions, demonstrating the importance of careful engineering.
By completing this classroom project, students gain a better appreciation of how science and engineering improve transportation, trade, and public safety around the world.
Safety Guidelines
Although this project is simple and enjoyable, safety should always be a priority. Students should use scissors carefully and only under adult or teacher supervision. If a hot glue gun is needed, it should be handled only by adults or older students who have received proper instruction.
Water used during testing should be placed in a stable container on a flat surface. Any spilled water should be cleaned immediately to prevent slips and falls.
Small objects such as coins, marbles, washers, or pebbles should be handled carefully, especially around younger children, because they may present a choking hazard. Students should wash their hands after completing the activity, particularly if recycled materials were used.
Following these simple precautions allows everyone to enjoy the project safely while learning responsible laboratory and workshop habits.
Educational Benefits
The Unsinkable Boat Project offers learning opportunities across many school subjects.
In science, students explore buoyancy, density, displacement, gravity, and balance. They observe how different materials interact with water and how changes in design affect floating performance.
In mathematics, students measure dimensions, count test weights, compare results, and create tables or graphs showing their findings. These activities strengthen numerical reasoning and data interpretation.
Engineering skills develop naturally as students follow the design process: identifying a problem, planning a solution, building a prototype, testing it, analyzing the results, and improving the design.
Art also becomes part of the project. Students can decorate their boats with colorful sails, painted flags, windows, names, or creative themes. These decorations make each boat unique while encouraging imagination and personal expression.
The project also builds valuable life skills. Students practice patience, communication, teamwork, creativity, and perseverance as they overcome construction challenges and improve their designs.
Environmental Awareness
One of the most valuable lessons of this activity is the importance of recycling and reusing materials. Many of the supplies used in the project would normally be discarded. Plastic bottles, cardboard boxes, foam trays, and food containers become useful engineering materials instead of waste.
Students learn that protecting the environment begins with small everyday actions. Reusing household items reduces waste, conserves resources, and encourages responsible consumption.
Teachers can expand the lesson by discussing plastic pollution, ocean conservation, and sustainable engineering. Students may even be inspired to create additional projects using recycled materials.
Creative Extensions
After completing the basic boat, students can continue exploring new engineering ideas.
For example, they may build boats with different hull shapes and compare their stability. Some may design a paddle-powered boat using rubber bands, while others experiment with a small balloon-powered boat to investigate propulsion.
Students can organize classroom competitions to determine:
- Which boat carries the greatest weight?
- Which boat remains the most stable?
- Which design uses the fewest materials?
- Which boat has the most creative appearance?
Another exciting activity is redesigning the boat after the first round of testing. Students compare their original and improved models, demonstrating how engineering is a continuous process of learning and refinement.
Reflection
Reflection is an important part of every scientific investigation. After completing the project, students should consider questions such as:
- What part of the design worked best?
- Which materials provided the greatest buoyancy?
- What problems occurred during testing?
- How were those problems solved?
- What changes would improve the boat in the future?
Writing short reports or giving classroom presentations encourages students to communicate their ideas clearly while reinforcing what they have learned.
Conclusion
The School Project: Building an Unsinkable Boat Using Household Materials is an engaging STEM activity that combines science, engineering, mathematics, creativity, and environmental awareness into one enjoyable learning experience. By using simple recycled materials, students discover that effective engineering does not require expensive equipment. Careful planning, creative thinking, and scientific observation are the keys to success.
Throughout the project, students learn about buoyancy, density, displacement, gravity, balance, and stability while designing, constructing, testing, and improving their boats. They experience the engineering design process firsthand, discovering that every test provides valuable information for creating a better model.
The project also develops practical life skills. Students strengthen teamwork, communication, critical thinking, creativity, patience, and problem-solving abilities as they work together to overcome challenges. They gain confidence by seeing their ideas transformed into successful floating models.
Perhaps the most important lesson is that science is not limited to textbooks. It is all around us in rivers, lakes, oceans, bridges, ships, and everyday objects. Through this hands-on project, students see how scientific principles explain the world and how engineering uses those principles to solve real problems.
In conclusion, building an unsinkable boat from household materials is much more than a classroom craft. It is an inspiring educational adventure that encourages curiosity, innovation, and lifelong learning. Whether completed at home, in school, or at a science fair, this project demonstrates that with imagination, careful planning, and a willingness to experiment, ordinary recycled materials can become extraordinary engineering creations.
